My previous post explained how to perform a Zerto Windows ZVM migration to the Linux ZVMA in a situation where you have two NICs on your ZVM for traffic separation. But, what about everyone else who is running a standard deployment of Zerto with single-NIC ZVMs? I mean, the process has got to be simpler, right? The answer to that is yes. There are a lot less steps involved since we’re not going to be dealing with additional network interfaces and fumbling around with persistent routing in Windows and Linux, and then remembering we had that in place months, or years later!

When thinking of how the migration process works when moving from Windows to Linux, I can’t help but feel that the product team at Zerto couldn’t have come up with a simpler and more elegant way to accomplish this. I mean, its like having a “penguin” standing outside a “window” holding a box, while you full-send all the data held behind that window into the box – and then tell the penguin he is now all things that window was.
Well, that was fun (and thanks to Dall-e for creating that image for me), but realistically, it’s as simple as four main steps (and one pre-req). Also, there’s a video at the end of this if you don’t feel like reading; which will walk you through the migration of both sites.
Pre-req: Windows ZVM Must be on Zerto 9.7U4patch2
Oh yeah, it might help you if you also double-check the Interoperability Matrix to make sure the intended versions of Zerto are compatible with your version of vCenter and ESXi.
- Deploy the Linux Zerto Virtual Manager Appliance to vCenter
- Download and run the Zerto Migration Utility from the Windows ZVM
- Log into the Zerto UI and validate
- Repeat for the recovery site
Below, I’ll break down each of those three steps to provide a little more color about what is involved with each one. Trust me, if you prep everything in a way you can simply just move from one step to the next, it’ll all go smoothly and before you know it, you’re done.
If you’re wondering where to start and not sure if you should do the protected or the recovery site first, I usually start with the protected site because if that’s down while it’s being migrated, and you need to perform any type of recovery, at least you’ll still have the recovery site intact. Or you could prefer to migrate the recovery site first. It’s totally up to how you would normally upgrade Zerto when new releases are out. Just make sure you complete one site before starting on the next.
Step 1: Deploy the Linux ZVMA to vCenter(s)
So the very first thing you need to do is to make sure you have all your Windows ZVMs upgraded to the latest version of Zerto, which is at the time of this writing, 9.7U4patch2.
Next, head to https://www.zerto.com/myzerto, go to Support and Downloads, and download version 10.0U2 of the Zerto Virtual Manager Appliance (Linux). This comes as an OVF, so there’s no need to build your own Linux VM. Just simply download the OVF and deploy it as you would any other virtual appliance in that format in vCenter.
Once you’ve deployed the ZVMA to each vCenter, power them up. You’re going to do a couple of things (in this order):
- Once booted up, login with the username: zadmin and enter the default password, which is: “Zertodata123!” (without the quotes). You will be prompted to change the password to something more secure that matches your policy guidelines for passwords.
- Once logged in, you may see the appliance enter an initialization stage – this may take several minutes, but typically goes pretty quick before it displays the appliance manager menu. Follow the steps in order below because if you start with the network settings, you’ll have to reboot before you can enable SSH.
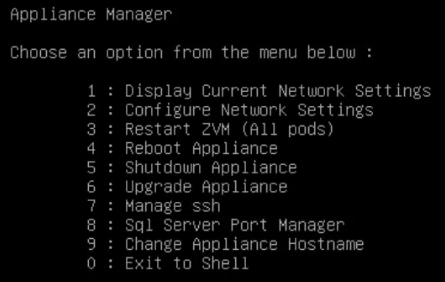
- Select option 7 to enable SSH. Once enabled, you’ll be returned to the appliance manager menu.
- Press 2 and configure static IP settings for the appliance. This IP address will only be used temporarily, so you won’t need to create a DNS record for it, or anything like that. Ultimately, the IP address of this appliance will be the IP address your Windows ZVM is using prior to the migration. Once you’ve configured your IP settings, the appliance will let you save the settings and then tell you to reboot to complete the network configuration.
- That’s it. You are done preparing the appliance for the migration.
Step 2: Download and Run the Zerto Migration Utility from the Windows ZVM
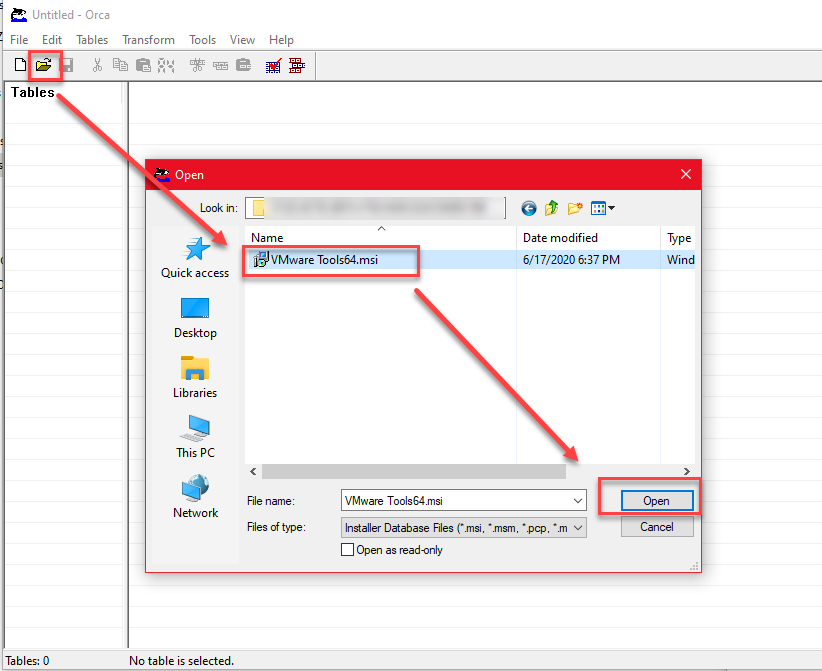
- Go to https://www.zerto.com/myzerto and download the Zerto Migration Utility from support and downloads (same place you got the Linux ZVMA OVF). Save the migration utility to the desktop of the Windows ZVM.
- Open a Remote Desktop connection to the Windows ZVM. Once logged in, run the migration utility (right-click –> Run as administrator). Oh yeah, get yourself another temporary IP address for this server, because the Migration Utility will need it.
- When the migration utility starts, the first screen will have a link to a “read me.” You’ll need to click that link before the “Next” button is enabled.
- Click next.
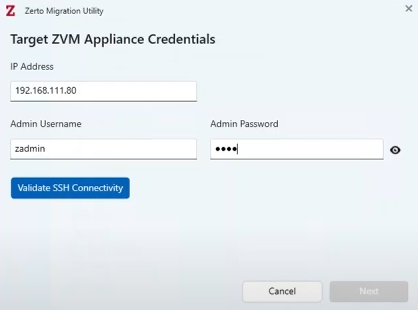
- Enter the IP address for the Linux ZVMA and the password for the zadmin account, then click Verify SSH Connectivity button. After that connectivity is confirmed, click Next.
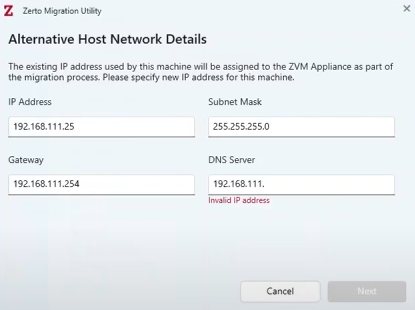
- Now, enter that temporary IP address I mentioned 4 steps ago and complete the rest of the network settings, then click Next.
- Review the Summary screen, and then click Migrate when ready.
- Within a few seconds, your RDP connection will drop you – that’s because the alternative IP has been applied to the Windows ZVM. Just re-connect your RDP session using that alternative IP that you entered. The migration utility will still be running.
- Once the migration completes, and says it’s successful, you can shutdown the Windows ZVM. Notice how the screen also includes a link to the IP address that was previously assigned to the Windows ZVM for production use. This IP address has now been assumed by the Linux ZVMA. If you’re using DNS and FQDNs to access Zerto, now might be a good time to update DNS to reflect the change.

NOTE: Do not run the uninstaller for Zerto from the Windows Add/Remove programs. Doing this will delete VPGs, uninstall VRAs, unpair sites, and remove the Zerto plug-in from vCenter. In other words, IT WILL BREAK YOUR ZERTO IMPLEMENTATION. Just delete the Windows ZVM after you’ve migrated all sites from Windows to Linux successfully.
Step 3: Login to the Zerto UI and Validate
- Open your browser, and connect to Zerto using the original IP address of the Windows ZVM (see the “Migration Completed” image above for reference) that was moved over to the Linux ZVMA. The new URL to access Zerto is https://[IPorFQDN]. Note, there is no port 9669 after the host name. The appliances uses port 443 for the UI.
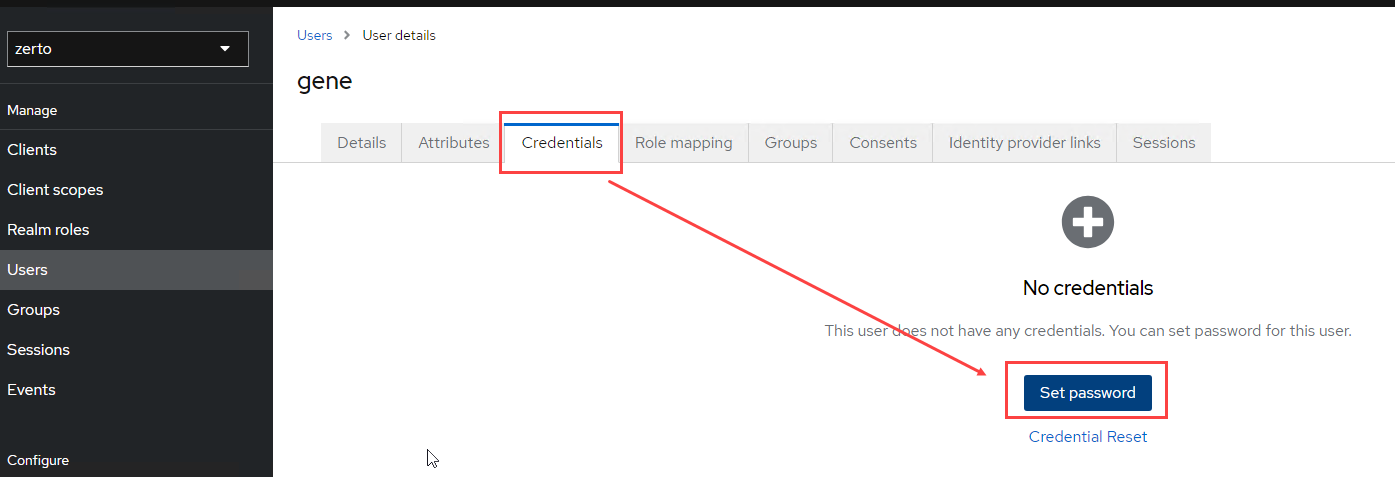
- Login using the following credentials. Since it’s the first time you’re logging in, you will be prompted to change the password.
User: admin
Password: admin
When you first login, you’re likely going to see some alerts. Give Zerto a few minutes – those will all go away. Don’t get impatient like I did, you’ll end up in a troubleshooting frenzy only to find out that it all will settle down if you just give it some time. After all, Zerto just underwent brain surgery, it will need to heal.
While the healing is going on, click around to Sites, VPGs, Setup, etc. If you also selected to upgrade the VRAs automatically, you’re probably going to see a bunch of that activity taking place too, so keep an eye on the vSphere tasks as well as the alerts in Zerto to get an idea of what’s happening.
Once everything settles, login to the recovery site UI and make sure it sees the same things the protected site is seeing in terms of the Zerto status.
Step 4: Delete the Windows ZVM
Once you’ve gotten both the protected and recovery sites migrated to the Linux Zerto Virtual Manager Appliance, you can now clean up – remember – do not uninstall Zerto from those old Windows ZVM VMs. It will break Zerto. The best thing to do is to delete those old ZVMs after both sites are successfully migrated and you have validated that everything works.
Thanks for stopping by! Please leave a comment if you have any questions or to let me know how this worked out for you. And if you found this useful, please share it with others who you feel it could help.
Here’s a video to show you how the above process works. Enjoy!