SRM 6.1 POC Update – Post Failed PSC Remediation

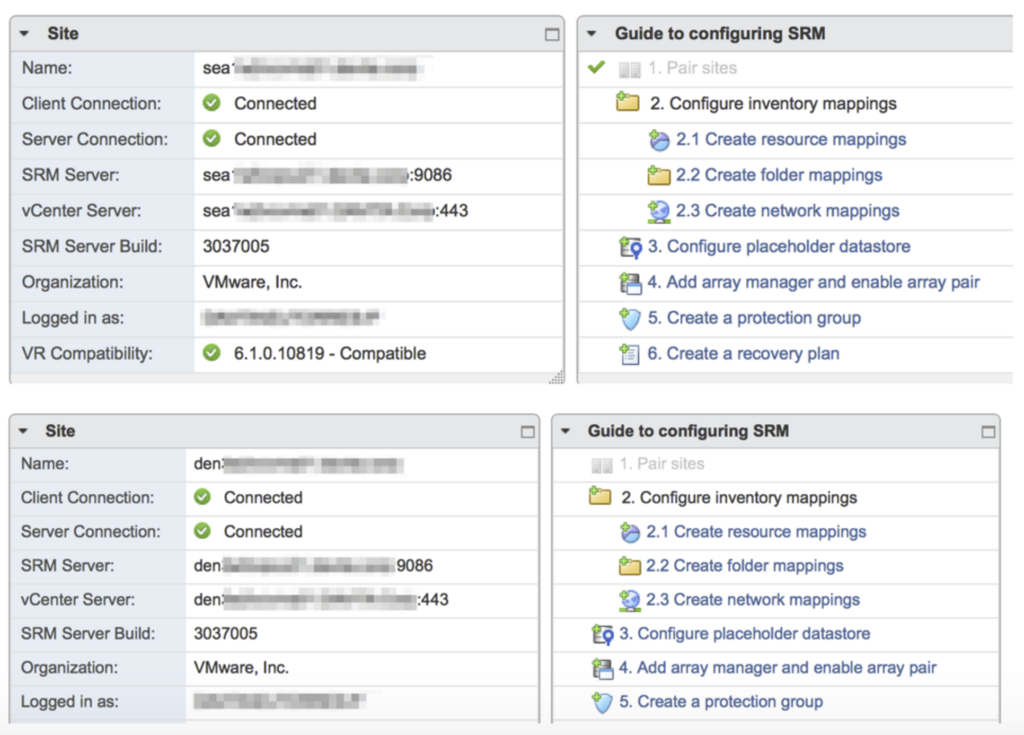
Just an update here to show that after resolving that PSC synchronization issue in our environment, I am now able to successfully pair the two SRM sites in our POC.

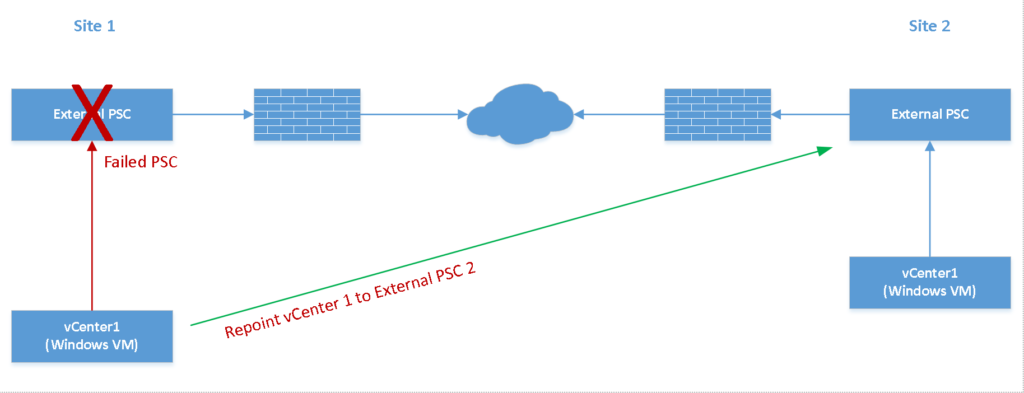
Since I have replaced the failed PSC with a new one (new name/IP), and the SRM server was initially connected to the old PSC, I had to first modify the SRM installation and update the PSC it was pointed at. Once I did that, site pairing was successful, and all those SSL and user/password errors I was getting went away.

srm_poc_update_post_pscfix

So, my advice if you run into the same issues as I did – is not to count other systems in the environment out, otherwise, you may be thrown for a loop and support would be no help.

If we hadn’t discovered that synchronization issue between external PSCs, this would have likely been an ongoing issue and it would have seemed like there was no light at the end of the tunnel.

For a recap of the issues seen with site pairing due to the PSC synchronization being broken, see this blog entry.

Share This:

Replace a Failed External PSC in Enhanced Linked Mode: Part 2

In Part 1 of “Replace a Failed External PSC in Enhanced Linked Mode”, I worked through repointing a Windows vCenter Server to another External PSC, in an effort to unregister, and rebuild a failed PSC.

In this guide, I will walk through:

  • Building a new Windows external PSC
  • Joining the SSO Domain
  • Re-pointing VC1 back to this newly-built, and linked external PSC, therefore, returning us to the original topology we started with (except for the server name)

The main systems I’ll be working with in this guide are:

  • VC1 (Windows vCenter that was re-pointed to working PSC for other site while we rebuild it’s home PSC)
  • PSC3 – This is a newly built Windows Server 2012 R2 PSC that is taking the place of PSC1.

I would have chosen to use the same name of the original PSC, but from experience, it’s always better to be safe, and not try to re-introduce a problematic record into the environment, just in case there are still entries hanging out somewhere in the working configuration.

At the end of this guide, we will end up with this topology:
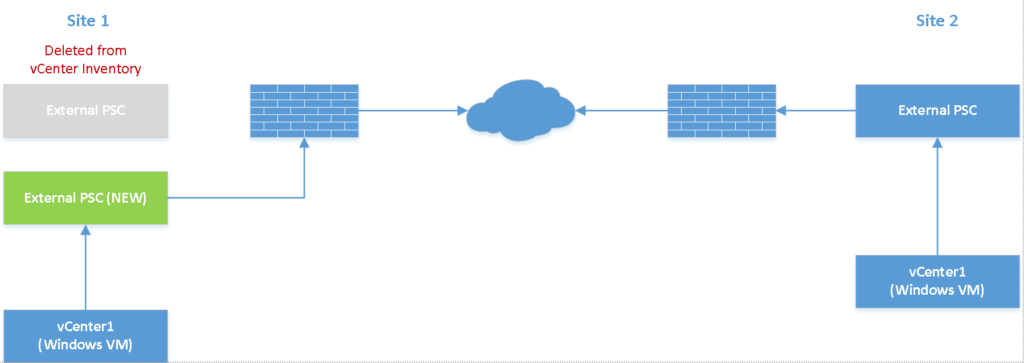
replace_psc_part2_topology_1


Install the External PSC Role on the New Server


Note: 
These steps are the same ones to deploy the second PSC in “Deploying Windows vCenter with External PSCs in Enhanced Linked Mode: Part 2.”

  1. Launch the vCenter Server Installer
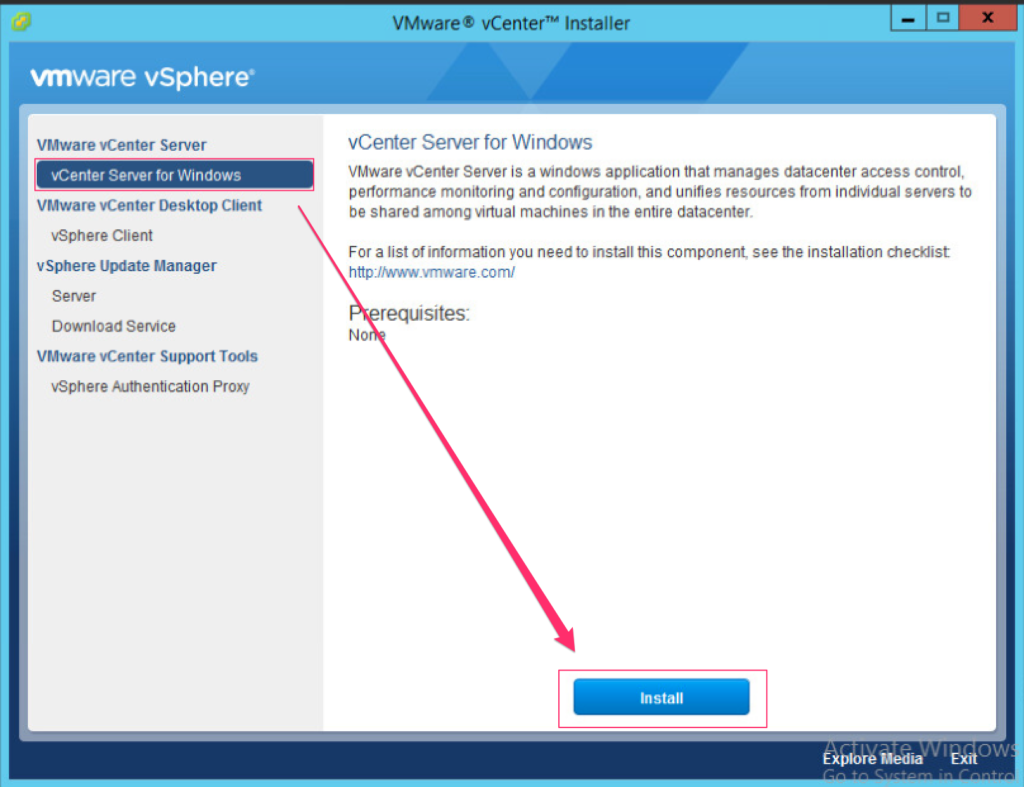
  2. Select vCenter Server for Windows, and click Install.
  3. Click Next on the welcome screen.
  4. Accept the EULA, click Next.
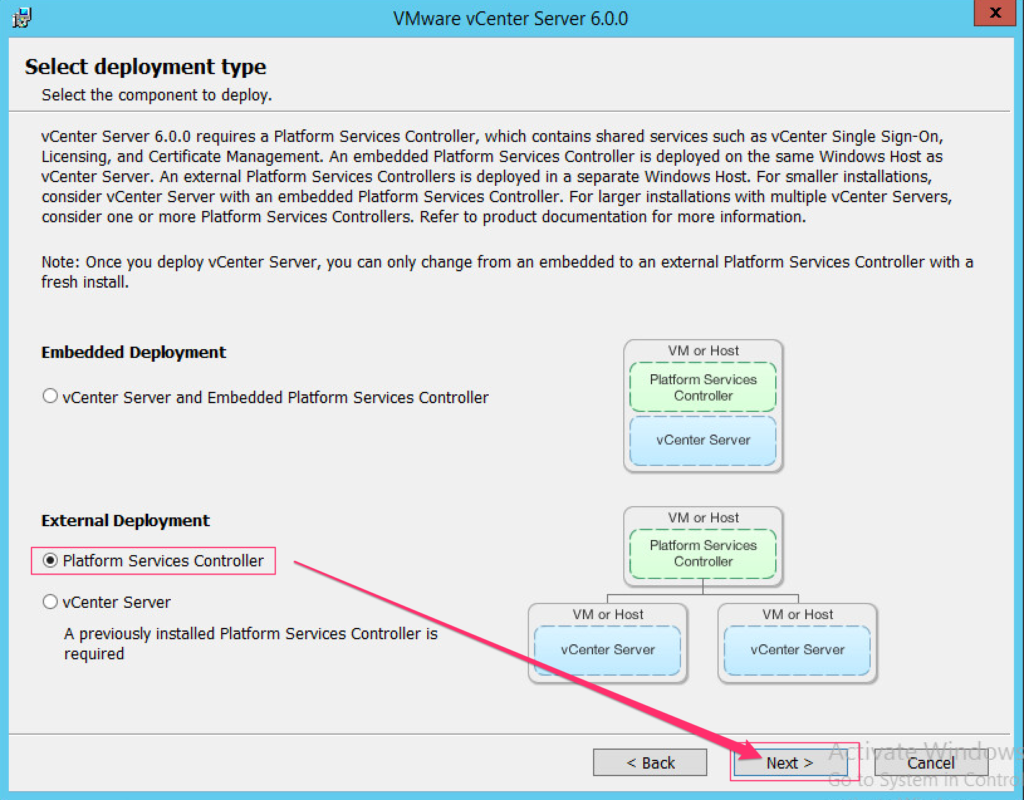
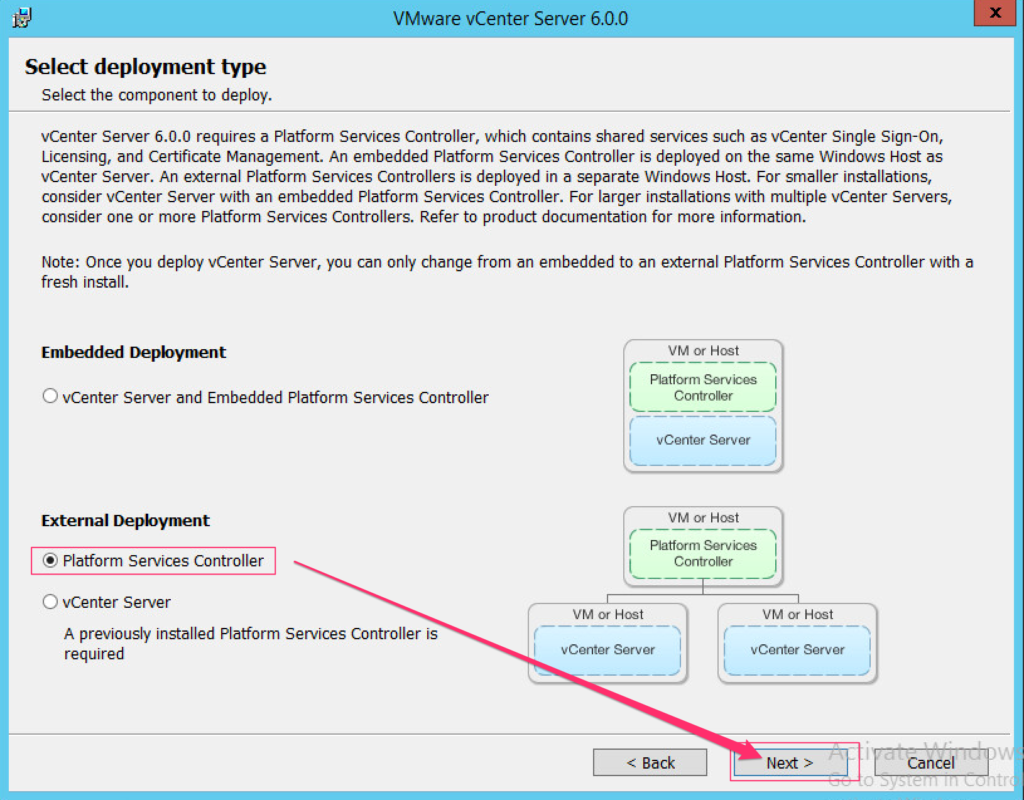
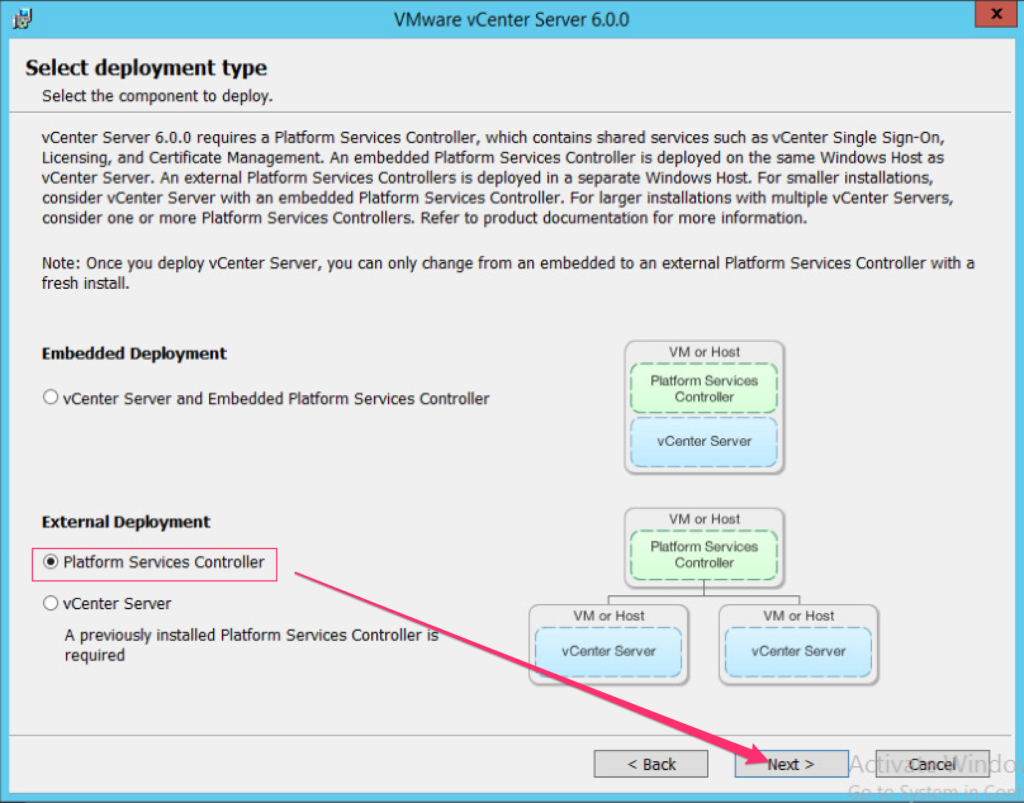
  5. Under External Deployment, select Platform Services Controller, and click Next.replace_psc_part2_1_5
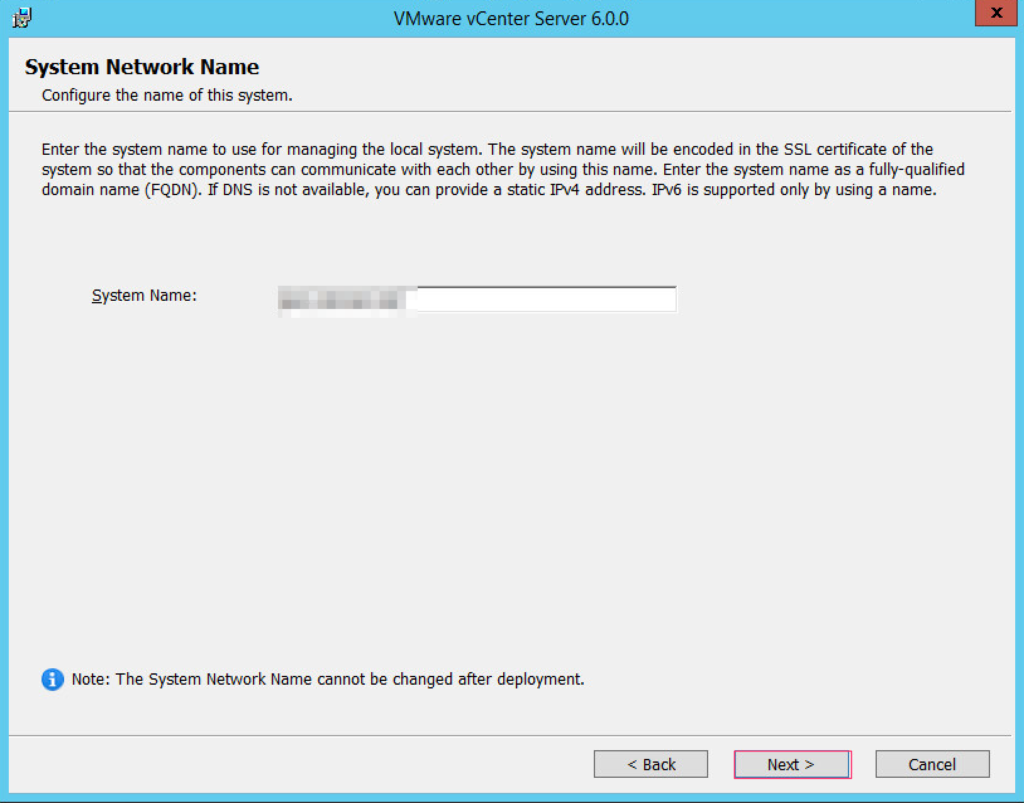
  6. Verify the system name (This should be the same FQDN of the PSC you are building to replace the failed one), and click Next.
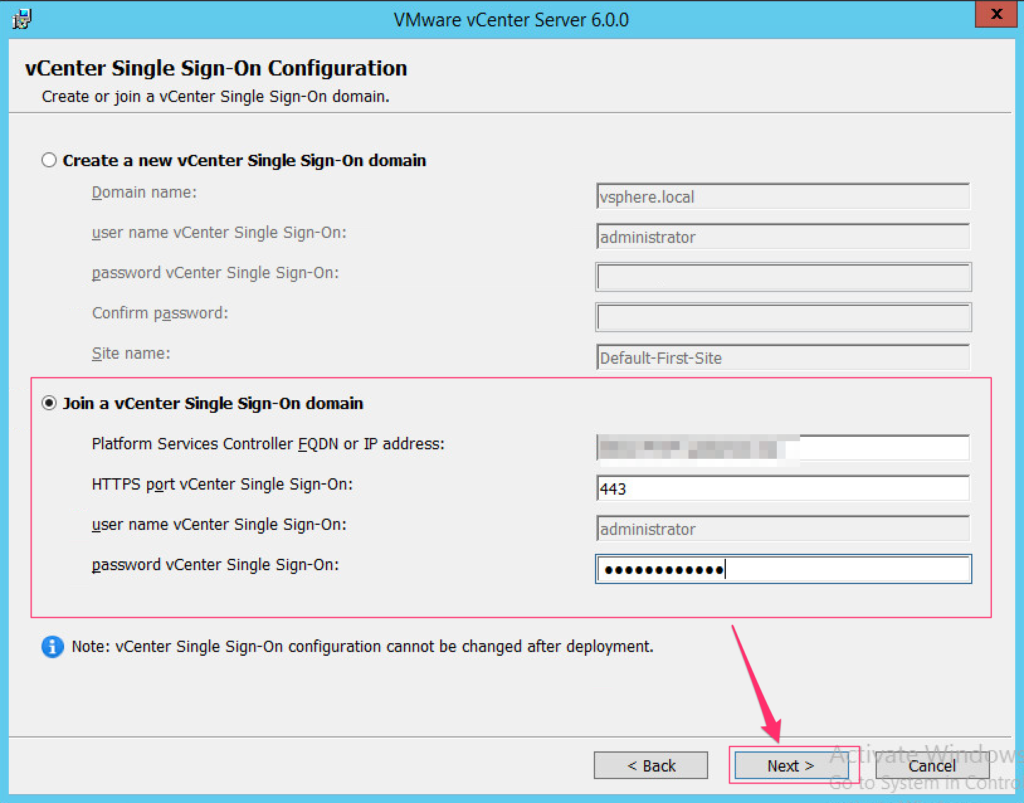
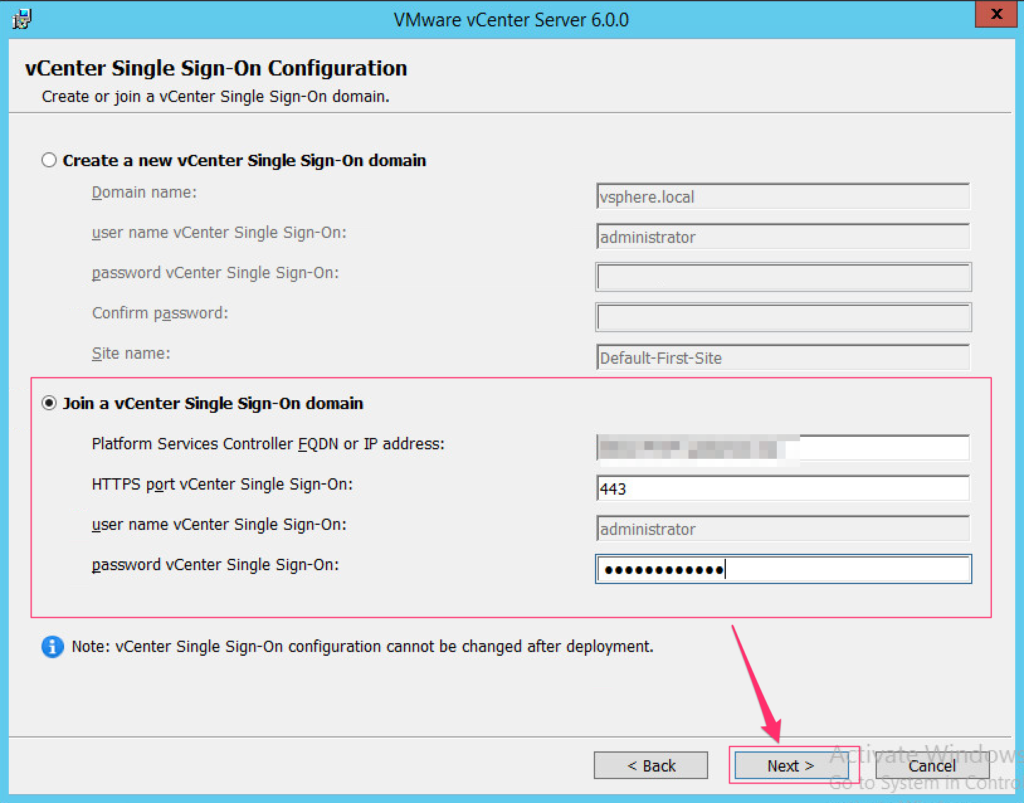
  7. Select Join a vCenter Single Sign-On domain.
  8. Enter the FQDN for the first Platform Services Controller that owns the SSO domain you want to join.
  9. Enter the vCenter Single Sign-On password, then click Next.replace_psc_part2_1_9
  10. When prompted for Certificate Validation, click OK to accept the self-signed certificate.
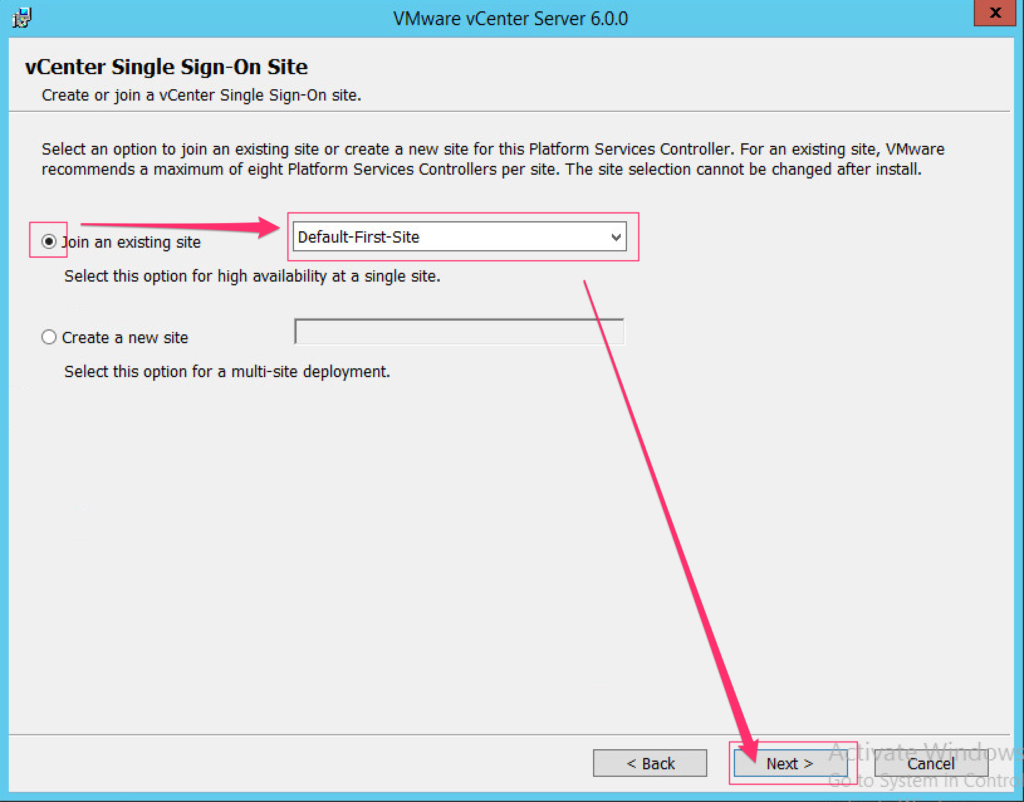
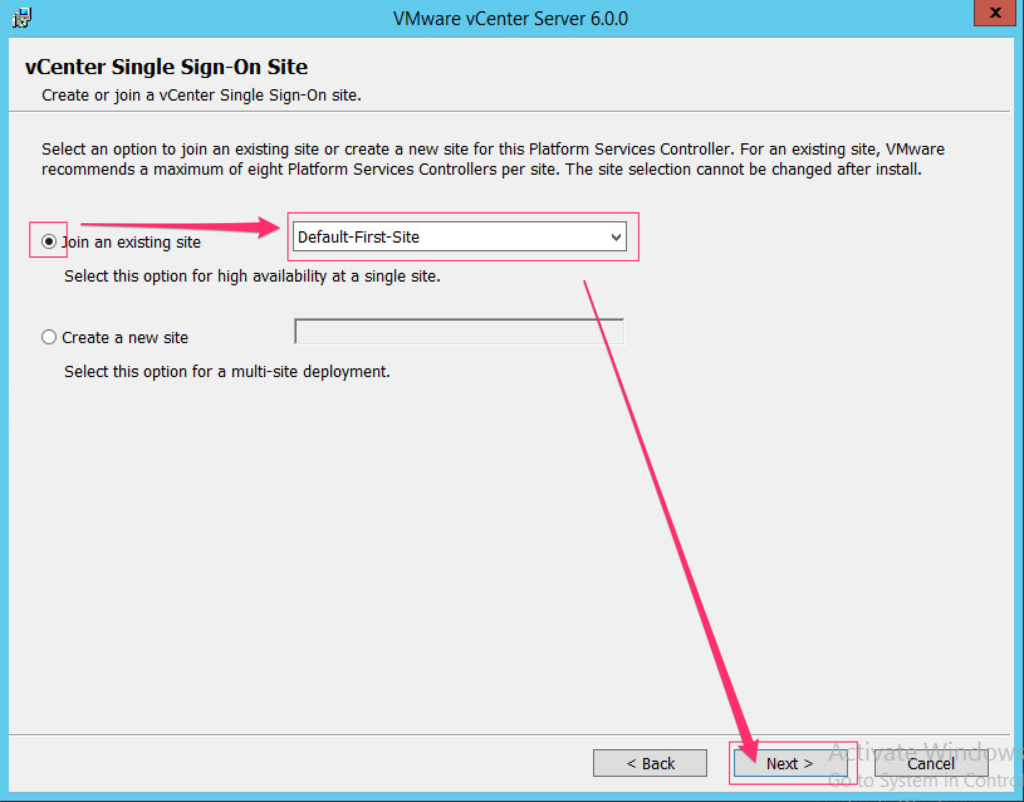
  11. Select Join an existing site, choose the site from the dropdown menu(should match the site name of the first PSC you created), and click Next.replace_psc_part2_1_11
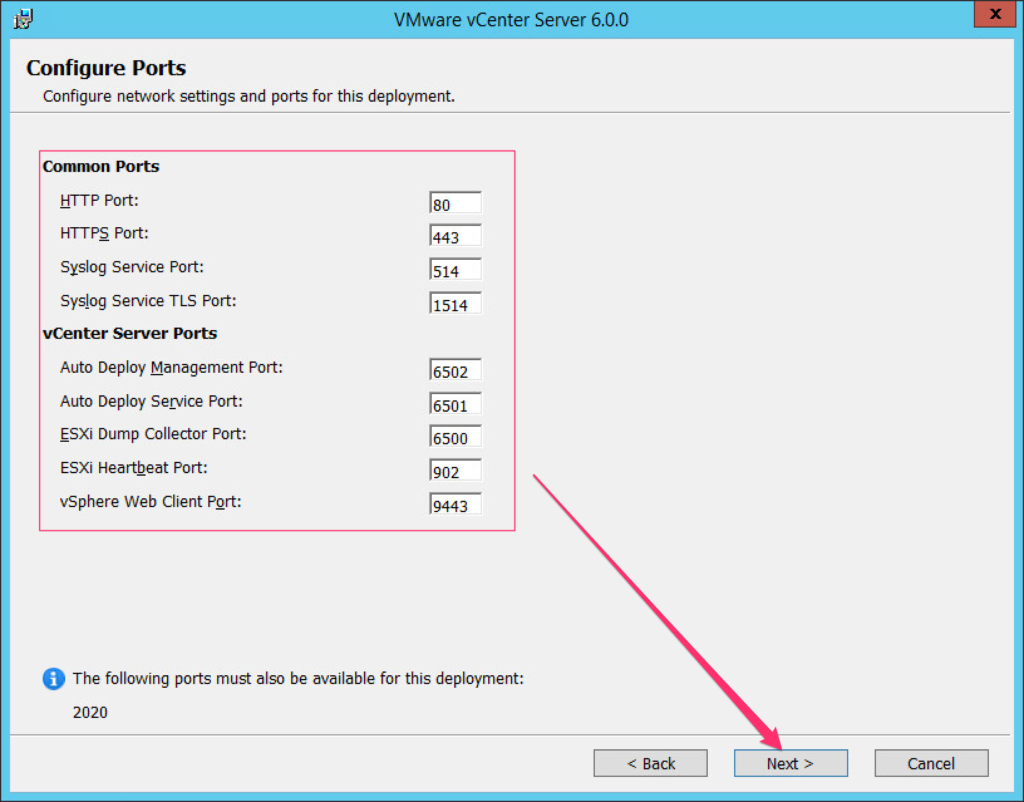
  12. On the Configure Ports page, make any changes necessary for your environment, and click Next.
  13. Set the PSC installation and data directories, and click Next.
  14. Select whether or not to join the Customer Experience Improvement Program (CEIP), and click Next.
  15. Verify the installation summary settings, and if all looks well, click Install.
  16. Once the installation has completed, log into the vSphere Web Client, and navigate to Home > Administration > Deployment > System Configuration.  Under the Nodes object, verify that there are now 4 nodes (you should see 2 PSCs, and 2 vCenter servers).


Next Steps:

After verifying functionality of the newly added PSC, the next step is to re-point VC1 (repointed previously to PSC2) to the new PSC (PSC3).

replace_psc_part2_2_main

Repoint the Connections Between vCenter Server and Platform Services Controller:
 
  1. Log onto the vCenter Server instance (VC1).
  2. In the command prompt (run as administrator), navigate to C:\Program Files\VMware\vCenter Server\bin (or wherever you have vCenter installed to).
  3. Run the cmsso-util script:
    cmsso-util repoint --repoint-psc psc_fqdn_or_static_ip [--dc-port port_number]

    psc_fqdn_or_static_ip – is the FQDN or static IP address of the PSC you want to repoint to.
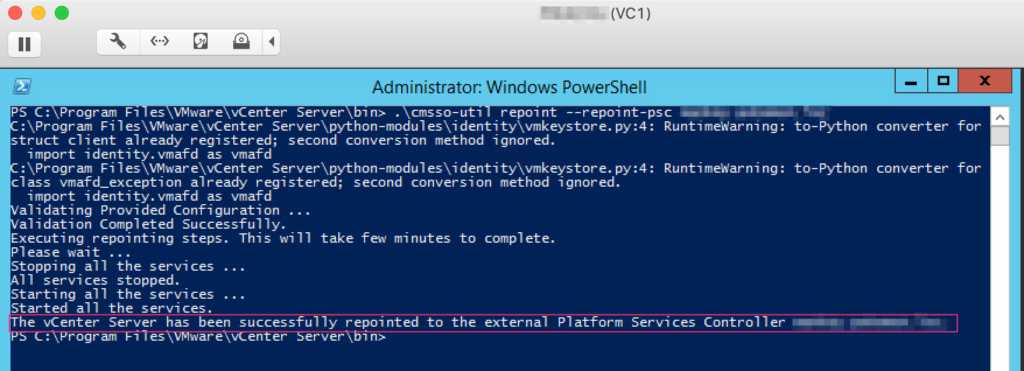
    replace_psc_part2_3_3

  4. Log into the vCenter Server instance by using the vSphere Web Client to verify that the vCenter server is running and can be managed.
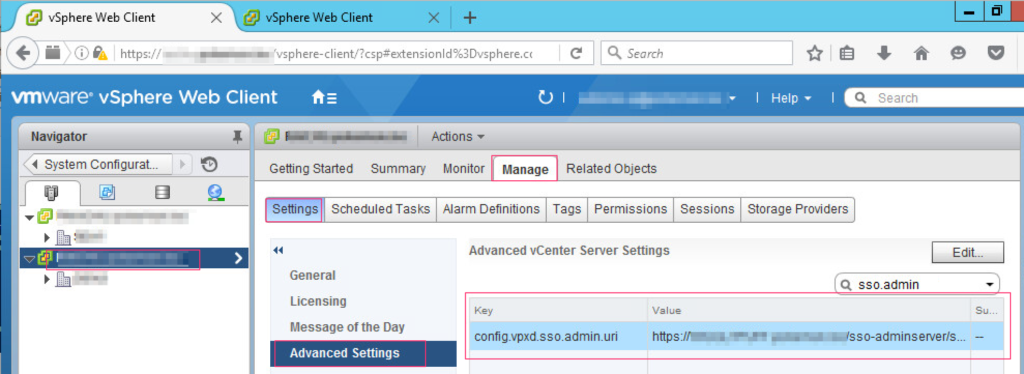
  5. Finally, to see what PSC each vCenter is connected to:
    1. Log into the vSphere Web Client, and navigate to Hosts and Clusters View.
    2. Select a vCenter, and go to the Manage Tab.
    3. In Settings, go to Advanced Settings.
    4. Search for the config.vpxd.sso.admin.uri
    5. When the result is returned, look at the Value field, and this will tell you what PSC the particular vCenter is connected to.replace_psc_part2_3_5


This completes the series for Replacing a Failed External PSC in Enhanced Linked Mode. If you find that this has helped you, please feel free to share the information. It took me quite a while to gather all the information needed, and build the environment for this, so I really hope it helps.

In my research when first encountering the issues with my failed PSC, I found that there are a lot of other bloggers out there who have written something about the issues, troubleshooting steps, and fixes related to a failed PSC. While this is not a “one fix to rule them all” solution, it is a very clean way to replace a failed PSC. I apologize for not documenting the same thing for the VCSA, however, if you follow the steps in the order I provided, the links I have in my posts also have the proper steps to execute for the VCSA.
 

Share This:

Replace a Failed External PSC in Enhanced Linked Mode: Part 1

If you’ve followed along starting with the 2-part series about “Deploying Windows vCenter with External PSCs in Enhanced Linked Mode…”, this is the next installment, in which we will go through replacing a failed external PSC using that same topology.
If you haven’t followed along, then the following links will help set the stage for what we’re doing here:

The reasons I’m performing these steps, or even trying it, are:
  • I have never performed this procedure before.
  • I would like to know how to do this and be able to help others out by sharing my experience and the information.
  • I would like to understand the requirements and general order of operations for performing the procedure.
  • I would like to address a current production issue without experimenting in production, and therefore causing further complications or a causing a complete loss of manageability of my environment.


The Workflow

replace_psc_part1_topology


Lab Testing


So to prepare for this in the lab, I’ve created a datacenter in each vCenter, assigned some permissions to both of them (AD-integrated permissions), and licensed both vCenters (licenses to be removed following the testing).  This was done to ensure that replication was succeeding between the two PSCs.  I also ran the vdcrepadmin.exe utility on both PSCs to ensure replication is succeeding, and there are no outstanding changes or replication problems.

From PSC1:

.\vdcrepadmin.exe -f showpartnerstatus -h localhost -u administrator -w [password]

replace_psc_part1_lab_1_1
From PSC2:
.\vdcrepadmin.exe -f showpartnerstatus -h localhost -u administrator -w [password]
replace_psc_part1_lab_1_2
The next step for me to do is shutdown PSC1 to simulate a failure.  Once shut down, re-point the vCenter affected by this failure to the working PSC:
replace_psc_part1_lab_1_3

If I run the following on PSC2, it will show that PSC1 is now offline:

.\vdcrepadmin -f showpartnerstatus -h localhost -u administrator -w [password]

If I run the following on PSC2, it still shows that there are two PSCs registered:

.\vdcrepadmin -f showservers -h localhost -u administrator -w [password]

replace_psc_part1_lab_1_4

Re-point the Connections Between vCenter Server and Platform Services Controller

  1. Log onto the vCenter Server instance (VC that is still connected to the failed PSC).
  2. In the command prompt (run as administrator), navigate to C:\Program Files\VMware\vCenter Server\bin (or wherever you have vCenter installed to).
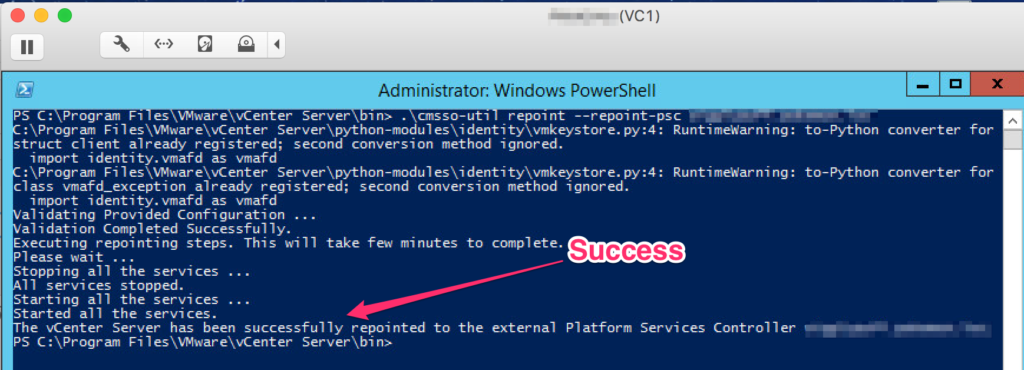
  3. Run the cmsso-util script to repoint the connection of this vCenter to the PSC that is still alive:
    cmsso-util repoint --repoint-psc psc_fqdn_or_static_ip

    (Running the command above may take some time to complete. In my test lab, it took approximately 13 minutes to complete)

    replace_psc_part1_lab_3_3

    Part of the repointing task includes stopping and starting all vCenter related services on the server.  Give the web server additional time to fully initialize before moving on with the next step.

  4. Log into the vCenter Server instance by using the vSphere Web Client to verify that the vCenter server is running and can be managed.After the web server completed its initialization for VC1, I was able to log in successfully, and verify the inventory, permissions, and licensing.  The next step is to Unregister the bad PSC (PSC1) from the configuration on PSC2.


Unregister the Failed PSC


  1. On the PSC (live one that you just repointed to), open a command prompt (run as administrator).
  2. Browse to C:\ProgramData\VMware\vCenterServer\cfg\install-defaults.
  3. On the failed PSC: Open the vmdir.ldu-guid file to find the hostid.
  4. On the working PSC: Navigate to C:\Program Files\VMware\vCenter Server\bin
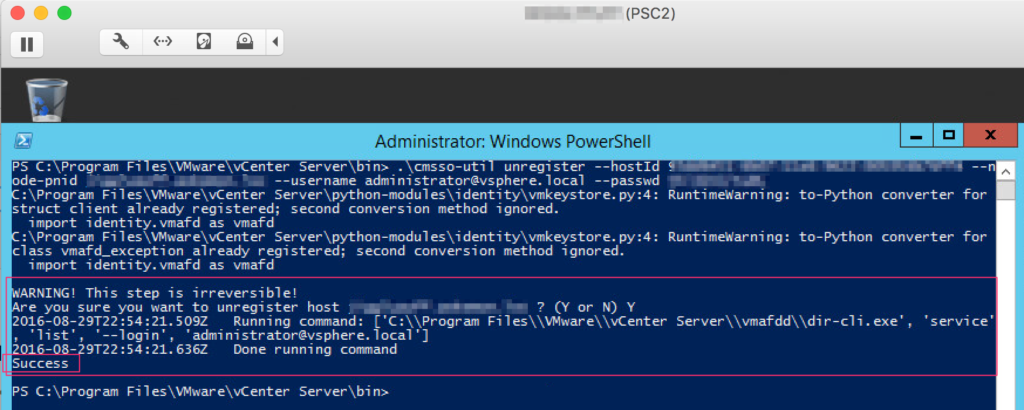
  5. On the working PSC: Run the cmsso-util unregister command to unregister the stopped/failed Platform Services Controller:

    cmsso-util unregister --hostId host_Id --node-pnid Platform_Services_Controller_System_Name --username administrator@vsphere.local --passwd [password]

    replace_psc_part1_lab_4_5

    After this has been run successfully, verify that the OLD PSC has been removed from the topology.

  6. n the vSphere Web Client, navigate to Home > Administration > Deployment > System Configuration.  Under the Nodes object, verify that there are only 3 nodes (you should see 1 PSC, and 2 vCenter servers).
  7. On PSC2, run

    .\vdcrepadmin -f showservers -h localhost -u administrator -w ************

    replace_psc_part1_lab_4_7

    You should now only see one server in the listing, as opposed to 2, since you just removed the failed PSC.

  8. Delete the failed PSC (VM) you no longer need from the vSphere inventory.


There you have it.  We have successfully re-pointed a vCenter to another PSC, unregistered the bad PSC, and validated that we are now ready to rebuild in order to re-instate the original topology.  The next part to this series will cover building the replacement PSC, joining the SSO domain, and finally, repointing the vCenter at this new PSC, therefore returning the topology to where it was before we started.

Share This:

Deploying Windows vCenter with External PSCs in Enhanced Linked Mode: Part 2

Before following any steps in here, be sure to refer to the previous part to this series, which will provide some background information and walk through the steps to install the first PSC and vCenter servers.  The steps contained in this post will be a continuation, marking the differences between the initial install (previous post), and the additional PSC and vCenter server.
In this post, I will be walking through joining the second PSC to the SSO domain created previously.  Following that, if there are any steps different for the subsequent vCenter Server installation, I will call out any steps in this installation that differ from the first install and include screenshots.
For any pre-requisites, head to Part 1 of this series.


Install the Second Platform Services Controller on a Windows Machine and Joining the SSO Domain

If deploying in a production environment, refer to the vSphere Installation and Setup for vSphere 6.0 Guide.

    1. Launch the vCenter Server Installer
    2. Select vCenter Server for Windows, and click Install.
    3. Click Next on the welcome screen.
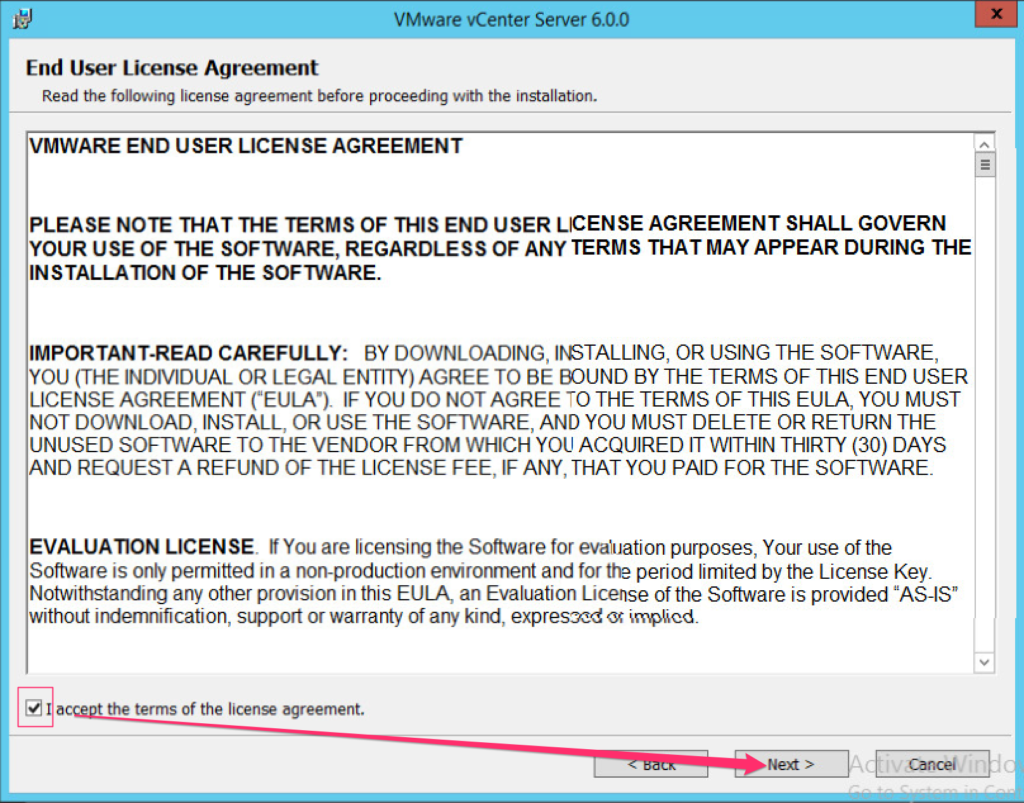
    4. Accept the EULA, click Next.
    5. Under External Deployment, select Platform Services Controller, and click Next.external_psc_part2_1_5
    6. Verify the system name (recommended you use FQDN, not IP Address), and click Next.
    7. Select Join a vCenter Single Sign-On domain.
    8. Enter the FQDN for the first Platform Services Controller that owns the SSO domain you want to join.
    9. Enter the vCenter Single Sign-On password, then click Next.external_psc_part2_1_9
    10. When prompted for Certificate Validation, click OK to accept the self-signed certificate.
    11. Select Join an existing site, choose the site from the drop-down menu (should match the site name of the first PSC you created), and click Next.external_psc_part2_1_11
    12. On the Configure Ports page, make any changes necessary for your environment, and click Next.
    13. Set the PSC installation and data directories, and click Next.
    14. Select whether or not to join the Customer Experience Improvement Program (CEIP), and click Next.
    15. Verify the installation summary settings, and if all looks well, click Install.

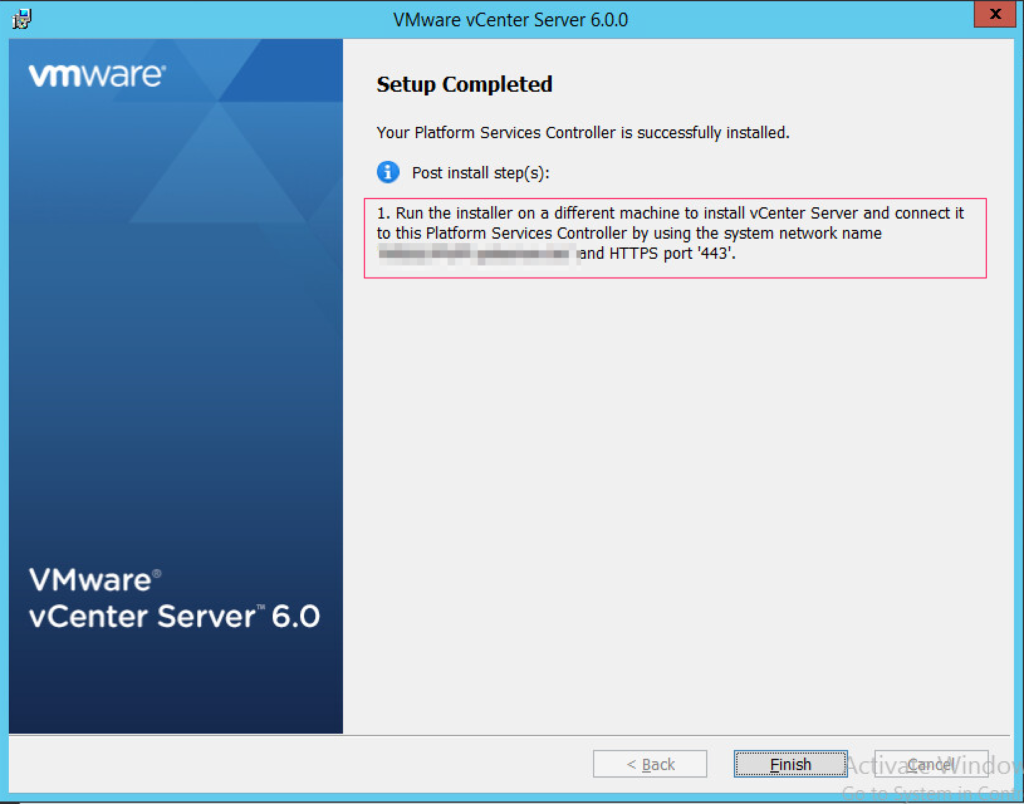
Next Steps

 
Once completed, run the installer on the vCenter Server that will connect to this PSC, and be sure to connect it to THIS PSC, NOT THE FIRST PSC that was built.

external_psc_part2_1_ns_1

Install vCenter Server and the vCenter Server Components, Connecting to the Second PSC

Perform these steps, making sure to connect this vCenter to the PSC that was just installed above, not the first PSC from Part 1.
Installation
 
  1. Launch the vCenter installer and select vCenter Server for Windows. Click Install.
  2. Once the installer initializes, click Next.
  3. Accept the VMware End User License Agreement, and click Next.
  4. Under External Deployment, select vCenter Server and click Next.
  5. Enter the system’s FQDN, and click Next.
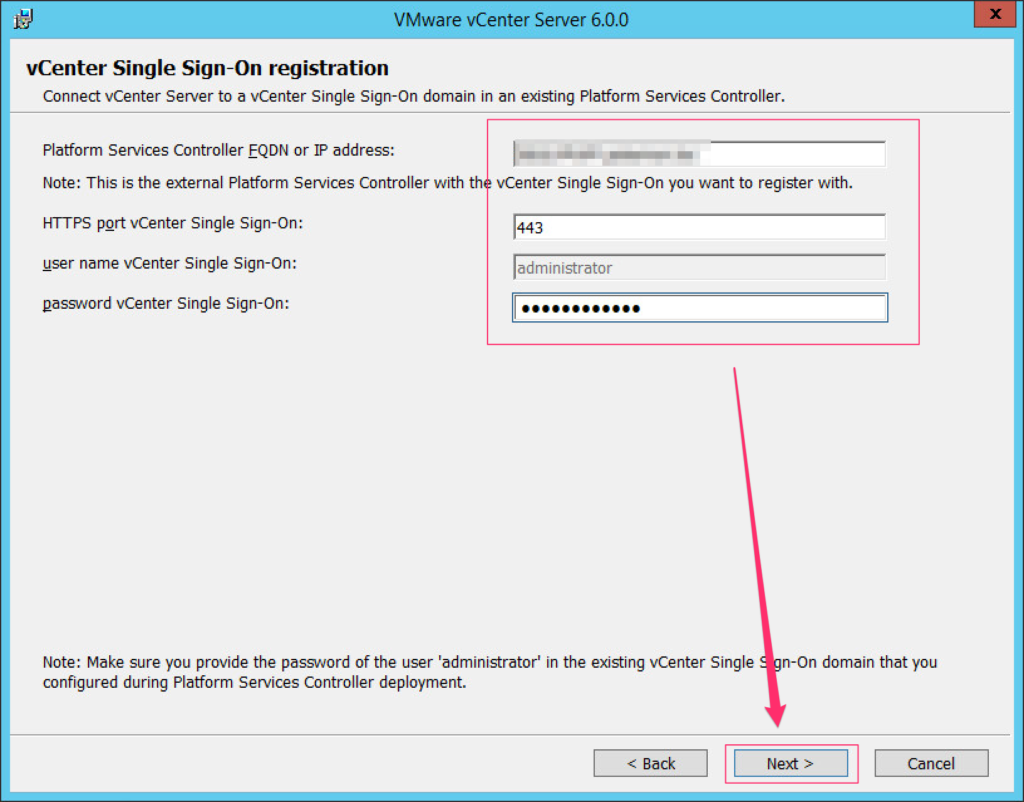
  6. Enter the information for the external PSC that was deployed in the section above, and click Next.  This step will register the vCenter with the PSC.
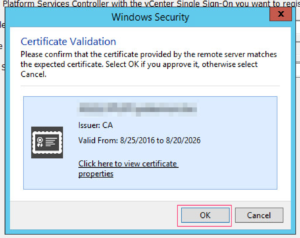
  7. When prompted for certificate validation, click OK to approve the self-signed certificate created by the PSC.
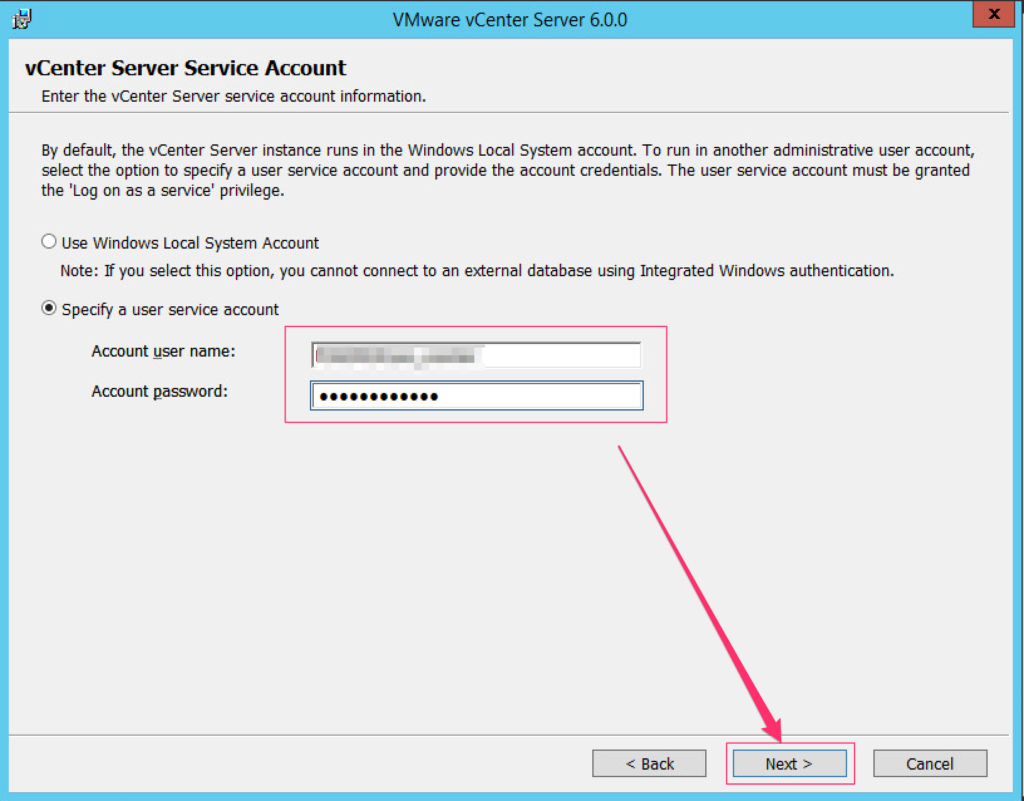
  8. Configure the vCenter service account according to your environment requirements and click Next.  If you are using an external database server, you will need to specify a user service account.

    Note: 
    If you are using a user service account, you will need to make sure it has the “log on as a service” privilege in the local security policy.

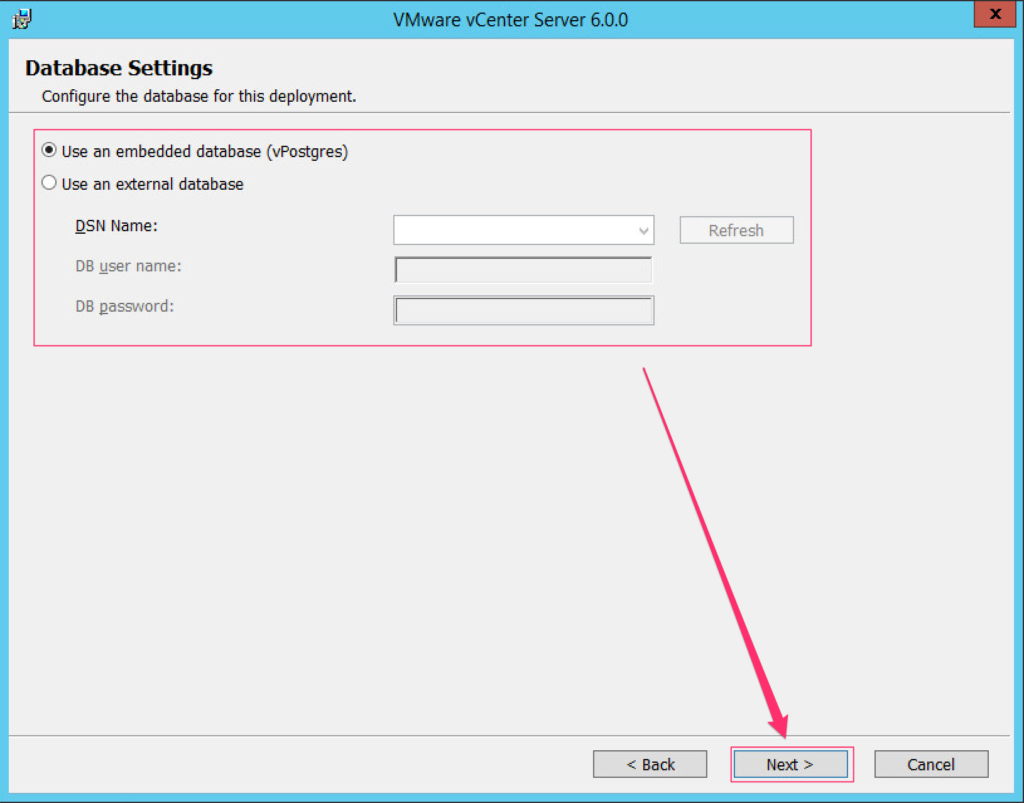
  9. Select your database deployment and enter information if necessary, then click Next.
  10. Configure the required ports if necessary to match your environment, and click Next.
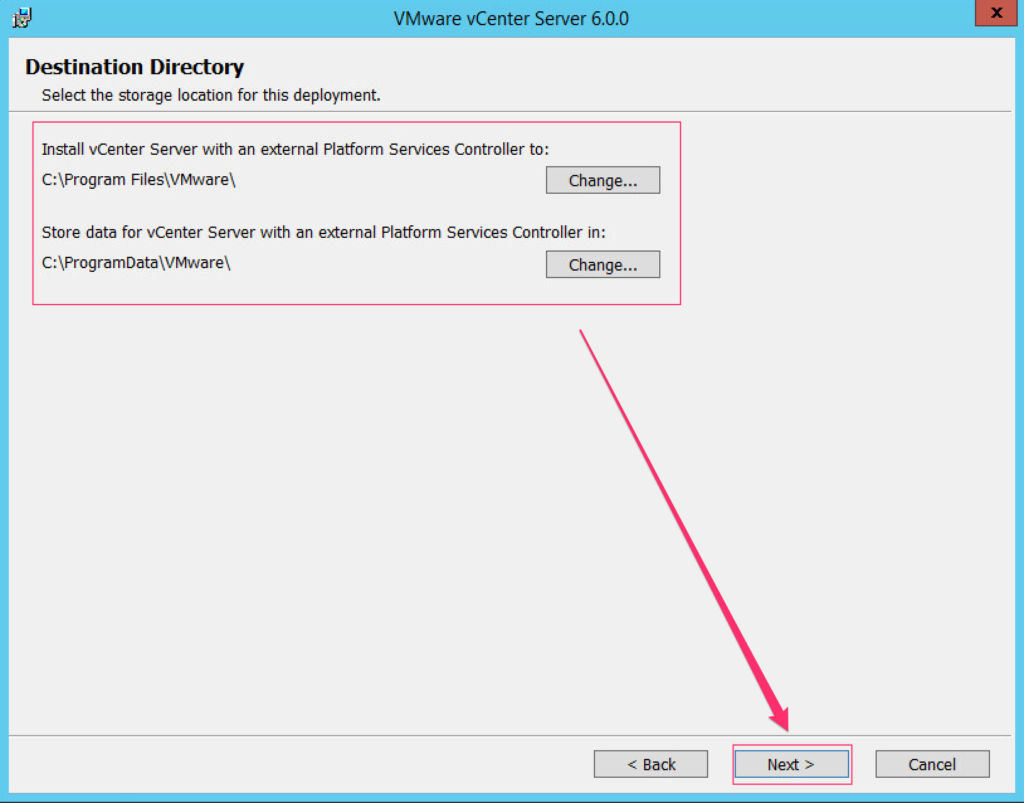
  11. Configure the installation directory for the vCenter Server and data, then click Next.
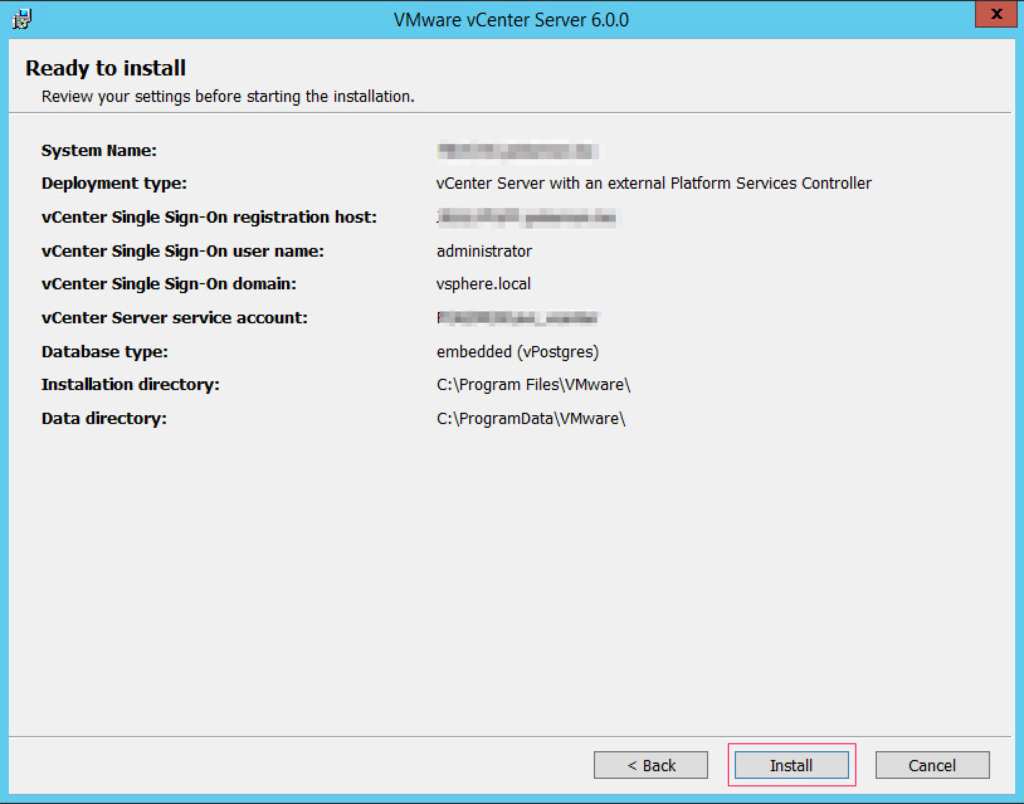
  12. Review all settings, and when ready, click Install.
Next Steps
 
After you’ve completed this setup, you should now have a functional topology, with 2 vCenters each connected to an external platform services controller.  The two external PSCs should now also be running in enhanced linked mode, and to verify, you can log into either vCenter, and see that you can also manage the inventory of the other.
I will follow this up with my testing for vCenter repointing and recovering from a failed PSC in this topology.
Share This:

Deploying Windows vCenter with External PSCs in Enhanced Linked Mode: Part 1

In many cases for small environments, it makes sense to deploy a vCenter Appliance with an embedded Platform Services Controller.  In larger environments with multiple sites, although you can (doesn’t mean you should) manage remote hosts with a single vCenter, it may make more sense to deploy a vCenter in each site, or region to further increase availability.  Furthermore, by configuring Enhanced Linked Mode, you can make management simpler by being able to link vCenter systems and replicate roles, permissions, licenses, policies, and tags; instead of having vCenter servers which are all managed individually.

Enhanced Linked Mode not only allows you to connect Windows vCenters, or just vCenter Server appliances; you can have an environment where Windows vCenters as well as vCenter Appliances can be linked together.  That said – there are supported and unsupported topologies, which is beyond the scope of this, however, you can find the information for those topologies in this VMware KB Article.

The following procedure is my re-creation of our production topology in a test environment.  The steps will walk through standard installation and configuration of the vCenter servers and PSCs in Enhanced Linked mode to get a to a usable state.  The follow-up post to this will be related to Installing the second PSC and vCenter, linking to the SSO domain and site created in this how-to.

Disclaimer:  The following information and procedures are performed in an isolated environment, and I am building these with the absolute minimum requirements since my test environment is a single physical host that also hosts other test machines in use by another engineer.  If performing these steps in production, be sure to follow proper sizing best practices, and built to suit your particular environment using the resource links provided throughout the article.

Hardware Requirements: vCenter Server for Windows

Before we get into the installation procedure, here’s an idea of what I’m building and the topology I will be using.

(All servers listed below are running Windows Server 2012 R2)

  • 1 Active Directory Domain Controller
  • 1 Single Sign-On Domain
  • 2 Sites (simulated)
  • 2 External Platform Services Controllers (one for each site)
  • 2 vCenter Servers (one for each site)

external_psc_diagram_1


Install a Platform Services Controller on a Windows Host


If deploying in a production environment, refer to the vSphere Installation and Setup for vSphere 6.0 Guide.
Pre-requisites
  • Verify system meets the minimum HW/SW requirements
  • Download the vCenter Server Installer
  • Install Adobe Flash Player version 11.9 or later if you will be running using the vSphere Web Client from one of the host machines.
  • Forward and Reverse DNS entries should be created for each system prior to installation.


Installation

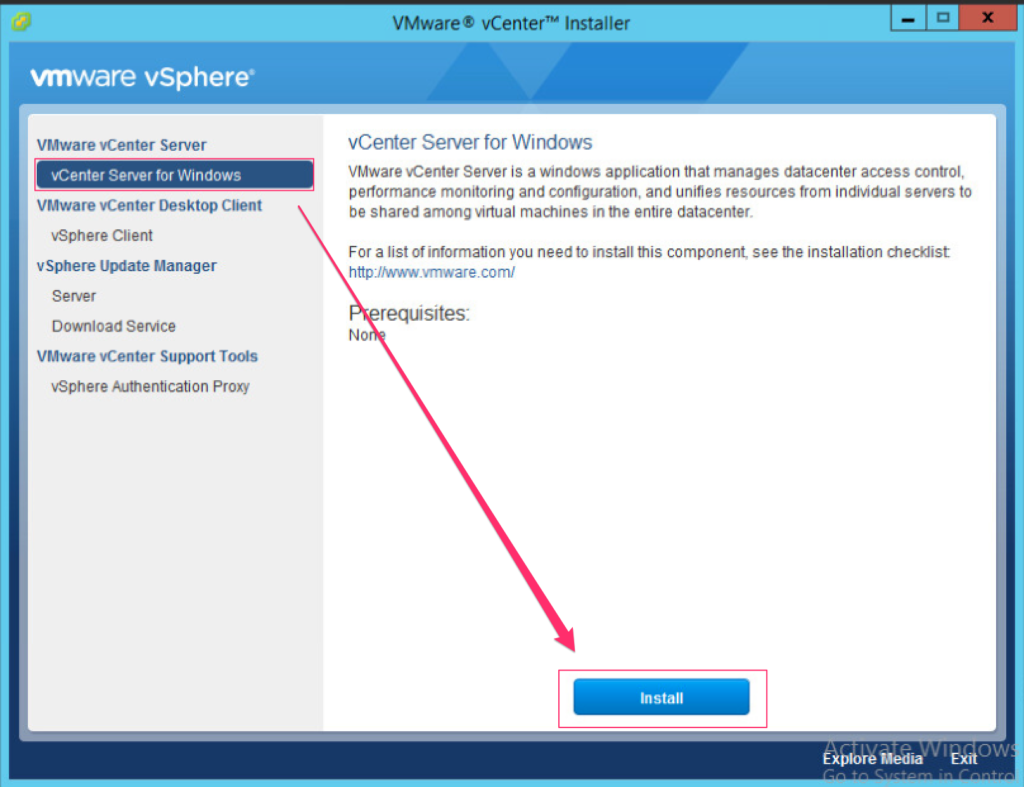
  1. Launch the vCenter installer and select vCenter Server for Windows. Click Install.

    external_psc_part1_1_1

  2. Once the installer initializes, click Next.
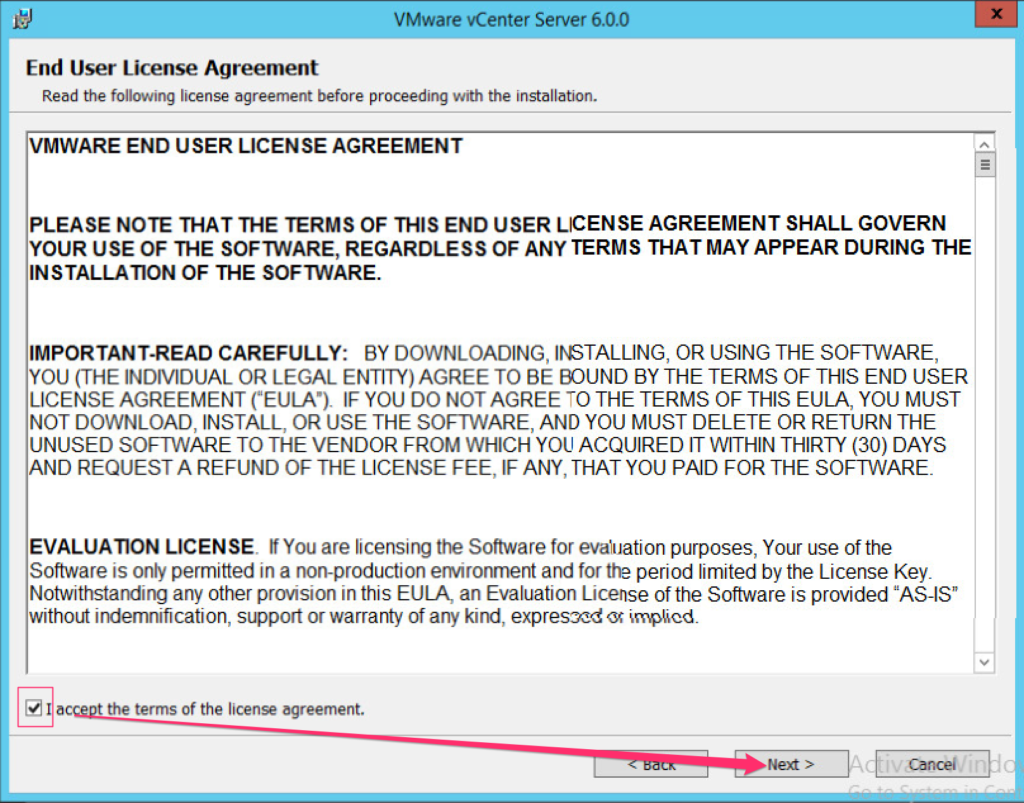
  3. Accept the VMware End User License Agreement, and click Next.

    external_psc_part1_1_3

  4. Under External Deployment, select Platform Services Controller and click Next.

    external_psc_part1_1_4

  5. Enter the system’s FQDN, and click Next.

    external_psc_part1_1_5

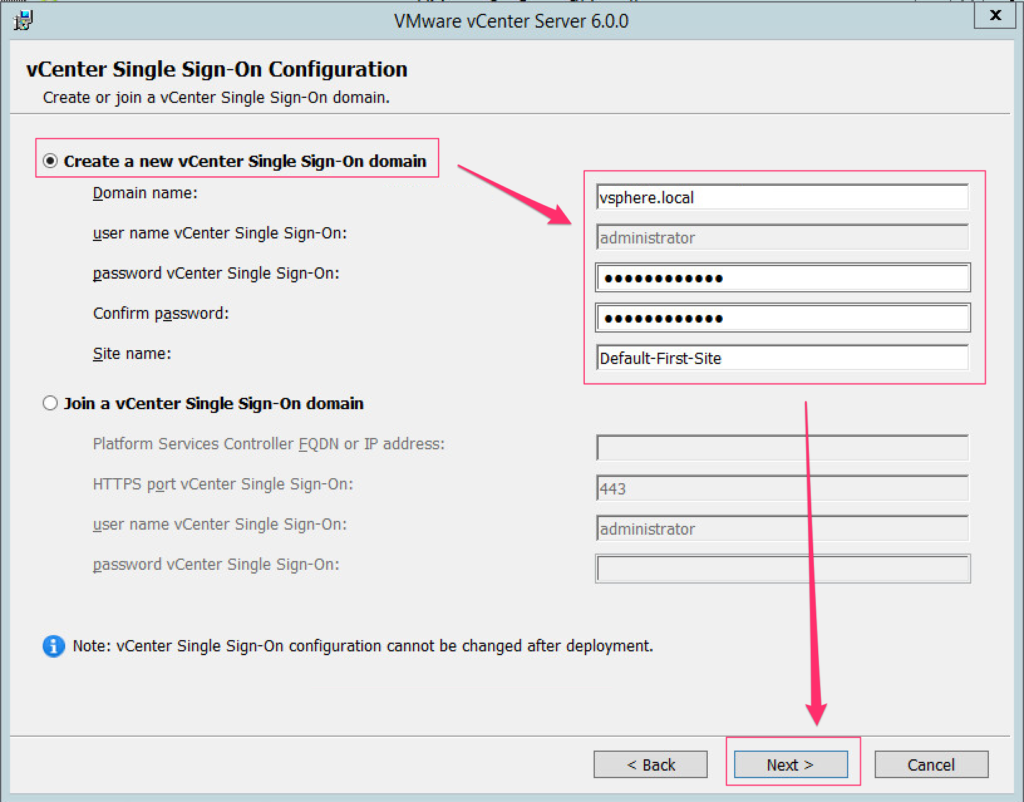
  6. If this is the first PSC being created, create a new Single Sign-On Domain, set the password, provide the site name, and click Next.

    external_psc_part1_1_6

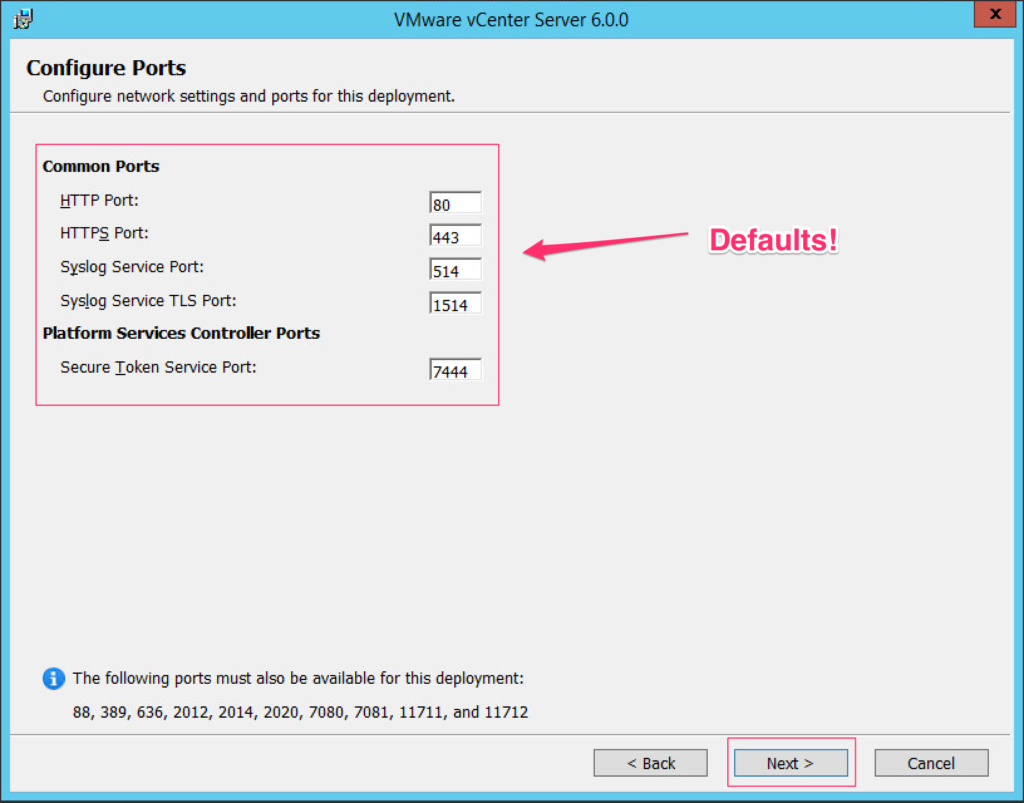
  7. Configure the ports as needed (I left this at the defaults, as I have no need to change them), then click Next.

    external_psc_part1_1_7

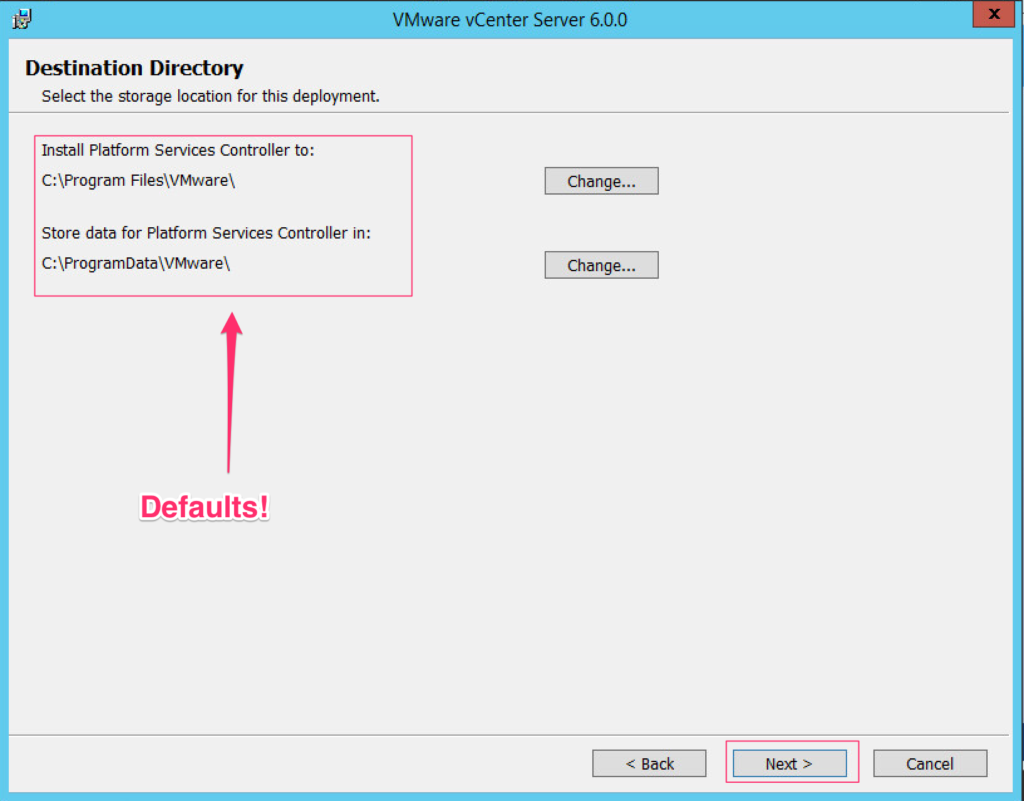
  8. Change the installation and data directories as needed and click Next.  For my implementation, I kept the defaults, since this is not production.

    external_psc_part1_1_8

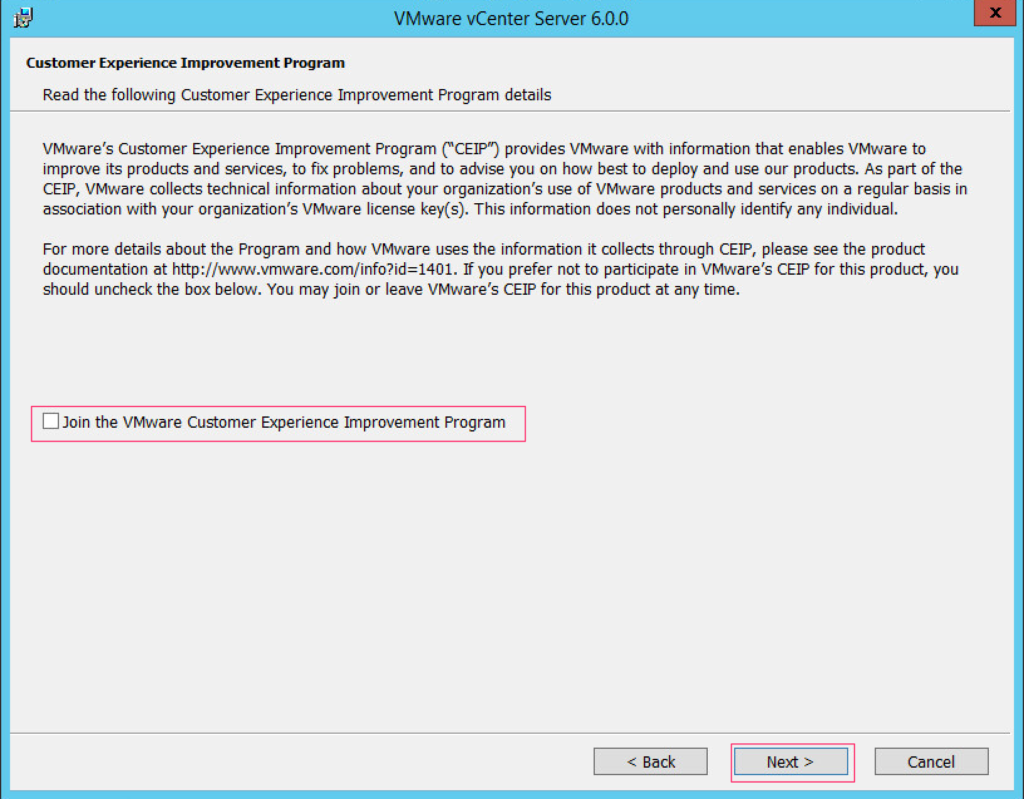
  9. Select whether or not you want to join the customer experience improvement program (CEIP), then click Next. Since this is an isolated environment with no external internet access, I unchecked it.

    external_psc_part1_1_9

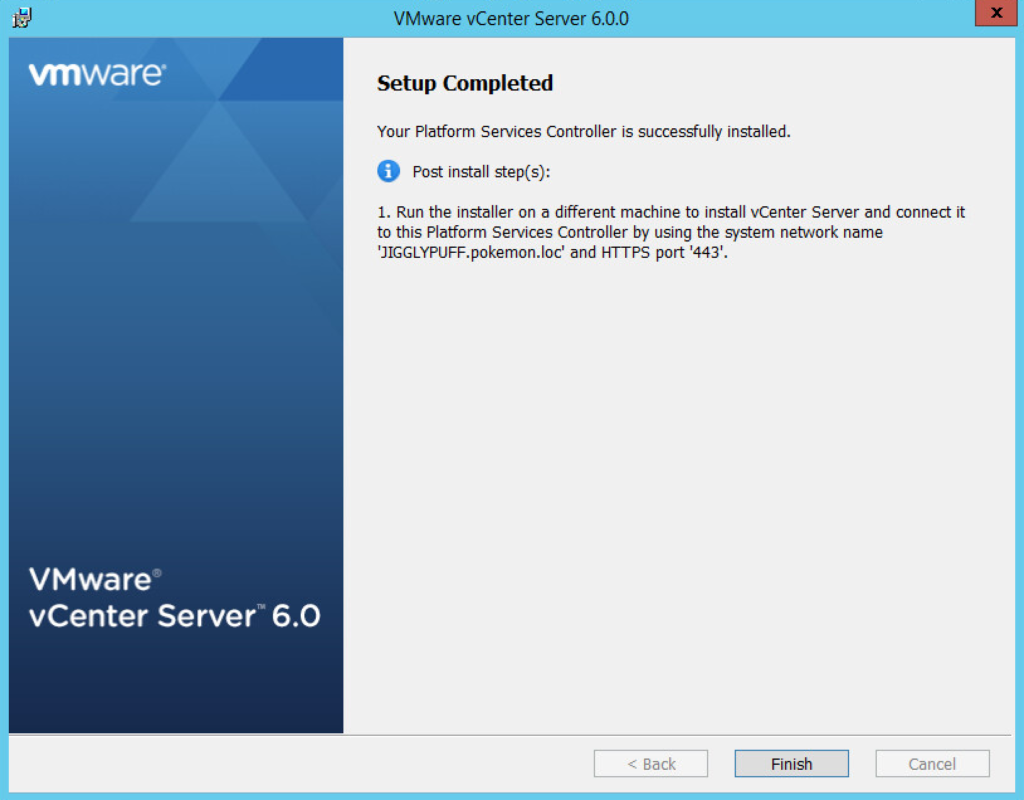
  10. At the Ready to Install screen, verify settings, and if everything looks good, click Install.  When done, the installer will provide you with next steps (convenient!)

    external_psc_part1_1_10


Next Steps
 
Note: You must wait for the PSC installation to complete before moving to the next step.  VMware does not support concurrent installations of PSC and vCenter.


Install vCenter and the vCenter Components


  1. Launch the vCenter installer and select vCenter Server for Windows, then click Install.

    external_psc_part1_2_1

  2. Once the installer initializes, click Next.
  3. Accept the VMware End User License Agreement, and click Next.

    external_psc_part1_2_3

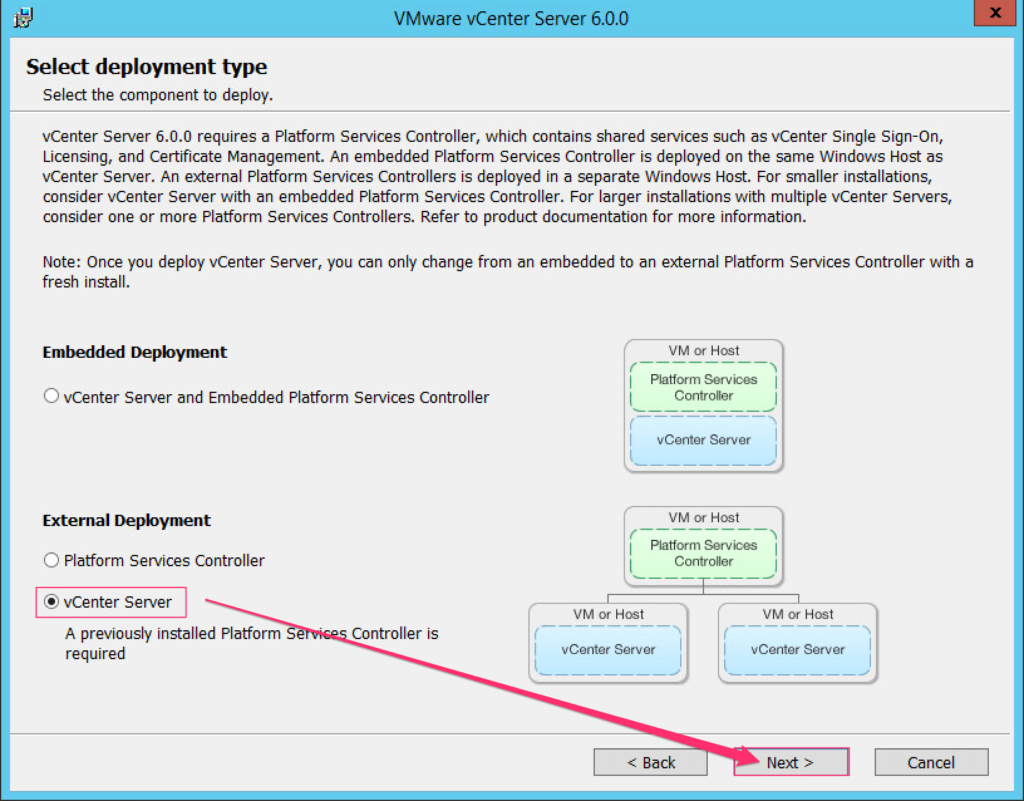
  4. Under External Deployment, select vCenter Server and click Next.

    external_psc_part1_2_4

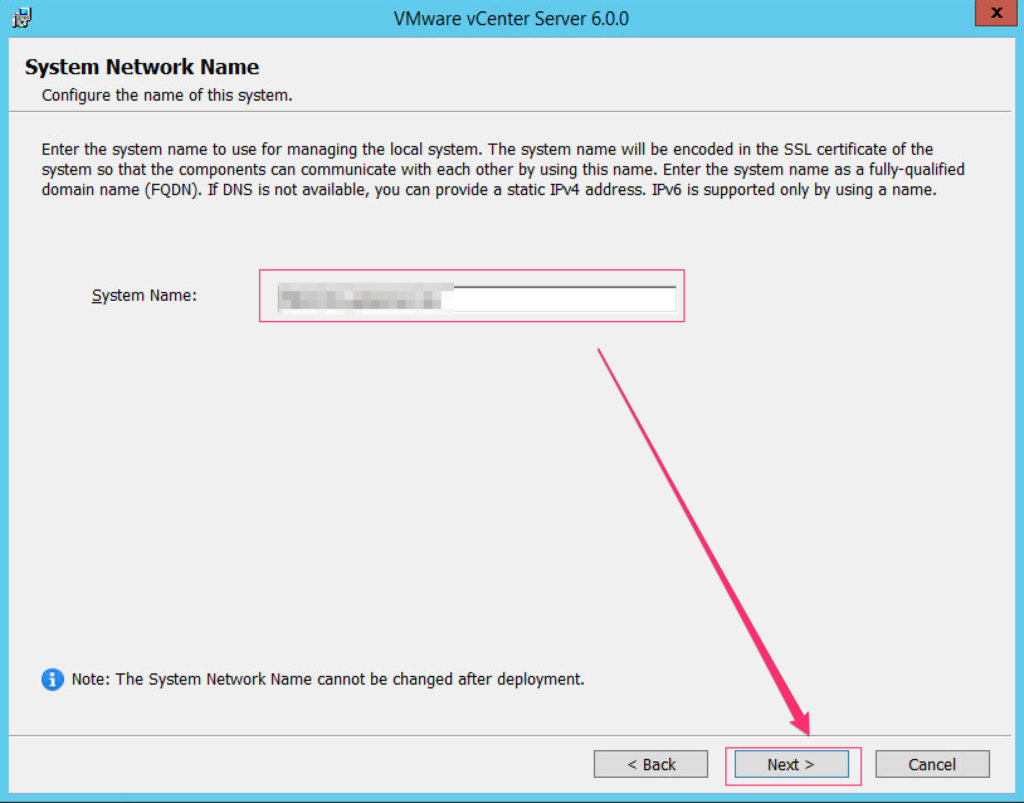
  5. Enter the system’s FQDN, and click Next.

    external_psc_part1_2_5

  6. Enter the information for the external PSC that was deployed in the section above, and click Next.  This step will register the vCenter with the PSC.

    external_psc_part1_2_6

  7. When prompted for certificate validation, click OK to approve the self-signed certificate created by the PSC

    external_psc_part1_2_7

  8. Configure the vCenter service account according to your environment requirements and click Next.  If you are using an external database server, you will need to specify a user service account.

    Note: If you are using a user service account, you will need to make sure it has the “log on as a service” privilege in the local security policy.

    external_psc_part1_2_8

  9. Select your database deployment and enter information if necessary, then click Next.

    external_psc_part1_2_9

  10. Configure the required ports if necessary to match your environment, and click Next.

    external_psc_part1_2_10

  11. Configure the installation directory for the vCenter Server and data, then click Next.

    external_psc_part1_2_11

  12. Review all settings, and when ready, click Install.

    external_psc_part1_2_12


Next Steps
  • Configure vCenter to integrate with your Active Domain or LDAP server as needed.
  • Configure any group memberships, roles, permissions, licenses, etc…
  • Install the next PSC and be sure to join the existing Single Sign-On domain that you just created.  Following that, install the next vCenter, and you are done!
Share This: