Zerto 10 Keycloak and Okta SAMLv2.0 Integration

Did you know that when the Linux-based Zerto Virtual Manager Appliance (ZVMA) was released, the way Zerto handled permissions has completely changed, giving you more control over who has access and what type of access they have?

In the old days (like a year ago, and to some still currently on the Windows-based ZVM), Zerto permissions were really an extension of vSphere permissions. When Zerto got installed on a Windows VM, part of that installation process created roles and permissions within vCenter that you could use to grant users access to certain Zerto functionality, if not all functionality. This was because Zerto mainly relied on whether or not you or any user trying to get into Zerto had an account with access to vCenter. For those who knew about it and used it, it worked, however, it left much more to be desired, like true RBAC and eliminating the possibility for any old vSphere Admin to have complete control over Zerto.

Today, as of the Zerto 9.7 Linux appliance and into 10, managing access in to Zerto has been decoupled from vSphere permissions and brought into Zerto through Keycloak, not to only provide RBAC, but to also provide an additional layer of security and more integration options for access management. Now the only connection into vSphere is a service account, and all user access into Zerto is based on having access granted through Keycloak.

Identity Provider Options

When you take a look at what type of integrations are available with Keycloak, it can be a little overwhelming, however, as long as it has what you need, you likely won’t care for what else is there, right? There are currently 18 built-in options for identity providers and user federation options (pictured below). I’d say there are likely many more when you consider that anything else that can be connected to with OpenID Connect, SAML v2.0, Kerberos, and LDAP/s are also available.

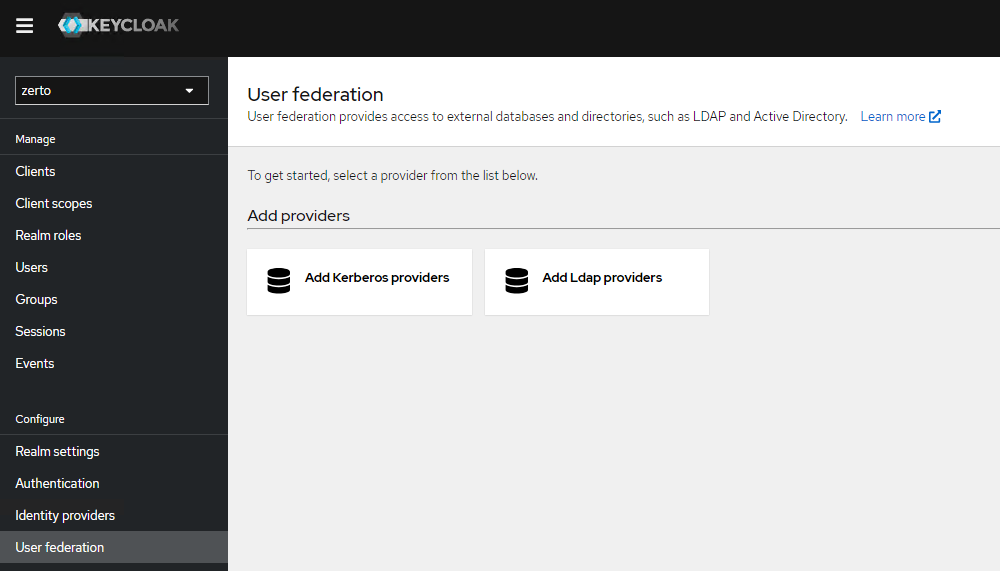
Keycloak User federation options screenshot

With a plethora of options available, the two most common ones I hear as customer needs today are Okta and Active Directory, and I’ve already published a YouTube video for Active Directory integration via LDAPs, so this update is going to be specific on how to set up Okta integration via SAML v2.0.

The goal here in this post is to list out the order of operations and the steps required to perform so that when you log in to Zerto, instead of pre-creating an account in Keycloak, you’re going to rely on an existing account in Okta that has access to Zerto, with the added benefit of push-button MFA.
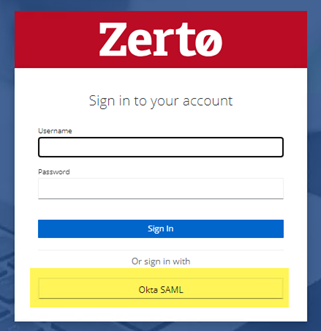
Zerto UI Login Okta SAML button

Configuration

Procedure Overview

So I’ve tested this with both OpenID Connect, and SAML v2.0 Identity providers, and I’ve come to the conclusion (and verified with some customers I’ve encountered who were also Okta customers) that configuring this integration via SAML v2.0 is much simpler, and doesn’t require banging head on keyboard. Having no prior experience setting this identity provider up took less than an hour from start to finish, so it was extremely simple.

So if you want to do this in one sitting, there are five main steps in the procedure that I counted.. okay, 6 if you want to include deploying the ZVMA and getting it on the network, which I won’t cover here:

Note: Keycloak and Okta have the tendency to automatically log your session out if you leave them idle for too long, so be sure to keep those sessions active while you’re jumping between the two.

  1. Deploy, configure, and license the ZVMA
  2. Configure the SAML 2.0 provider in Keycloak
  3. Create the Okta Application and download the signing certificate
  4. Configure mappers to map user attributes from Okta into Keycloak
  5. Upload and import the Okta signing certificate to the ZVMA and Keycloak trust store
  6. Logging in to Zerto

One thing to note is that when you’re performing steps 2,3, and 4 above, you may want to have both Keycloak and Okta open at the same time, because there are some values that they will be trading back and forth. Having both open allows you to complete them in parallel and make for a smoother experience.

I will also include at the end of this write up a “next steps” optional but recommended step that comes after logging in for the first time, so be sure to read all the way through, because it will be about RBAC assignment to the Okta user that has been logged in.

If you have any questions, please ask them in the comments.

Configure the SAML v2.0 Provider

  1. Log into the Keycloak administrator interface on the target ZVMA via https://[FQDNorIP]/auth (replace [FQDNorIP] with the FQDN or IP address of your ZVMA).
  2. After you’re logged in, you will see a drop-down list at the top left that defaults to “master.” Click there and select zerto from the list to change into the Zerto realm of settings.
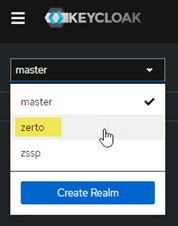
    Keycloak realm selection screenshot
  3. In the left navigation bar, under configure, select Identity providers.
  4. From the selection screen, choose SAML v2.0
  5. Enter the information as shown in the screenshot below, and note that you cannot change the Redirect URI, however, you will need this when configuring the Okta app, so copy it and have it ready to go when you get to the Okta configuration portion below.

    Keycloak SAML v2.0 general setting screenshot
  6. In the SAML Settings area, disable the setting labeled “Use entity descriptor.” Once disabled, more fields will appear below in the SAML settings.

    Disable Use entity descriptor setting screenshot
  7. Before filling anything out further, open another browser window and log in to the Okta admin site to create an app for Zerto, because now you’re going to need to gather/enter URIs in both Keycloak and Okta.

Create and Configure the Okta Application and Download the Signing Certificate

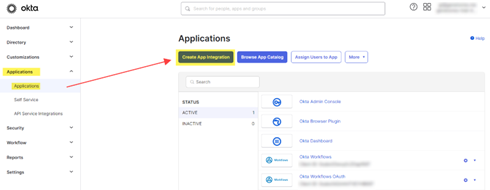
  1. In the Okta admin, expand Applications in the left navigation bar, and select Applications from the nested options.
  2. Click on Create App Integration

    Okta Create App Integration Screenshot
  3. For the name, enter Zerto SAML, then click Next.
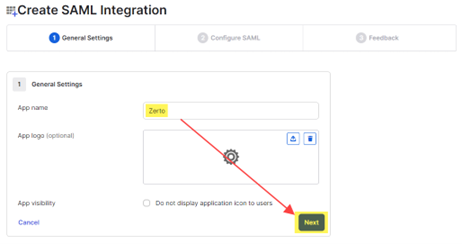
    Okta app general settings screenshot
  4. Under General, where it asks for the Single sign-on URL, enter the Redirect URI that was automatically created in Keycloak. Refer to step 5 above where you started setting up the SAML v2.0 provider in Keycloak.
  5. Enable the ckeckbox labeled “Use this for Recipient URL and Destination URL.”
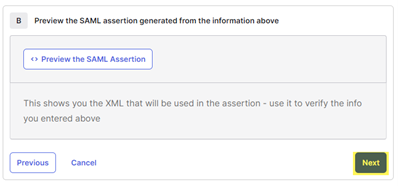
  6. Leave everything else as default, then scroll down and click Next.
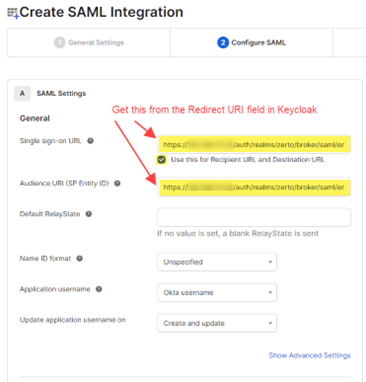
    Create SAML Integration Configure URLs screenshot
    Configure SAML Integration Next button screenshot
  7. The next page is for feedback, so select the following options and click Finish. You will be returned to the applications page.
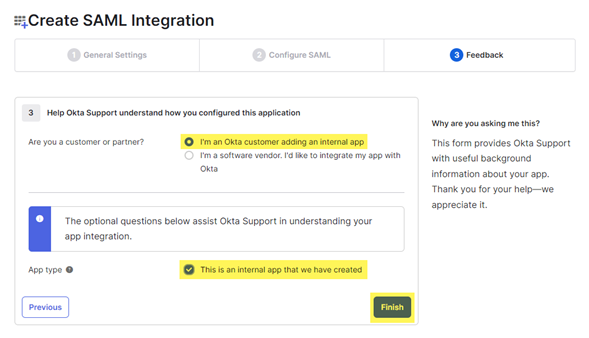
    Okta Feedback screenshot
  8. On the applications page, click the gear icon to the right of the Zerto SAML app you just created, and select Assign to Users.
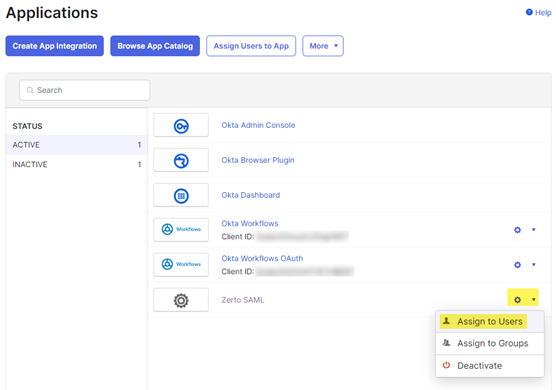
    Assign users to Okta app screenshot
  9. For each user that requires access to Zerto, click the Assign link to the right of their name to add them to the app. Without assigning them, they won’t be able to login to Zerto using their Okta account. Optionally, you can create a group in Okta and assign your users to that instead of individually here.
  10. When you click on Assign, another box will pop up with the user name in the box. Click Assign and go back to be returned to the main list of users. If there are more users to add, repeat the previous step, otherwise, you can close the window with the list of users.
  11. Back on the applications page, if you click on the app, you will see your added users/groups in the list.
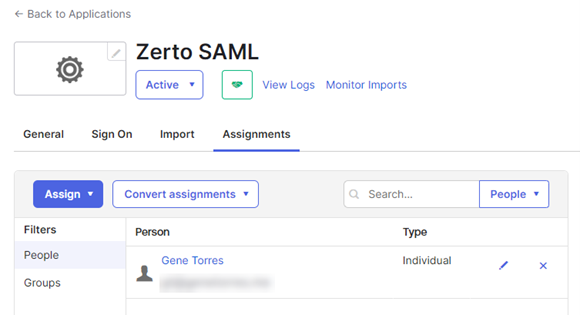
    Okta app assigned users
  12. Now, download the signing certificate. Click on the Sign On tab at the top.
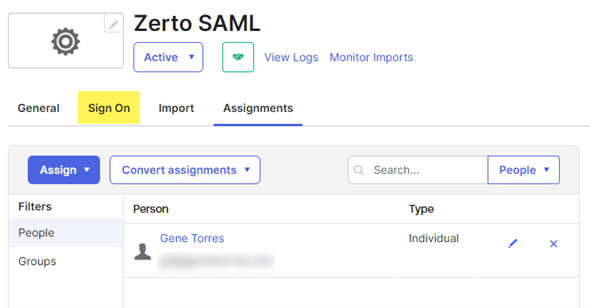
    Okta app sign on tab
  13. Scroll down to the SAML Signing Certificates section and find the active certificate. At the right of that active certificate, select Actions > Download Certificate. This is what you will be uploading to the ZVMA and importing to Keycloak, so keep track of it. Save the certificate as a .cert file (which should be what it defaults to).
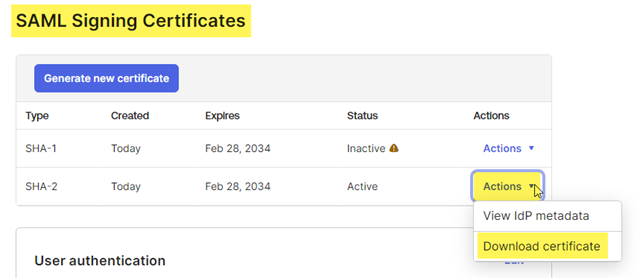
    Download the Okta signing cert
  14. Now you need to get a couple of URLs from Okta to use in Keycloak. Click on the Sign On tab for the Okta application.
  15. Scroll down to the SAML 2.0 section. Beneath the Metadata details header, click on the link that says more details.
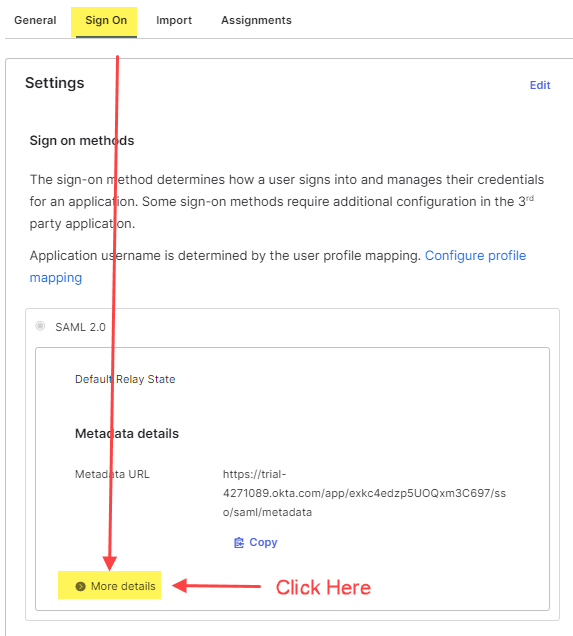
    Okta SAML Details for Keycloak
  16. Copy the Sign on URL and the Sign Out URL
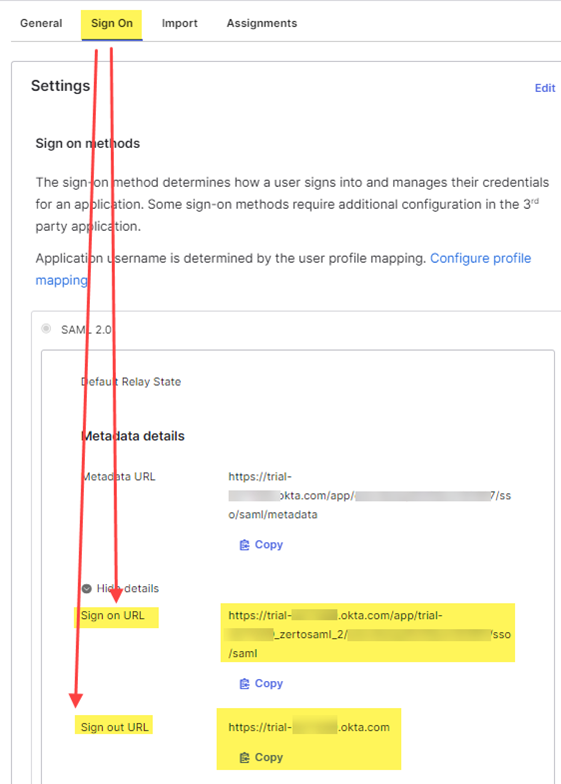
    Correct Okta URLs to copy to Keycloak
  17. Now return to Keycloak to continue the SAML v2.0 provider configuration.

Return to Keycloak

  1. In the SAML Settings section of the SAML v2.0 provider you’re configuring in Keycloak, find the Single Sign On Service URL field and enter the Sign on URL that you copied from Okta in the previous step.
  2. For the Single Logout Service URL, past the Sign Out URL you copied from Okta in the previous step. When done, it will look similar to the image below:

    Correct URLs to put into Keycloak
  3. Leave all other fields as default. Click Save.
  4. Scroll down to the Advanced Settings and verify the following settings:
    • First login flow: first broker login
    • Post login flow: none
    • Sync mode: Import

      SAML v2.0 provider advanced settings
  5. Click Save.

Configure Mappers for Attribute Import From Okta to Keycloak on Login

Mappers will be used between Okta and Keycloak to easily import user attributes on login to Zerto. If you do not provide mappers, then on first login, the user will be prompted to enter their e-mail address, first name, and last name. The idea with configuring mappers is to bring those attributes over from Okta to populate the fields in Keycloak for the user automatically, so the login is much more seamless.

First we will configure the attribute mapping in Okta, followed by the mapper configurations in Keycloak.

Okta Mapper/Attribute Configuration

  1. Log onto the Okta administration page.
  2. Go to the SAML Application that you previously configured in Okta (probably named Zerto SAML).
  3. On the General tab of the application, scroll down to the section labeled SAML Settings and click Edit.
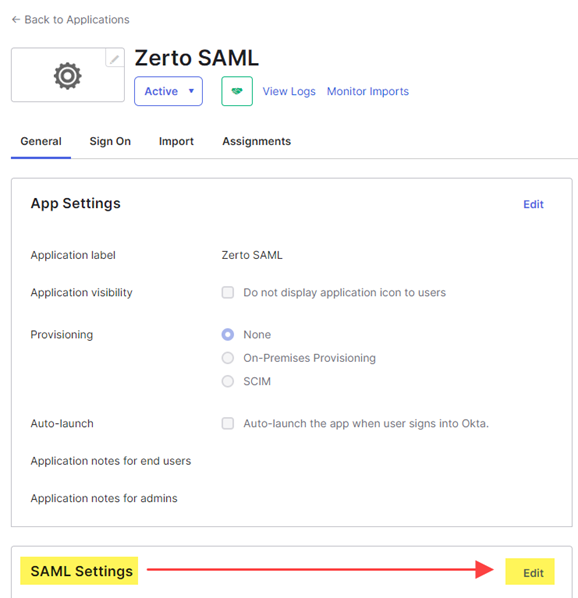
    SAML Settings Edit
  4. Click Next.
  5. On the Configure SAML step, scroll down to the Attribute Statements section and add the following attributes. These will map Okta user attributes to Keycloak user attributes for simpler login as mentioned above.
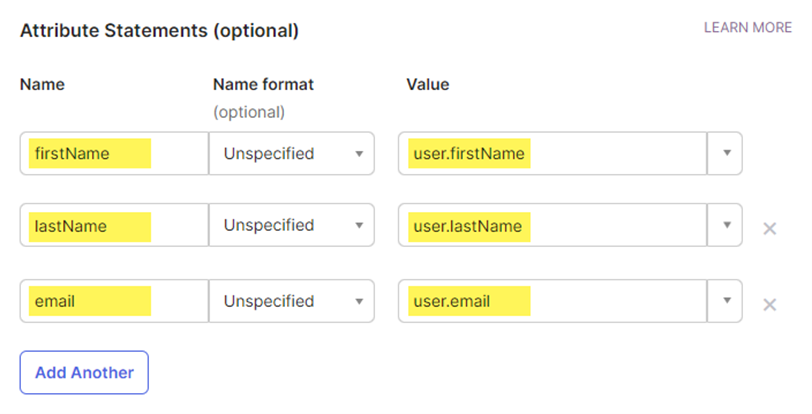
    Okta SAML Attribute Mapper
  6. Scroll down and click Next.
  7. Click Finish.

Keycloak Mapper Configuration

Configure the Mappers for users’ e-mail, first name, and last name in Keycloak to be brought over to their Keycloak account automatically on login.

  1. In Keycloak, click on the Okta SAML provider you configured.
  2. Click the Mappers tab at the top, then click Add Mapper.
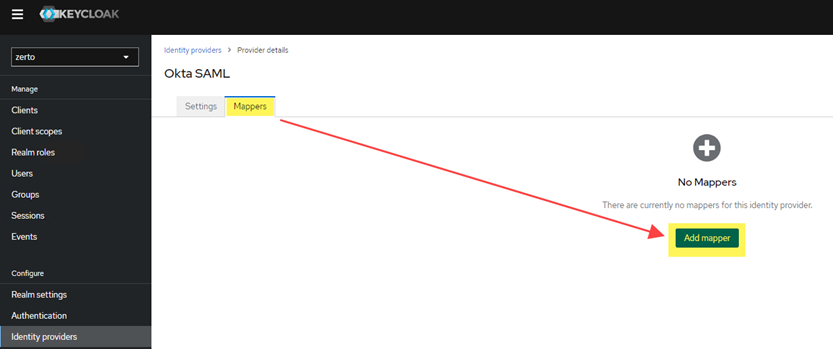
    Add Mapper in Keycloak
  3. Add the mapper for the user’s first name. Complete the fields as shown in the image below, then click Save.
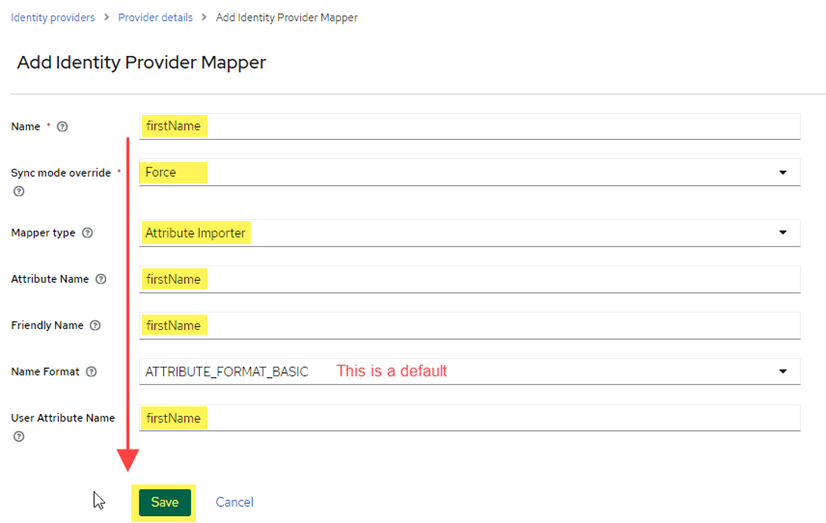
    Keycloak first name mapper settings
  4. Go back to the Mappers tab, and add another mapper for the user’s last name this time (see image below for values to use). Click Save.
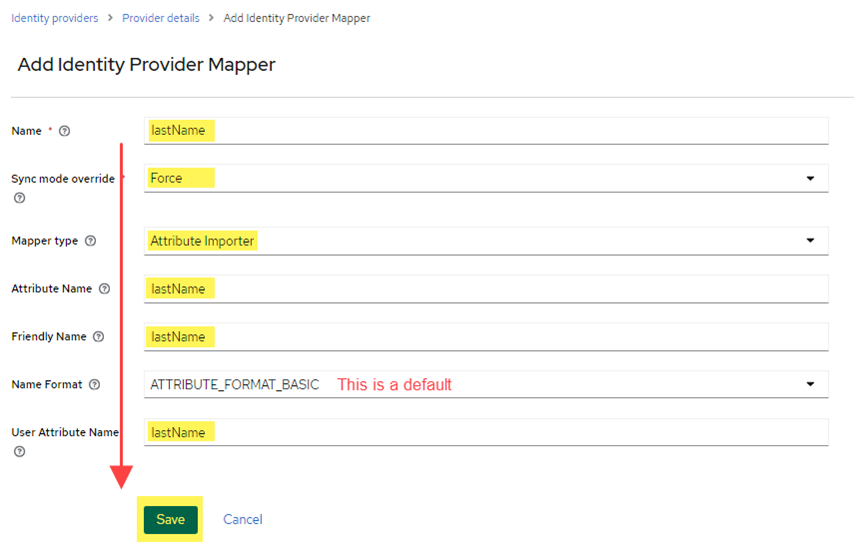
    Keycloak Mapper for Last name
  5. Go back to the Mappers tab, and add another mapper for the user’s e-mail address this time (see image for values to use). Click Save.
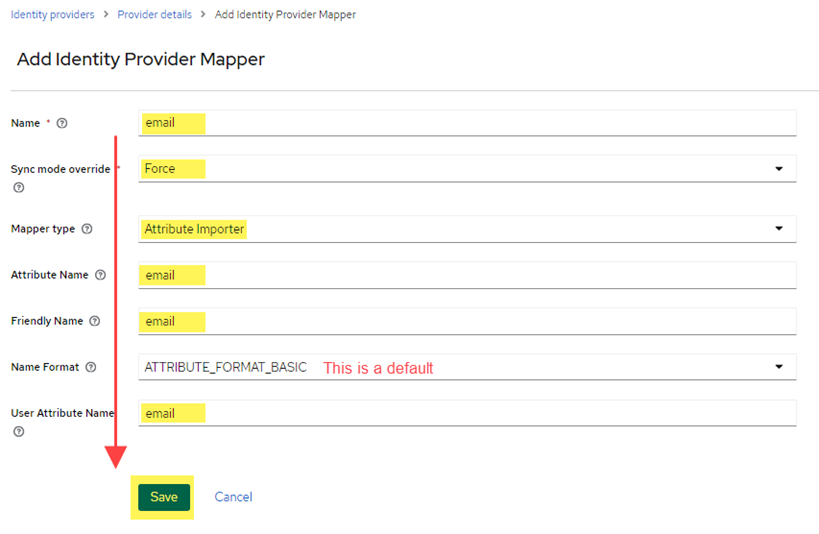
    Keycloak Email Mapper

Upload and Import the Okta Signing Certificate to the ZVMA and Keycloak Trust Store

Update: I decided to include the certificate import steps here, but left the link to the original Zerto documentation as others have been asking for it and felt this would be more “complete” with it inline.

  1. Upload the Okta certificate to the ZVMA. Put the file in the following location: /var/data/zerto/zkeycloak/certs/
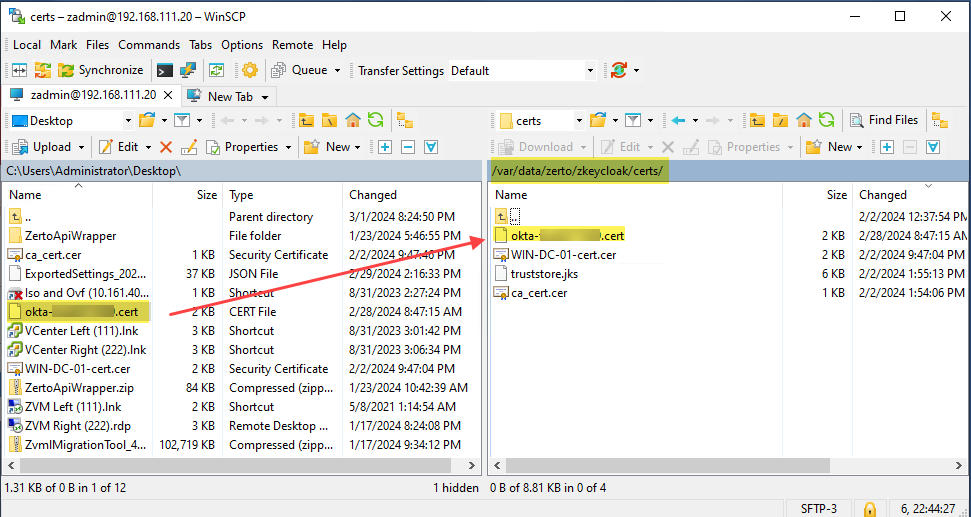
    Upload Okta certificate file to /var/data/zerto/zkeycloak/certs/
  2. Use PuTTy or other SSH client to log onto the ZVMA. If you are doing this via the vSphere console, select 0 from the appliance manager menu to exit to the shell.
  3. Run the following command to add the certificate to Keycloak’s trust store:

    kubectl exec -i zkeycloak-0 -- /usr/bin/keytool -import -alias oktacert -file /opt/keycloak/conf/certs/[oktacertfilename].cert -keystore /opt/keycloak/conf/certs/truststore.jks
  4. You will be prompted to enter the keystore password. Use the password below. If for some reason you are asked to change that password, use the same one, don’t change it.

    truststorepass
  5. When prompted to trust the certificate type yes and press enter.
  6. Finally, fun the following command to kill the current pod and run the updated one with the certificate in place

    kubectl delete pod zkeycloak-0
  7. You can now end your SSH session and start logging in to Zerto via the Okta SAML login method.

Original Zerto documentation for importing certificates into Keycloak’s truststore:

https://help.zerto.com/bundle/Linux.ZVM.HTML.10.0_U3/page/Importing_the_AD_FS_Certificate_to_Keycloak.htm

Next Steps

After you’ve completed all the steps previous to this section, you can start logging in to Zerto. One thing to note is that when you login via your Okta credentials, the user loggig in (if given access to the Zerto SAML app via Okta) will be logged into Zerto, and if you look in the Users section of the Keycloak Zerto realm, there will also be an account created in there for the user.

By default, the user being given access through this method will have admin rights to Zerto. If you would like to minimize permissions or access into Zerto with, for example, read-only access, you can visit the following URL where I have previously wrote about how the Role-based Access Controls work within Zerto. Optionally, you can import group attributes from Okta the same way you mapped user attributes, however, that is out of scope here.

Zerto 10 Role-based Access Controls (RBAC) via Keycloak: https://www.genetorres.me/2023/10/13/zerto-10-role-based-access-controls-via-keycloak/

That’s all I’ve got for this time. I hope you’ve found this useful and if so, please share it with others who you feel will find it useful as well. For any questions, please leave a comment!

Update: Mapping Okta Groups to Keycloak Groups

After you’ve gone through this, you’re probably wondering how you can also automatically map Okta groups into Keycloak for Zerto access. Please see my follow-up blog post on Mapping Okta Groups to Keycloak (SAML 2.0) to continue from here and get your groups mapped over automatically. By doing this, you will avoid having to add users to Keycloak groups after their first login.

Share This:
Windows to Linux Migration

Zerto: Windows ZVM to Linux ZVMA Migration (Single NIC)

My previous post explained how to perform a Zerto Windows ZVM migration to the Linux ZVMA in a situation where you have two NICs on your ZVM for traffic separation. But, what about everyone else who is running a standard deployment of Zerto with single-NIC ZVMs? I mean, the process has got to be simpler, right? The answer to that is yes. There are a lot less steps involved since we’re not going to be dealing with additional network interfaces and fumbling around with persistent routing in Windows and Linux, and then remembering we had that in place months, or years later!

Windows to Linux Migration

When thinking of how the migration process works when moving from Windows to Linux, I can’t help but feel that the product team at Zerto couldn’t have come up with a simpler and more elegant way to accomplish this. I mean, its like having a “penguin” standing outside a “window” holding a box, while you full-send all the data held behind that window into the box – and then tell the penguin he is now all things that window was.

Well, that was fun (and thanks to Dall-e for creating that image for me), but realistically, it’s as simple as four main steps (and one pre-req). Also, there’s a video at the end of this if you don’t feel like reading; which will walk you through the migration of both sites.

Pre-req: Windows ZVM Must be on Zerto 9.7U4patch2

Oh yeah, it might help you if you also double-check the Interoperability Matrix to make sure the intended versions of Zerto are compatible with your version of vCenter and ESXi.

  1. Deploy the Linux Zerto Virtual Manager Appliance to vCenter
  2. Download and run the Zerto Migration Utility from the Windows ZVM
  3. Log into the Zerto UI and validate
  4. Repeat for the recovery site

Below, I’ll break down each of those three steps to provide a little more color about what is involved with each one. Trust me, if you prep everything in a way you can simply just move from one step to the next, it’ll all go smoothly and before you know it, you’re done.

If you’re wondering where to start and not sure if you should do the protected or the recovery site first, I usually start with the protected site because if that’s down while it’s being migrated, and you need to perform any type of recovery, at least you’ll still have the recovery site intact. Or you could prefer to migrate the recovery site first. It’s totally up to how you would normally upgrade Zerto when new releases are out. Just make sure you complete one site before starting on the next.

Step 1: Deploy the Linux ZVMA to vCenter(s)

So the very first thing you need to do is to make sure you have all your Windows ZVMs upgraded to the latest version of Zerto, which is at the time of this writing, 9.7U4patch2.

Next, head to https://www.zerto.com/myzerto, go to Support and Downloads, and download version 10.0U2 of the Zerto Virtual Manager Appliance (Linux). This comes as an OVF, so there’s no need to build your own Linux VM. Just simply download the OVF and deploy it as you would any other virtual appliance in that format in vCenter.

Once you’ve deployed the ZVMA to each vCenter, power them up. You’re going to do a couple of things (in this order):

  1. Once booted up, login with the username: zadmin and enter the default password, which is: “Zertodata123!” (without the quotes). You will be prompted to change the password to something more secure that matches your policy guidelines for passwords.
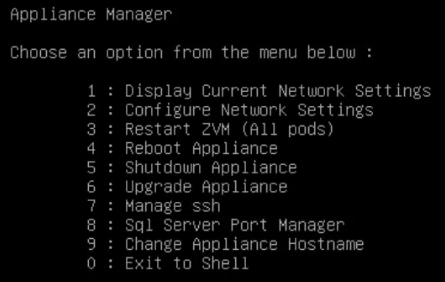
  2. Once logged in, you may see the appliance enter an initialization stage – this may take several minutes, but typically goes pretty quick before it displays the appliance manager menu. Follow the steps in order below because if you start with the network settings, you’ll have to reboot before you can enable SSH.

    ZVMA appliance manager menu
  3. Select option 7 to enable SSH. Once enabled, you’ll be returned to the appliance manager menu.
  4. Press 2 and configure static IP settings for the appliance. This IP address will only be used temporarily, so you won’t need to create a DNS record for it, or anything like that. Ultimately, the IP address of this appliance will be the IP address your Windows ZVM is using prior to the migration. Once you’ve configured your IP settings, the appliance will let you save the settings and then tell you to reboot to complete the network configuration.
  5. That’s it. You are done preparing the appliance for the migration.

Step 2: Download and Run the Zerto Migration Utility from the Windows ZVM

  1. Go to https://www.zerto.com/myzerto and download the Zerto Migration Utility from support and downloads (same place you got the Linux ZVMA OVF). Save the migration utility to the desktop of the Windows ZVM.
  2. Open a Remote Desktop connection to the Windows ZVM. Once logged in, run the migration utility (right-click –> Run as administrator). Oh yeah, get yourself another temporary IP address for this server, because the Migration Utility will need it.
  3. When the migration utility starts, the first screen will have a link to a “read me.” You’ll need to click that link before the “Next” button is enabled.
  4. Click next.
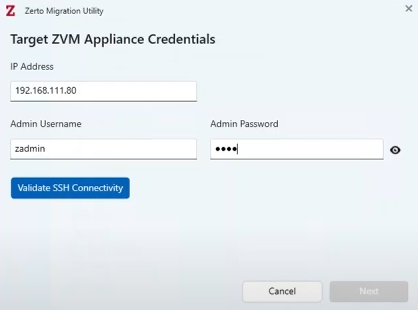
  5. Enter the IP address for the Linux ZVMA and the password for the zadmin account, then click Verify SSH Connectivity button. After that connectivity is confirmed, click Next.

    Migration Utility SSH Connectivity Screen
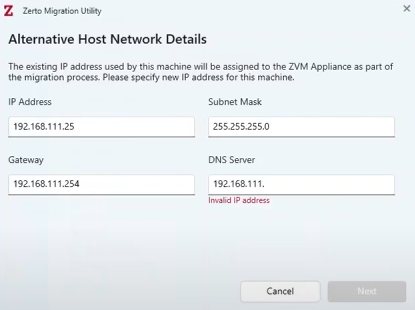
  6. Now, enter that temporary IP address I mentioned 4 steps ago and complete the rest of the network settings, then click Next.

    Migration Utility Alternate IP Screen
  7. Review the Summary screen, and then click Migrate when ready.
  8. Within a few seconds, your RDP connection will drop you – that’s because the alternative IP has been applied to the Windows ZVM. Just re-connect your RDP session using that alternative IP that you entered. The migration utility will still be running.
  9. Once the migration completes, and says it’s successful, you can shutdown the Windows ZVM. Notice how the screen also includes a link to the IP address that was previously assigned to the Windows ZVM for production use. This IP address has now been assumed by the Linux ZVMA. If you’re using DNS and FQDNs to access Zerto, now might be a good time to update DNS to reflect the change.

NOTE: Do not run the uninstaller for Zerto from the Windows Add/Remove programs. Doing this will delete VPGs, uninstall VRAs, unpair sites, and remove the Zerto plug-in from vCenter. In other words, IT WILL BREAK YOUR ZERTO IMPLEMENTATION. Just delete the Windows ZVM after you’ve migrated all sites from Windows to Linux successfully.

Step 3: Login to the Zerto UI and Validate

  1. Open your browser, and connect to Zerto using the original IP address of the Windows ZVM (see the “Migration Completed” image above for reference) that was moved over to the Linux ZVMA. The new URL to access Zerto is https://[IPorFQDN]. Note, there is no port 9669 after the host name. The appliances uses port 443 for the UI.
  2. Login using the following credentials. Since it’s the first time you’re logging in, you will be prompted to change the password.

    User: admin
    Password: admin

When you first login, you’re likely going to see some alerts. Give Zerto a few minutes – those will all go away. Don’t get impatient like I did, you’ll end up in a troubleshooting frenzy only to find out that it all will settle down if you just give it some time. After all, Zerto just underwent brain surgery, it will need to heal.

While the healing is going on, click around to Sites, VPGs, Setup, etc. If you also selected to upgrade the VRAs automatically, you’re probably going to see a bunch of that activity taking place too, so keep an eye on the vSphere tasks as well as the alerts in Zerto to get an idea of what’s happening.

Once everything settles, login to the recovery site UI and make sure it sees the same things the protected site is seeing in terms of the Zerto status.

Step 4: Delete the Windows ZVM

Once you’ve gotten both the protected and recovery sites migrated to the Linux Zerto Virtual Manager Appliance, you can now clean up – remember – do not uninstall Zerto from those old Windows ZVM VMs. It will break Zerto. The best thing to do is to delete those old ZVMs after both sites are successfully migrated and you have validated that everything works.

Thanks for stopping by! Please leave a comment if you have any questions or to let me know how this worked out for you. And if you found this useful, please share it with others who you feel it could help.

Here’s a video to show you how the above process works. Enjoy!

Share This:
Simple Lab: Dual-NIC Diagram

Zerto: Dual-NIC ZVM to ZVMA Migration

New ZVM New Me

It’s a new year, and along with that comes a whole lot of “new things.” New things may come in the form of resolutions, new gym memberships, new jobs… you get the point. And while it’s not so new today, Zerto 10 has delivered a new architecture for the Zerto Virtual Manager. So to some, a new year’s resolution could mean finally moving off of Windows, and onto a more secure and capable Linux-based Zerto Virtual Manager.

And if you’re like me, new things make us remember old things. In fact, I had totally forgotten that I wrote an article about bolting on (virtually) a second network interface to my ZVM back in 2016 to meet a network security requirement. Apparently, that was found useful to others, and it has come full circle, so I’ll share how to get that specific configuration from Windows to Linux without breaking Zerto (for too long). You can read the original post here.

The “Good to Know” Stuff

The blog post contains a lot of information related to the tasks performed, so it will be helpful to be familiar with a few things. I also did not write this as an in-depth “how to build your lab” write-up. Also, this is specific to vSphere environments and does not cover any public cloud Zerto environments.

If you want to build a lab to try this out, you can build it according to the diagram below in the “Lab Configuration” section. Then follow my Dual NIC ZVM post to configure your Windows in-guest routing.

Zerto Resources and Documentation

There is quite a bit of information that you’re required to understand before migrating from the ZVM to the ZVMA, and it’s the usual stuff like version compatibility, pre-requisites, etc, etc… So I’ve put everything here in case you need to review or are in planning.

.

The Lab Configuration

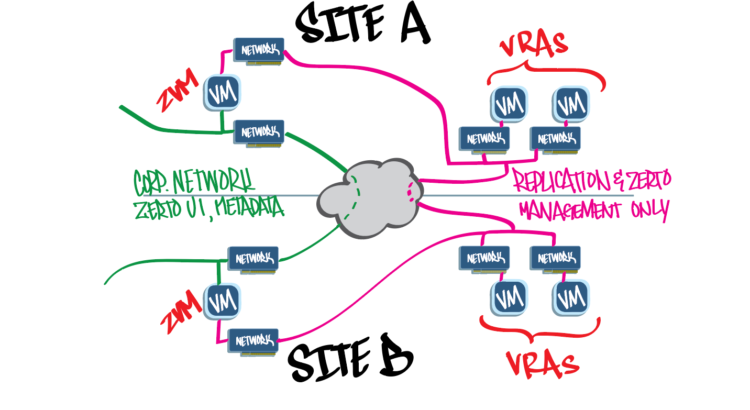
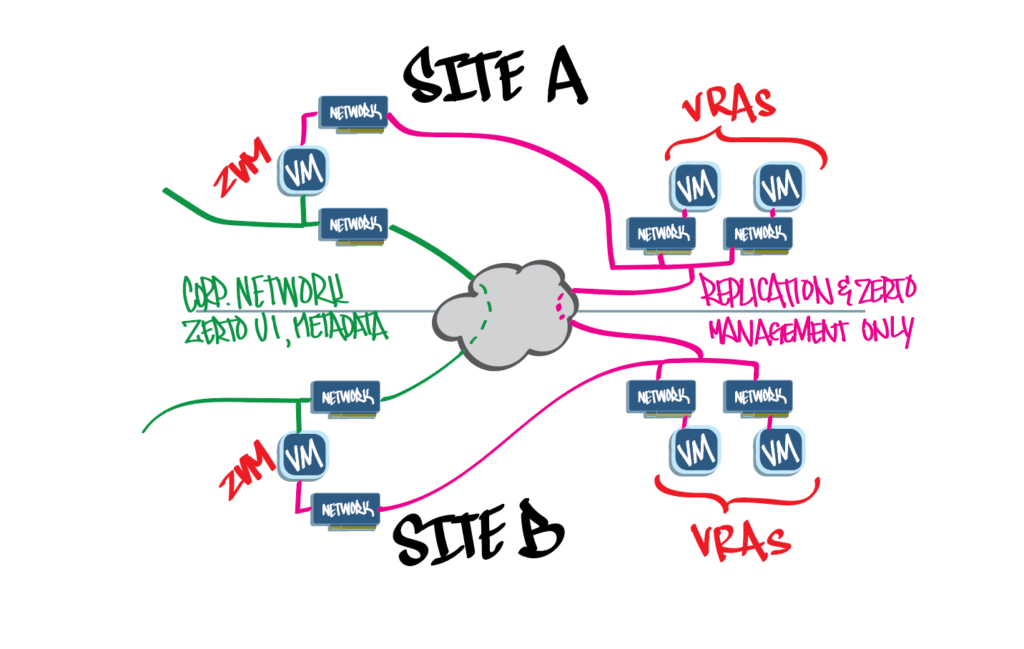
Below you’ll see a very high-level diagram of what this setup looks like in my lab if you’d like to build a lab out to follow along. How you achieve the network separation is up to you. In my lab, I didn’t have multiple subnets in each site, so I got creative and used a combination of Windows Defender firewall policies and in-guest persistent routes based on IP addresses. The main goal of this post is to get you migrated from a dual-NIC Windows ZVM to a dual-NIC Linux ZVMA.

What you’re seeing below is that the network interfaces connected to the green lines are all meant to communicate “administrative” traffic with each other. This is the network where your OS patches will be delivered, domain authentication takes place, and/or users will access the Zerto UI. They are also the interfaces over which you will pair Zerto sites.

The interfaces connected to the magenta lines are all meant for VRA-related traffic. This includes things like ZVM management control of VRAs, managing checkpoints, and log collection. The actual data being replicated for protection by Zerto will also flow on this network and is being managed by the VRAs through direct connections the source and target VRAs make with each other. Again, refer to the Zerto Ports Usage link above for more information.

Simple Lab: Dual-NIC Diagram

Windows ZVM to Linux ZVMA Migration

If you’ve made it this far in, you’re likely already running Zerto in your environment in a dual-NIC configuration and are looking to migrate to the Linux ZVMA, and have probably read this kb article. At the very bottom of that article, there’s some text stating that migrating a dual-NIC ZVM is not supported and that the recommendation was to “move” to a single NIC prior to migrating, then add it back afterwards. This is also called out in the Migration Utility Pre-requisites documentation.

What that really means is that during the migration, the utility will not allow you to migrate if there is still a second NIC on your Windows ZVM. I have included the steps below to get past that, but you’re still going to have to build that second NIC on the Linux ZVM post-migration, and I also cover that in detail.

The Migration Steps, In order

Below you will find a high-level set of steps to take to complete the migration. This procedure assumes you have two (2) NICs on each ZVM that needs to be migrated over to Linux, and that you have read the Zerto Migration Utility Pre-requisites documentation. Having some networking experience and being able to configure routing in Windows or Linux would also be helpful.

Tip: Have at least four IP addresses available to use as temporary IP addresses (two per site) during the migration process.

If you don’t want to read through these steps or want a more detailed demonstration of a complete migration, there’s a video at the end of this post that I created to walk you through the entire process. If there is any section that requires configuration text, I will include that below.

Important: Always complete the migration on one site before starting the second site. The steps below will only pertain to the site you’re working through migration on. When you are done with that first site, start again at step 1 for each remaining site.

  1. If this is being done for production – it helps to open a proactive (lower severity) support case with Zerto for visibility to let them know you’re going to start migrating your ZVM to Linux. This way, should you run into any issues along the way, you can call Zerto support and reference the existing case.
  2. For each site that you will be migrating, make sure you upgrade the Windows ZVM to the latest Windows version of Zerto. The last version of Zerto supported on Windows is 9.7U4p2, which was released on November 28, 2023.
    • Again when upgrading, be sure to complete the upgrade on one site before moving to the next. Don’t forget to upgrade the VRAs as well.
  3. Download the Linux-based ZVMA (version 10.0U2, released November 28, 2023) from MyZerto
    • Deploy the OVF in the vCenter that has the Windows ZVM you are going to migrate to Linux.
    • You’re going to need 1 temporary IP address for the ZVMA.
    • After you delpoy the OVF, power the ZVMA on, and login using the zadmin user. The default password can be found in the Appliance Manager Menu documentation.
    • Once logged in, you will see the Appliance Manager menu.
    • Select option 2 to configure a static IP address using the temporary IP address from above.
    • Reboot when prompted
    • After the reboot, log back in and this time use option 7 from the Appliance Manager Menu and enable SSH (this is required by the migration utility).
  4. Download the Zerto Migration utility (version 10.0U2, released December 4, 2023) from MyZerto
    • Save the .zip file to the desktop of the Windows ZVM
    • Extract the contents of the zip file to the desktop of the Windows ZVM
  5. Optional, but recommended: In vCenter, take a snapshot of the Windows ZVM to give yourself a point in time you can recover to should you need to.
  6. Open an RDP connection to the ZVM open the folder that contains the migration utility.
    • Before you run the migration utility:
      • You will need 1 temporary IP address for this Windows ZVM.
    • Because the migration utility doesn’t support migration when there are two NICs on the Windows ZVM, you will need to disable the second NIC.
      • Go to the Network Connections in Windows.
      • Right-click on and disable the second NIC. This NIC will stay disabled throughout the rest of the process. The migration utility will not do anything to this second NIC.
    • Run the migration utility entering the required inputs throughout the wizard.
    • At the summary screen, un-check the box to Upgrade VRAs because the VRAs reside on the network managed by your second NIC, you won’t be able to get to them, so it’s best to wait until you’ve re-applied that second NIC on the ZVMA after the migration has been completed.
    • Once the migration utility starts to run, you will get disconnected from your RDP session. This is normal because the IP address has been changed.
    • Log back in to the Windows ZVM via RDP using the alternative IP address you provided.
    • The migration utility will still be running.
    • Exit when the migration completes.
    • If the migration succeeded, shutdown the Windows ZVM that you have just migrated. DO NOT ATTEMPT TO UNINSTALL ZERTO FROM THIS WINDOWS ZVM.
      • If the migration doesn’t succeed, the utility will actually rollback the changes. If you don’t wish to proceed, re-enable that second NIC after the original IP address is re-instated to the Windows ZVM (original IP re-instatement will be done by the migration utility).
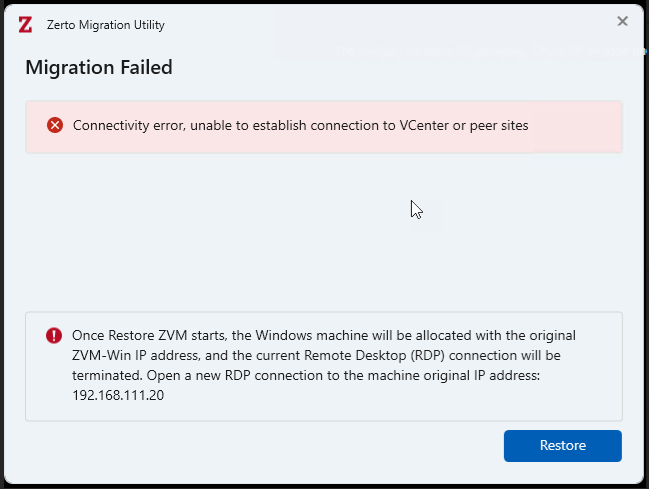
        • More importantly, if you encounter the error in the image below, it is not a show-stopper. This check can be bypassed, however, you will need to contact Zerto support to obtain the necessary fix. Unfortunately, I’m not authorized to post that fix publicly.

          Zerto Migration Utility Error - vCenter Peer Connectivity Check.  Contact support for the fix.
  7. Next, we will need to work with the Linux ZVMA, so open up either the vSphere console or a PuTTy session to the ZVMA. Remember, after successful completion of the migration utility, the IP address for the ZVMA will be the original IP address that the Windows ZVMA had.
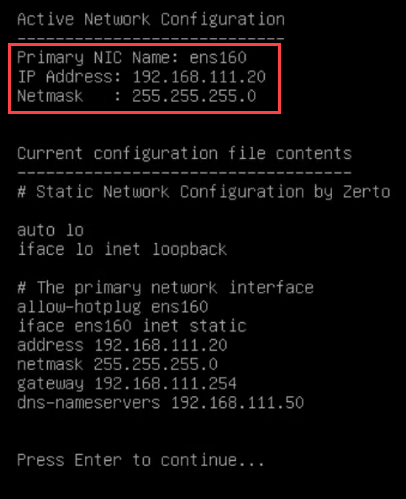
  8. Once logged onto the ZVMA, you’ll see the appliance manager menu. Use option 1 to display the current network settings. You’ll see that the primary IP address is the old IP address of the Windows ZVM. Take note of the Primary NIC Name, as this will be helpful to know when we configure the second NIC.

    ZVMA appliance manager menu
    Network details
  9. Press enter to return to the main menu.
  10. Because we have not yet added the second virtual NIC to the ZVMA, select option 5 to shutdown the appliance.
  11. Once the appliance is shutdown, edit the VM settings and add a second virtual network adapter, and put it on the network that the old Windows ZVM secondary NIC was on. Save the VM settings and power on the ZVMA.
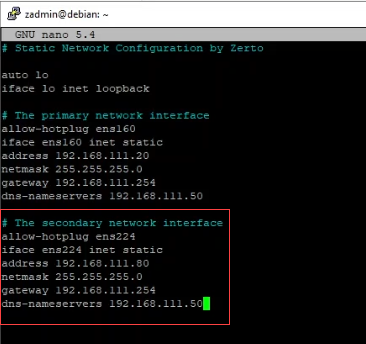
  12. Log back in to the ZVMA, and select option ‘0’ to Exit to the Shell. We will now start configuring the second NIC. The steps we will take are also listed in this KB article, so you can follow along with that to get your second NIC configured and saved. The screenshot below will show the format to use when entering the NIC settings since they are not formatted in the KB article.

    /etc/network/interfaces config file contents
  13. Once you’ve saved the configuration file and exited nano, we will configure the persistent routing required to make this new NIC route traffic to your replication network correctly (similar to what you have done on your Windows ZVM, but because it’s Linux, it’s a bit different).

    If you are watching the my video on this - you will need to skip toward the end (22:28) to watch the routing configuration section. In this write-up, this is the point where you will be configuring routing.

    While there are different ways to create the routing in Linux, the steps below will ensure they are persistent through reboots of the appliance.
  14. From the shell, we’re going to first create a routing table to use in later steps:

    sudo nano /etc/iproute2/rt_tables
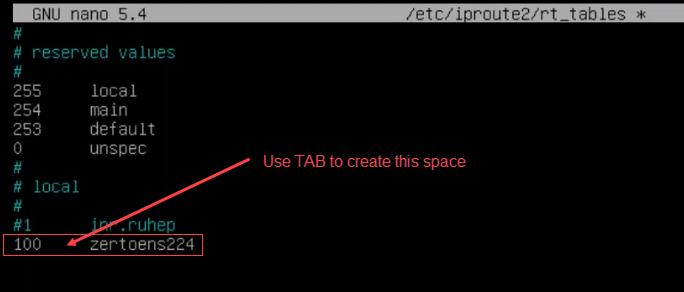
  15. In the rt_tables file, add a line to create a routing table to use. Follow the format in the image below. The number you use can be anything, but must be unique – don’t use the same number as any existing entries. The name can be anything you want it to be, just remember both the number and name, because it will be needed in the next steps.

    entry to add to rt_tables
  16. Use CTRL+O to write out (save) the file, then CTRL+X to exit nano.
  17. Now we’re going to go back in to the /etc/network/interfaces file and add our routing configuration.

    sudo nano /etc/network/interfaces
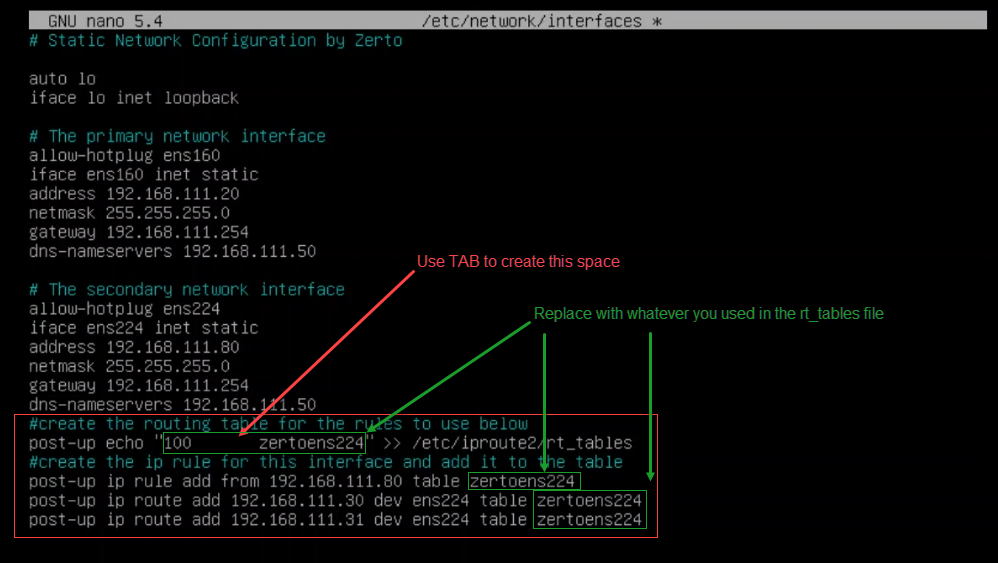
  18. Go to the end of the file and add the following lines. Replace “100 zertoens224” and any instance of “zertoens224” with whatever you used in the previous step to create the routing table.

    There’s also an image for you to reference at the end of this step:

    Use this if you want to route to specific IP addresses:

    #create the routing table on boot for the rules to use
    post-up echo "100 zertoens224" >> /etc/iproute2/rt_tables
    #create the ip rule for this interface and add it to the table
    post-up ip rule add from [your ens224 IP address] table zertoens224
    post-up ip route add [IP Address of the VRA] dev ens224 table zertoens224
    post-up ip route add [IP Address of the VRA] dev ens224 table zertoens224
    [add more lines as needed]


    Use this if you want to route to entire subnet(s) – replace [0.0.0.0/24] with your own network:

    #create the routing table on boot for the rules to use
    post-up echo "100 zertoens224" >> /etc/iproute2/rt_tables
    #create the ip rule for this interface and add it to the table
    post-up ip rule add from [your ens224 IP address] table zertoens224
    post-up ip route add [0.0.0.0/24] dev ens224 table zertoens224


    routing configuration in /etc/network/interfaces file
  19. Use CTRL+O to write out (save) the file. Use CTRL+X to exit nano.
  20. At the shell type appliance-manager to return to the appliance manager.
  21. Select option ‘4’ to reboot the ZVMA.
  22. To verify the settings, log back into the ZVMA, and select ‘1’ from the appliance manager to show the current configuration file contents for the network. You will see all the new routing entries in there.
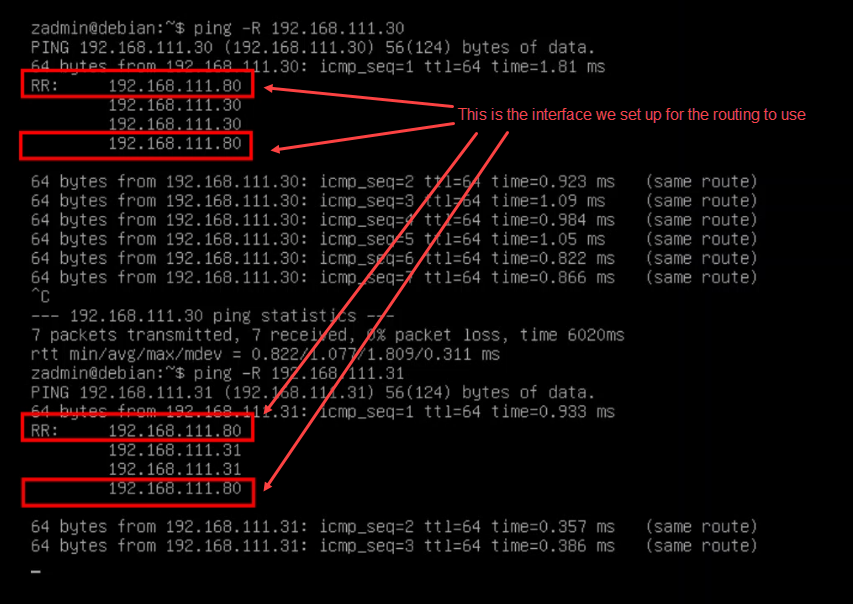
  23. To test connectivity, you can run ping -R [destination VRA IP address] from the shell and you’ll see what interface the ping goes out of and returns on (example image below).

    testing the routing configuration using ping -R
  24. You can now exit the shell and close your session with the ZVMA.
  25. Log onto the Zerto UI at https://[PrimaryIPaddressOfZVMA]

    Username: admin
    Password: admin
  26. Since this is the first time you’re logging into the Zerto UI on the ZVMA, you will be required to change the password, so set it to something appropriate for your environment or to meet your password requirements.
  27. Verify the dashboard shows everything as healthy – just note that because we just added that second NIC, it might take a few minutes for things to right themselves, so you might see some alerts regarding site connectivity. Because the primary NIC was online, it’s unlikely at this point you’d see a site connectivity alert.
  28. Go to the Setup tab, and you will notice that the VRAs all state that there is an upgrade available. At this time, you can start upgrading the VRAs.
  29. After all VRAs are upgraded, monitor Zerto to make sure things are returning to green/normal. If you see any issues, contact Zerto support and reference your support case opened in Step 1.
  30. Once everything returns to “normal” you can now turn your attention to your second site and go back to step 1 in this procedure to repeat the process until you’ve completed the migration in each environment/site.

Summary

I get it, change isn’t always welcomed, but without change and without innovation, we become stagnant and comfortable with accepting what’s “normal.” Hopefully, the past few years have changed our impression of change and what’s “normal.” I figure, since it’s also a new year, let’s meet some new challenges and overcome them clear any obstacles for the year, so we can keep moving forward!

With planning and reading up on the documentation to perform the migration from the Windows ZVM to the Linux ZVMA, the process is very straightforward. My recommendation is to gather all the pre-requisites, and verify that you meet all the version requirements prior to getting started for the most efficient route to completion. Its also helpful if you are fortunate enough to have a lab environment to go through this at least once to see how it works for yourself and document any differences in your own environment that need to be accounted for before pulling the trigger on this migration.

If you’ve performed the migration, or have any questions before you do, please leave a comment below, or in the video comments on YouTube (video below). Thanks for reading, and if you’ve found this useful or know anyone who could benefit from this, please share!

Thanks! -G

The Video

Share This:

Zerto 10 Role-based Access Controls via Keycloak

If you’re still on Zerto 9.7 or lower on the Windows Zerto Virtual Manager and have been asking for better role-based access controls (RBAC) for Zerto, then you need to get migrated over to the new Zerto Virtual Manager Appliance (ZVMA)!

About the Zerto Virtual Manager Appliance

The Linux-based Zerto Virtual Manager Appliance (ZVMA) made its debut in Zerto 9.5, and has since become the standard going forward with Zerto, as the last Windows version (of the ZVM) was 9.7. In Zerto 10, there is no Windows ZVM, so migration is now on the table and I’d highly recommend going that route to to prevent being left behind (and I will go more into detail about that in another blog post).

In addition to the underlying OS changing, came a modernization of how the ZVM has been architected. Instead of running everything as a single (or maybe a few) Windows services, Zerto has been built to run as containers on top of MicroK8s on a hardened Debian 11 virtual appliance. Please also note that because it’s Debian 11, the minimum vSphere version that supports it is vSphere 7.x.

That said – there is no separate software package to download and install; the ZVMA is now a fully-packaged OVF that you just deploy in vSphere. The best part is once it’s deployed, you’re ready to use it. This fundamental change on how Zerto has been built also introduced the ability to provide more frequent updates (quarterly) and virtually no disruption as each container can be updated independently without having to disrupt the entire functionality of the ZVM.

Now back to why you’re here…

While in the older versions of Zerto, there were some basic role-based access controls, they relied on vSphere roles, which meant that anyone who needed to log into Zerto would need to have credentials to log onto the vCenter client. This has all changed once you’ve entered the world of the Linux ZVM.

Instead of relying on vSphere permissions for each user, Zerto now has it’s own authentication services built on Keycloak (https://www.keycloak.org/), which provides you with a more secure posture when it comes to safeguarding your ability to recover from something as disruptive as a ransomware attack.

By removing the reliance on vSphere logins (which have typically been integrated to Active Directory), the chances of an elevated AD account becoming compromised will not affect Zerto’s operation because there is no dependency on those logins to get into Zerto. Not even the service account Zerto uses to manage API calls to vCenter can affect Zerto, because it’s not even managed by Zerto. While we’re on that subject, the ZVMA also supports MFA for added security. Additionally, you get to keep tighter grips on who actually has access and can log into vSphere while making sure your recovery environment stays protected/isolated.

Configure Role-based Access Controls in Zerto 10

In this section, I’ll cover what the role-based access controls looks like, what roles and permissions are involved, and how to set a user up and grant the correct roles, because when I first went through this, I didn’t find it as intuitive; so hopefully this helps if anyone reading finds themselves in a similar situation.

Note that before doing this, the assumption is that you’re already familiar with deploying the Linux Zerto Virtual Manager (OVF deployment via vCenter) and have already gone through and changed default passwords as well as paired to your vCenter. If you haven’t done that and need the information to do so, visit https://help.zerto.com for the deployment guide.

Also, this is not the guide for configuring Keycloak for any other integration such as Active Directory or Okta, for example. This is simply using accounts local to the ZVMA (in Keycloak). For other supported integration, visit the Zerto documentation at: https://help.zerto.com

Enable Roles and Permissions

Once you’ve completed the pre-requisite steps above, log onto the Zerto Management page at https://[yourZVMAIPAddress]/management. You must do this in order to leverage the Zerto Roles and Permissions through Keycloak.

  1. In the management interface, click on Security & RBAC on the left navigation bar.
  2. Enable the radio button for “No Access” under Roles & Permissions

    Enabling Roles & Permissions

Create a Keycloak User and Configure Permissions

  1. Log onto the Keycloak administration UI at https://[yourZVMAIPAddress]/auth.
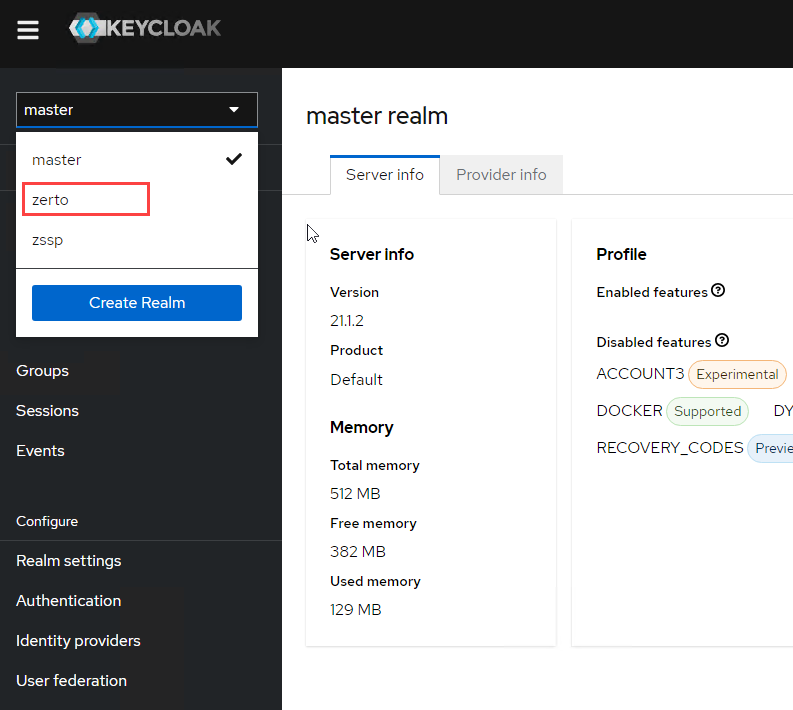
  2. Once logged in, click on the realm dropdown menu and switch from master to zerto.

    Changing the realm to zerto realm in Keycloak
  3. Click on Users on the left navigation bar, and then click the Add user button.

    Add a Keycloak user to the zerto realm
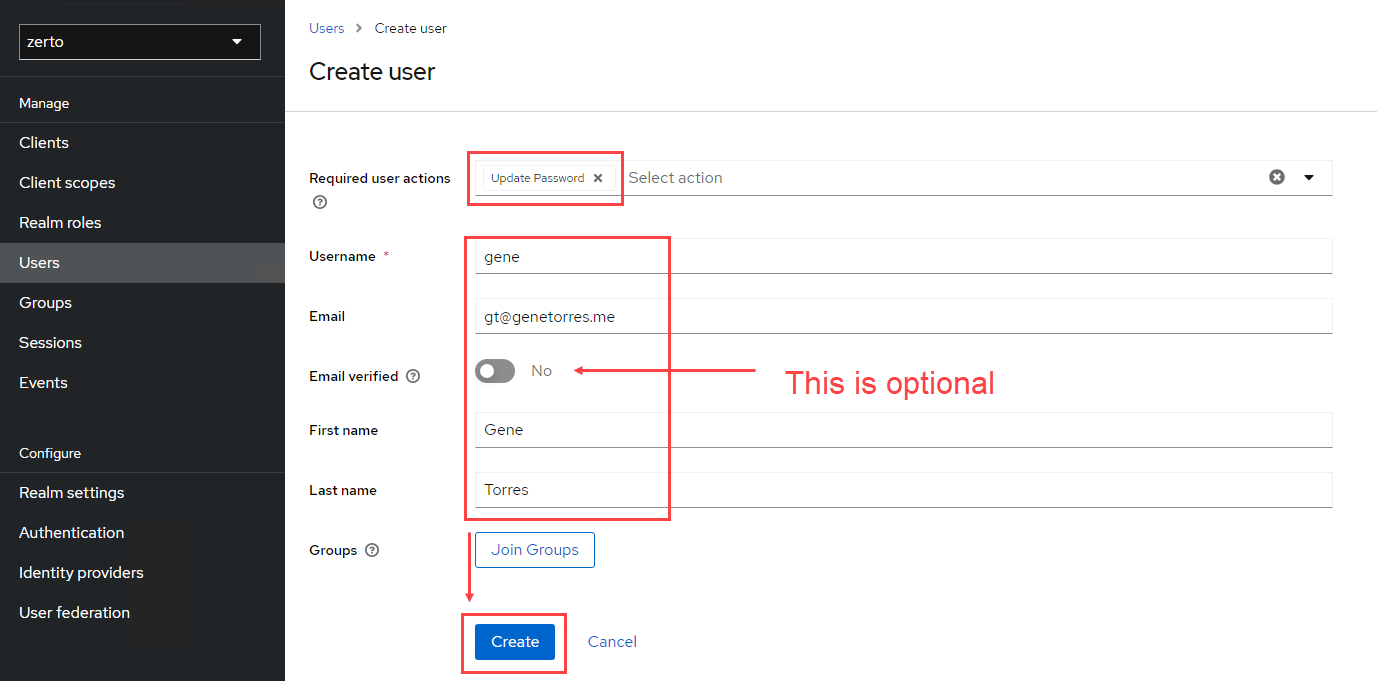
  4. In the create user window, set actions as needed, such as update password (change password upon initial logon) or any other options you require. Click Create when done.

    Keycloak create user dialog
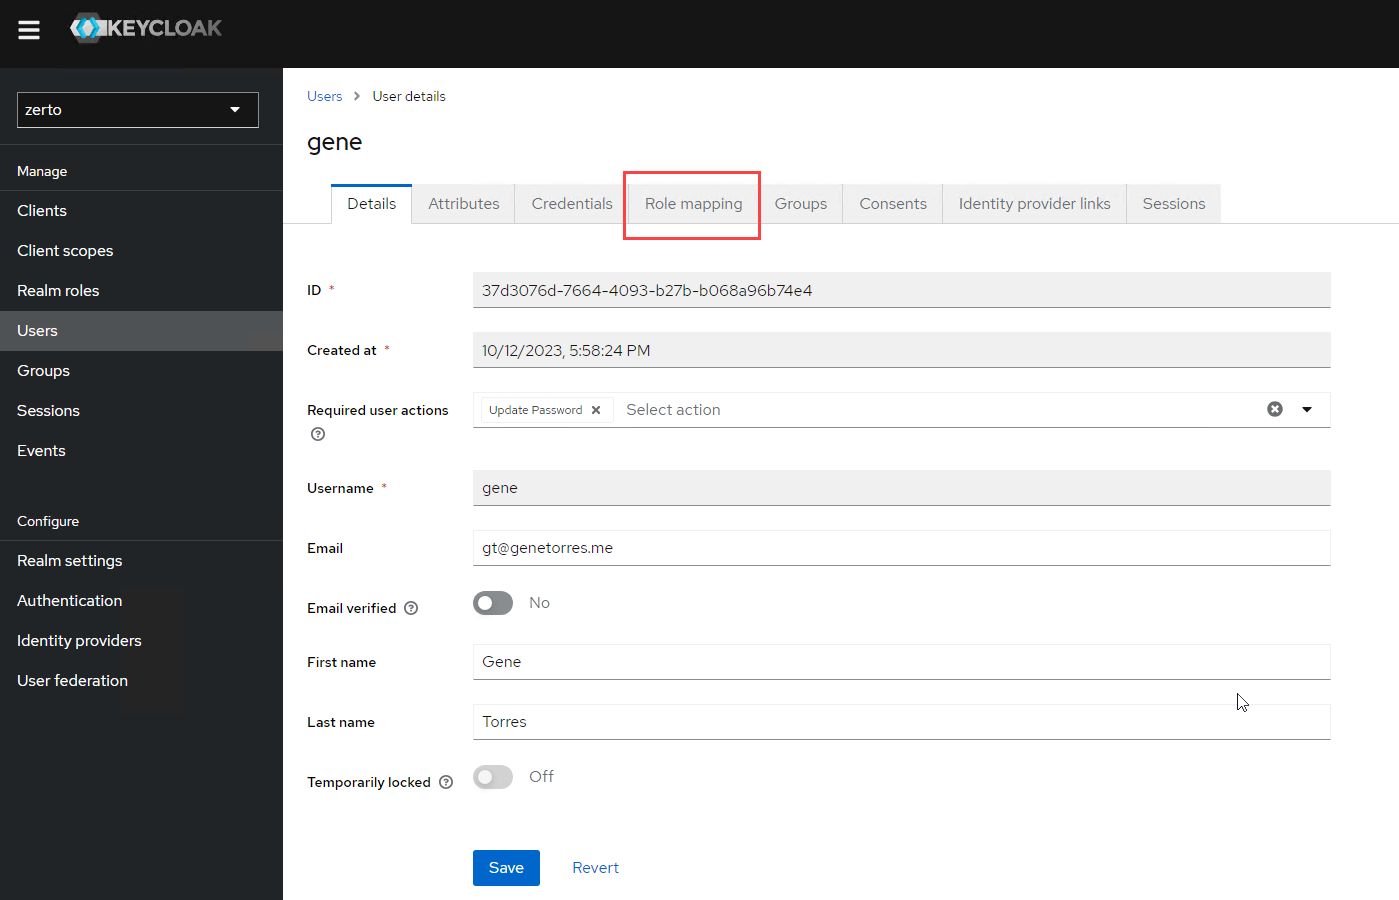
  5. You should now see the user details and several tabs across the top. Click on Role mapping.

    Role mapping in user details in Keycloak
  6. Click the Assign role button

    Assign role in Keycloak
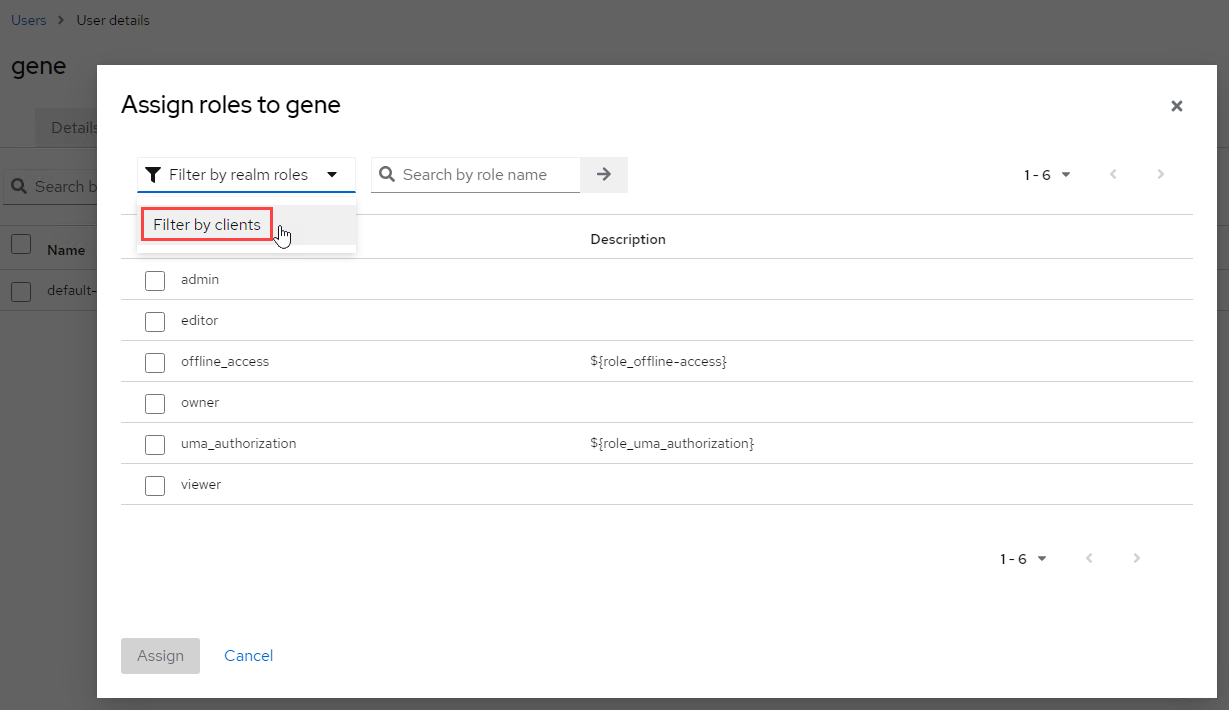
  7. At first glance, don’t worry if you don’t see any Zerto roles. (This is what got me and wasn’t clearly identified in the documentation). Click on the filter dropdown menu on the top left, and select Filter by clients.

    Filter by clients selection in Keycloak
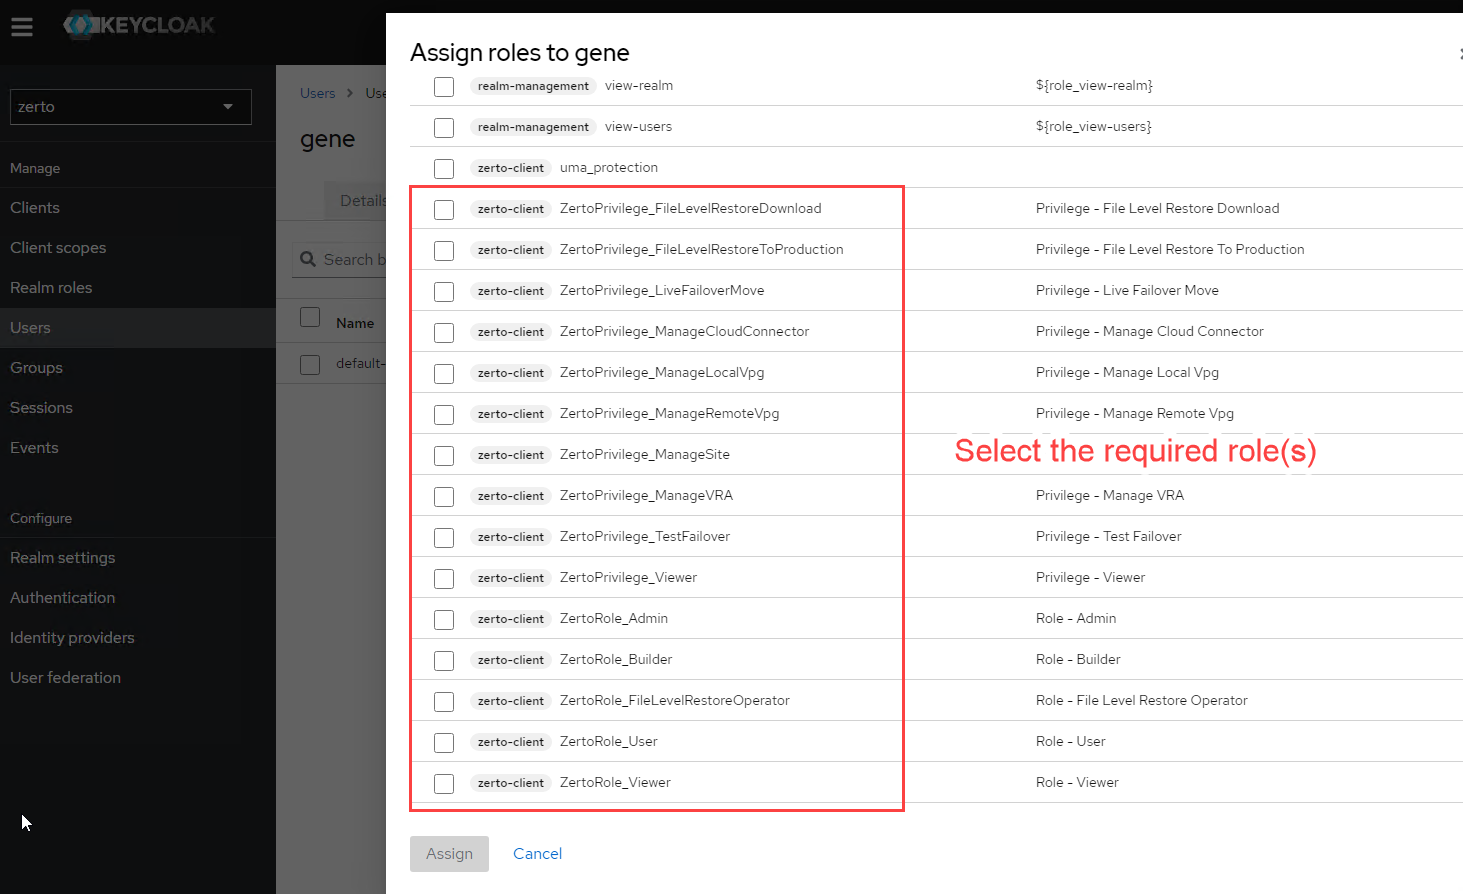
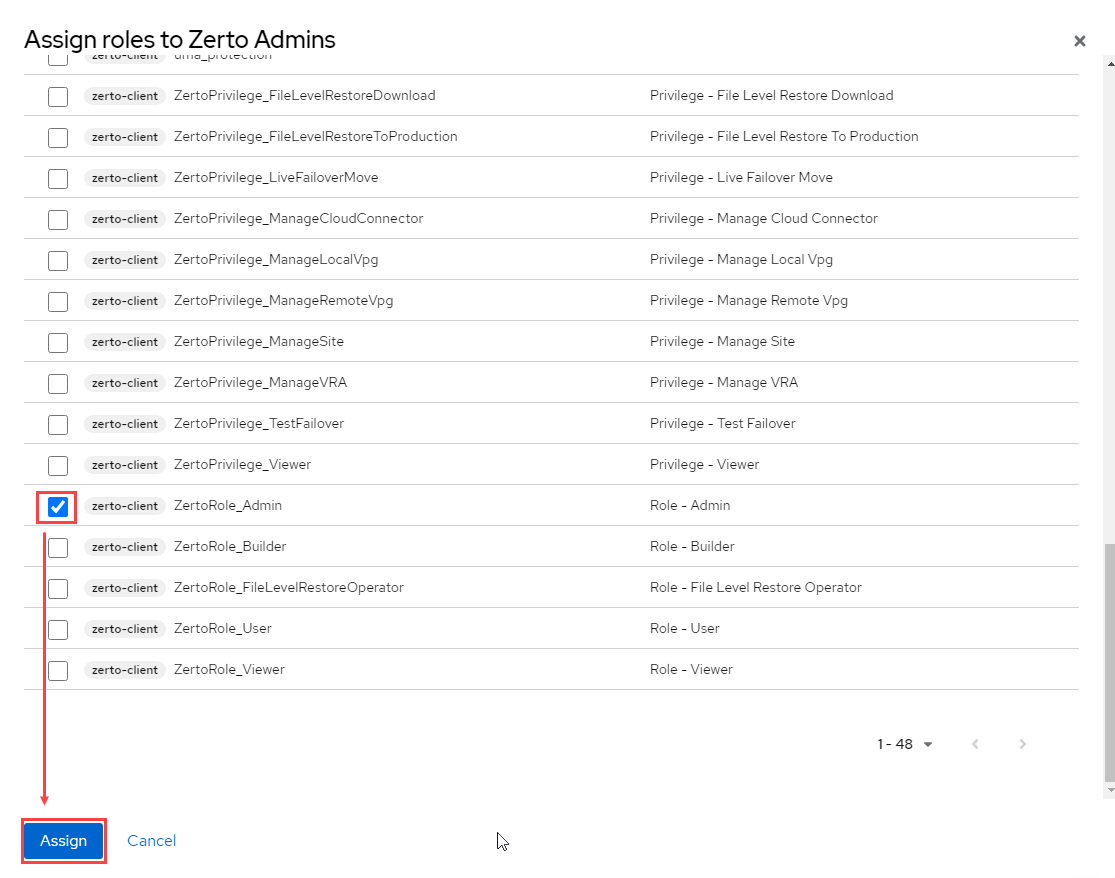
  8. You will now see a full list and a section tagged zerto-client. From that section, select the required roles for your user, and click the Assign button at the bottom.

    Zerto roles listed in Keycloak
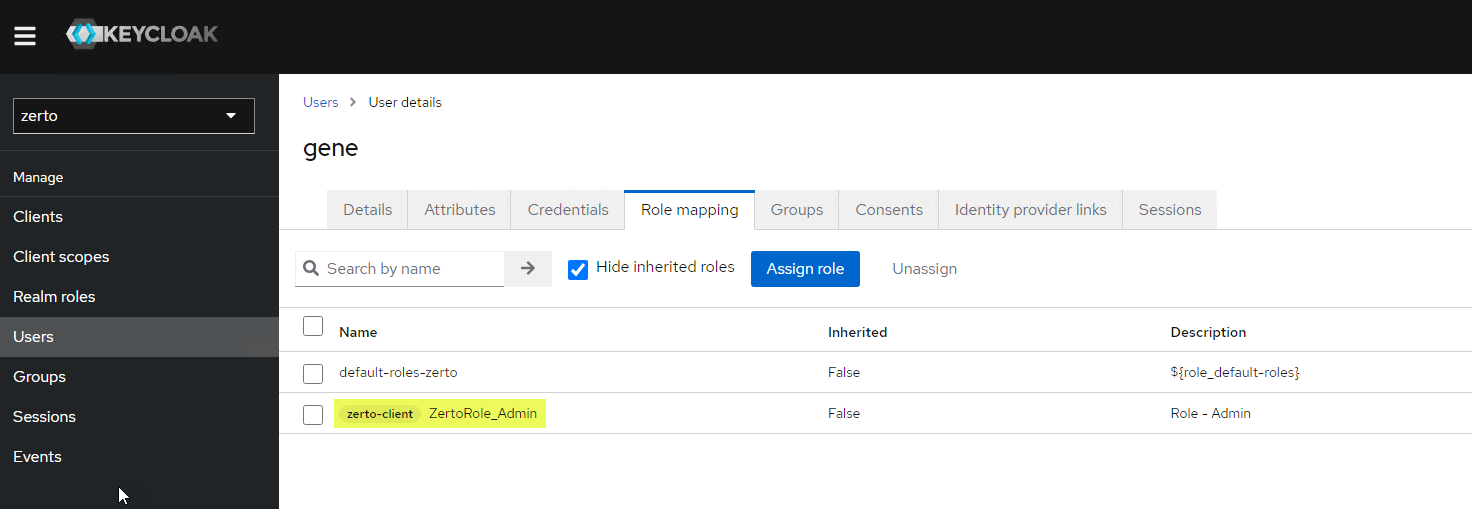
  9. You will now see the role(s) assigned to the user.

    Assigned role to user in Keycloak
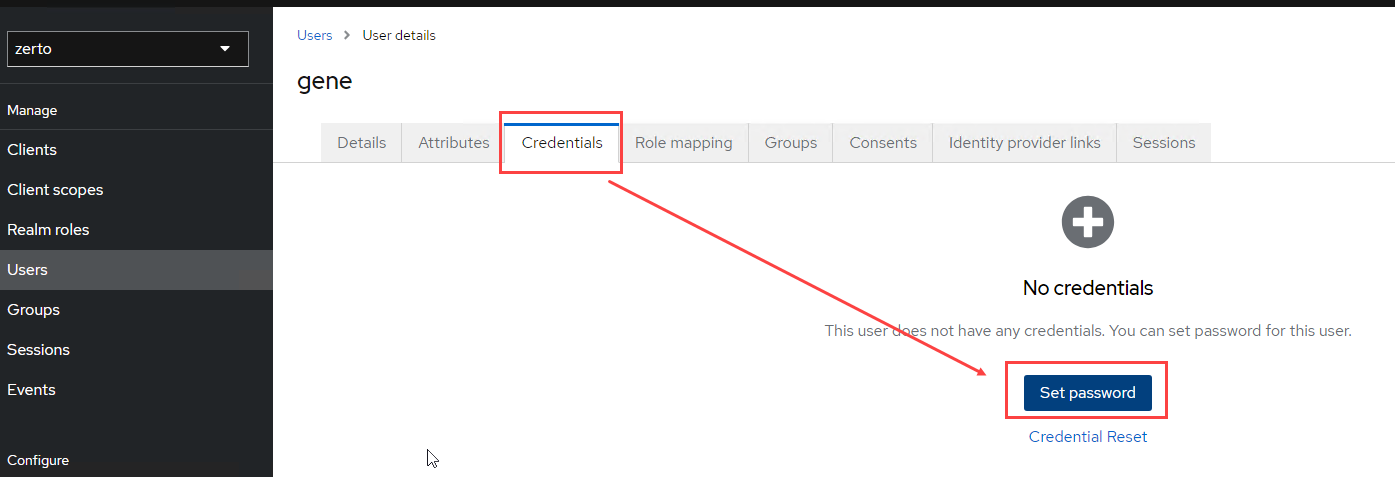
  10. Finally, before the user can try logging in, click on the Credentials tab at the top, and set the password.

    Set the user's password in Keycloak

Managing Zerto Roles by Using Groups

Maybe you don’t want to manage roles and permissions on a per-user basis, especially at scale. Besides, it’s a best practice to use groups for role management so you can simply add users to them down the road without having to repeat the steps above for each user.

So, if your preferred method to manage roles is by group, you can skip the steps above, and follow these steps and be on your way. Just remember, when you set users up, you still have to set the initial password and other options before they can login.
  1. If you’re not already logged into Keycloak, login at https://[yourZVMAIPAddress]/auth.
  2. Change from the master realm (dropdown on the top left) to the zerto realm.
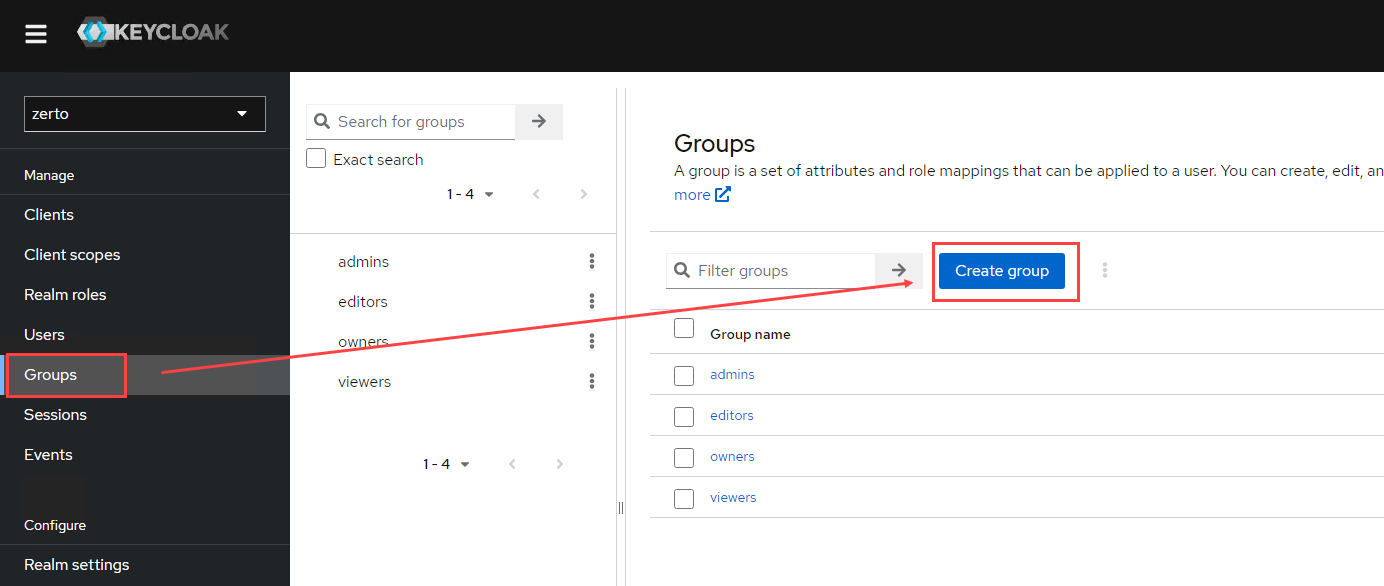
  3. Click on Groups under the Manage section on the left
  4. Click the Create group button.

    Create a group in Keycloak
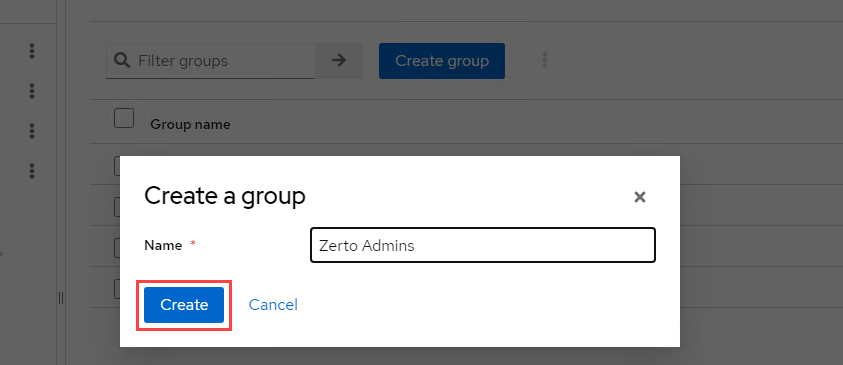
  5. Provide a name for your group and click Create

    Create a group in Keycloak
  6. Click on the group you just created.

    Group Created in Keycloak
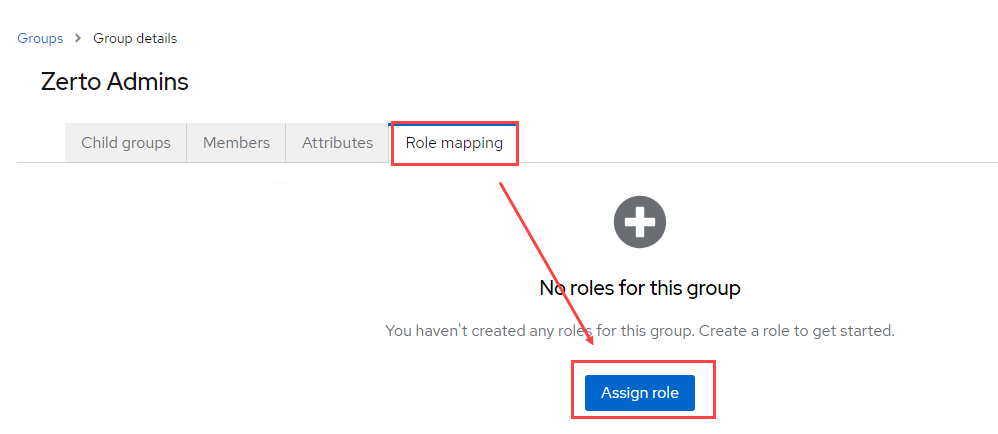
  7. Click on the Role mapping tab at the top, and click Assign Role

    Assign Role to group in Keycloak
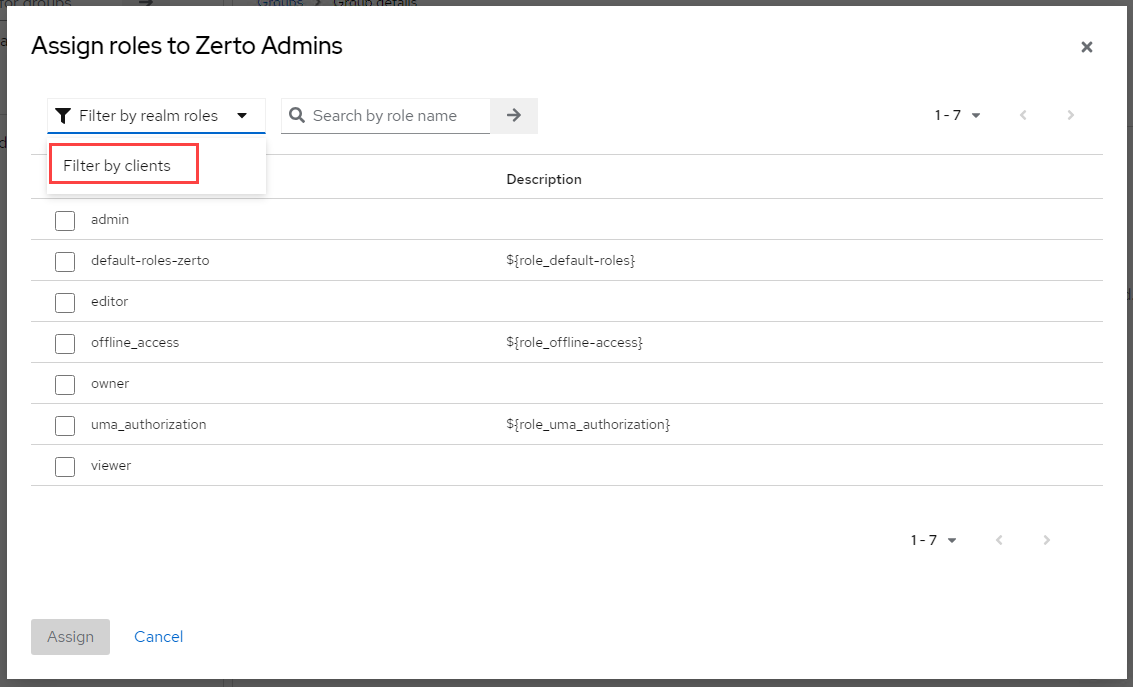
  8. Click on the filter dropdown and select Filter by clients.

    Filter by clients in Keycloak
  9. Scroll down the list to the area tagged zerto-client and select the role(s) you wish to apply to the group you just created. When done, click Assign.

    zerto-client roles in Keycloak
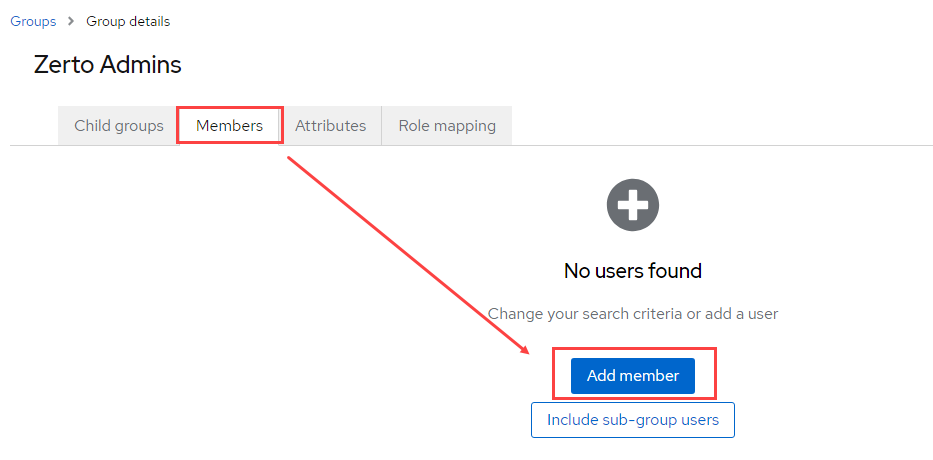
  10. Now, add members to the group (if you have previously created users – otherwise, create users and then add them to the group). Click on the Members tab, and click Add member.

    Add members to group in Keycloak
  11. Select the users to add to the group as members, and click the Add button to finish.

Summary

Managing Zerto users in Zerto 10 via Keycloak doesn’t have to be difficult. It’s quite easy, actually, especially when assigning roles at the group level. By assigning different roles to different users depending on what they need access to be able to do, you’re not only exercising better access controls with Zerto, but you are also providing better security, able to create responsibilities for others without giving them any vSphere permissions, and also reducing your own operational/administrative overhead.

Now the question is whether or not to integrate with Active Directory – that is totally up to you. I’m going to leave you with this piece of advice though. Zerto 10 was built with Keycloak to isolate authentication and provide better security when it comes to recovering from cyberthreats. By choosing not to integrate with AD, there is no other way for bad actors to access Zerto, therefore giving you a better chance at quickly turning the tables on them and recovering to a point in time before any malware/ransomware took over. Zerto 10 also introduced in-line encryption detection, so your protected workloads will have a built-in early warning system, so you’ll be able to not only react faster, but be notified before all hell breaks loose.

Let me know your thoughts in the comments, and feel free to ask me any questions about what was shared here.

I will be working on additional Zerto 10 content, so stay tuned!

Share This:

Update: Migrate VM from Hyper-V to vSphere with Pre-Installed VMware Tools (vSphere 7 and 8 Edition)

I had previously written a post in response to a problem a customer was facing with migrating from Microsoft Hyper-V to VM vSphere.

You can find that previous post here: Migrate VM from Hyper-V to vSphere with Pre-Installed VMware Tools

I am writing this as a follow-up, because while the workaround I documented still works (for vSphere 6.x VMware Tools), something with the VMware Tools had changed when vSphere 7 went GA.  Several attempts to manipulate the new .msi file proved to not work, and in the flurry of life, I hadn’t had a chance to really sit down and figure it out.  So, the workaround for “now” was to install the working 6.x version, get migrated, and then upgrade VMware Tools; and that still works, by the way.

Then one day, I was going through my blog comments someone had responded, saying they’d figured it out.  @Chris, thank you very much for sharing your find!

So, since vSphere 8 recently went GA, I figured I’d also test this procedure on VMware Tools 12, and I’m happy to say, it also works.  So here’s what’s changed from the previous post when you’re trying to do the same using VMware Tools 11 (vSphere 7) or VMware Tools 12 (vSphere 8).

What You Will Need

Before you can get started, you’ll need to get a few things.  For details on how to get these requirements, refer to the original post mentioned above. 

  • Microsoft Orca (allows you to edit .msi files) – This is part of the Windows SDK, so if you don’t have it, see the post referenced above for the link to download as well as the procedure to only install Orca.
  • VMware Tools 11 or 12
  • Visual C++ 2017 Redistributable (if you’re following the procedure to get the VMware Tools from your own system, be sure to grab the vcredist_x64.exe)

If you would like to skip editing the VMware Tools MSI, you can download already “jailbroken” versions below. 

Note: These worked in the testing I performed, and I will not be making any changes to them, supporting them, or be responsible for what you download off of the Internet.  To be absolutely sure you have complete control over what you install in your environment (ESPECIALLY IN PRODUCTION), download from trusted sources and perform the edit to the MSI yourself.

Edit VMware Tools MSI with Orca (for VMware Tools 11 and VMware Tools 12)

  1. Launch Orca
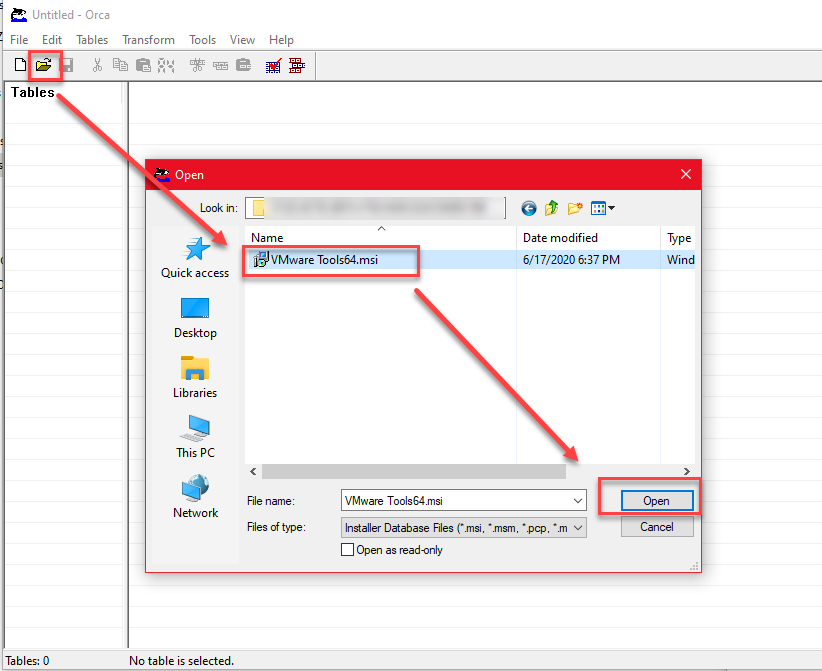
  2. Click Open, and browse to where you saved VMware Tools64.msi, select it, and click Open.

    Launch Orca and Open VMware Tools MSI

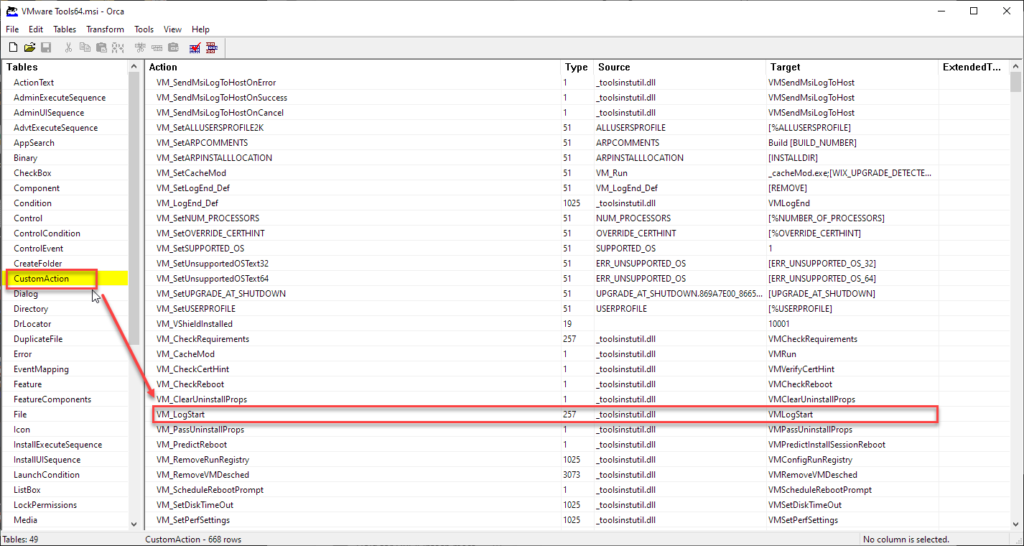
  3. In the left window pane labeled Tables, scroll down and click on CustomAction.
  4. In the right window pane, look for the line that says VM_LogStart, right-click it, and select Drop Row.
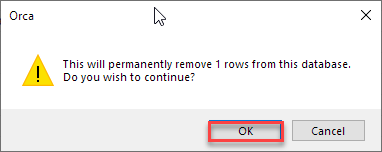
  5. When prompted, click OK to confirm.


  6. In the left window pane labeled Tables, scroll down and click on InstallUISequence.
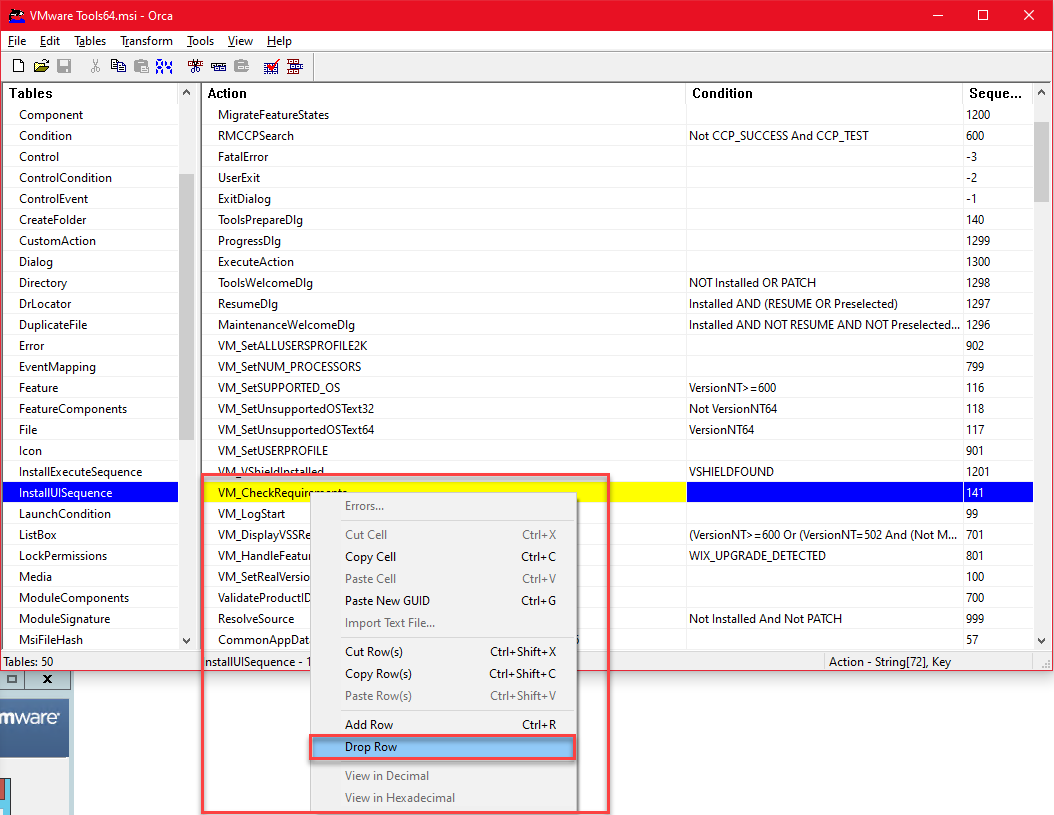
  7. In the right window pane, look for the line that says VM_CheckRequirements. Right-click on this entry, and select Drop Row.
  8. When prompted, click OK to confirm.

    InstallUISequence > VM_CheckRequirements > Drop Row

  9. Click save on the toolbar, and close the MSI file. You can also exit Orca now.

Next Steps

Now that you’ve successfully edited the MSI file to be able to be installed on your Hyper-V Windows VMs, copy the installers (don’t forget vcredist_x64.exe) and install.  When it asks for a reboot, you can safely ignore it, because once the VM boots up in vSphere, it would have already taken care of that for you.  (One less disruption to your production Hyper-V virtual machine).

Thanks for reading! GLHF

If you found this useful and know of any others looking to do the same, please share and comment.  I’d like to hear if/how it’s helped you out! If you’d like to reach me on social media, you can also follow me and DM me on Twitter @eugenejtorres

Share This:

Reduce the Cost of Backup Storage with Zerto 8.5 and Amazon S3

When Zerto 7.0 was released with Long-Term Retention, it was only the beginning of the journey to provide what feels like traditional data protection to meet compliance/regulations for data retention in addition to the 30-day short term journal that Zerto uses for blazing fast recovery.

A few versions later, Zerto (8.5) has expanded that “local repository” to include “remote repositories” in the public cloud. Today it’s Azure blob (hot/cold), and AWS S3 (with support for Standard S3, Standard S3-IA, or Standard One Zone-IA).

And to demonstrate how to do it, I’ve created some content, which includes video and a document that walks you through the process. In the video, I even go as far as running a retention job (backup) to AWS S3, and restoring data from S3 to test the recovery experience.

The published whitepaper can be found here: https://www.zerto.com/page/deploy-configure-zerto-long-term-retention-amazon-s3/

Update: I have just completed testing with S3 Bucket Encryption using Amazon S3 key (SSE-E3), and the solution works without any changes to the IAM policy (https://github.com/gjvtorres/Zerto-LTR-IAM-Policy). There are two methods to encrypt the S3 bucket, with Amazon S3 key as the first option (recommended), and AWS Key Management Service key (SSE-KMS) as the other. I suggest taking a look at the following AWS document that provides pricing examples of both methods. According to what I’ve found, you can cut cost by up to 99% by using the Amazon S3 key. So go ahead, give it a read!

https://aws.amazon.com/kms/pricing/

Now for the fun stuff…

The first option I have is the YouTube video below (or you can watch on my YouTube channel) .

I’ve also started branching out to live streaming of some of the work I’m doing on my Twitch channel.

If you find the information useful, I’d really appreciate a follow on both platforms, and hey, enable the notifications so when I post new content or go live, you can get notified and participate. I’m always working on producing new content, and feedback is definitely helpful to make sure I’m doing something that is beneficial for the community.

So, take a look, and let me know what you think. Please share, because information’s only useful if those who are looking for it are made aware.

Cheers!

Share This:

Migrate VM from Hyper-V to vSphere with Pre-Installed VMware Tools

Note: This post is written specifically for VMware Tools 10. If you’re looking for a procedure that works with VMware Tools 11 or VMware Tools 12, you can see my latest blog post here.

One of things I rarely get to do is work with Hyper-V, however, I’m starting to get more exposure to it as I encounter more organizations that are either running all Hyper-V or are doing some type of migration between Hyper-V and vSphere.

One of the biggest challenges that I’ve both heard and encountered in my own testing is really around drivers. If you’re making the move from Hyper-V to vSphere, you’re going to have to figure out how to get your network settings migrated along with the virtual machines, whether manually or in a more automated way.

And yes! You can definitely use Zerto as the migration vehicle and take advantage of benefits like:

  • Non-disruptive replication
  • Automatic conversion of .vhdx to .vmdk (and vice versa)
  • Non-disruptive testing before migrating
  • Boot Order
  • Re-IP

For re-IP operations , Zerto requires that VMware Tools is installed running on the VMs you want to protect.

Zerto Administration Guide for vSphere

There are two ways to accomplish a cross-hypervisor migration or failover with Zerto.

Installing the VMware Tools is going to be required either way. If you choose to install the VMware Tools before migrating or protecting, you are going to get much better results.

Post-installation of the VMware Tools will prevent the capability to automatically re-IP or even keep the existing network settings, therefore, you will end up having to hand-IP every VM you migrate/failover, which seriously cuts into any established recovery time objective (RTO) and leaves more room for human error.

Overview

We will walk through what you need to do in order to get VMware Tools prepared for installation on a Hyper-V virtual machine. After that, there is a video at the end of this post that will pick demonstrate successful pre-installation of VMware Tools, replication, and migration of a VM from Hyper-V.

At the time of this writing, the versions of Zerto, Hyper-V, and vSphere that I have performed the steps that follow are:

  • Zerto 8.0
  • Hyper-V 2016
  • vSphere 6.7 (VMware Tools from 6.7 as well)

I also wanted to give a shout out to Justin Paul, who had written a similar blog post about this same subject back in 2018. You can find his original post here: https://bit.ly/3dfWKdm

Pre-Requisites

Like a recipe, you’re going to need a few things:

VMware Tools

You will need to obtain a copy of the VMware Tools, and it must be a version supported by your version of vSphere. You can use this handy >>VMware version mapping file<< to see what version of the tools you’d need.

You can get the tools package by mounting the VMware Tools ISO to any virtual machine in your vSphere environment, browsing the virtual CD-ROM, and copying all the files to your desktop. If you don’t have an environment available, you can also >>download the installer<< straight from VMware (requires a My VMware account).

Since you only need a few files from the installer package, start the installer on your desktop and wait for the welcome screen to load. Once that screen loads, if you’re on a physical machine (laptop, PC, etc…), you’re going to get a pop-up stating that you can only install VMware Tools inside a virtual machine. DO NOT dismiss this pop-up just yet.

  1. Go to Start > Run and type in %TEMP% , the press Enter.
  2. Look for a folder that follows this naming convention {VVVVVVVV-WWWW-XXXX-YYYY-ZZZZZZZZZZZZZ} followed by “-setup” appended to it and open it.

    Open this folder and copy the 3 files out of it to your desktop.
  3. Copy the following 3 files to a folder on your desktop: vcredist_x64.exe, vcredist_x86.exe, and VMware Tools64.msi

    3 Required Files to Copy
  4. Once you’ve saved the files somewhere else, you can now dismiss the popup and exit the VMware Tools installer.

Microsoft Orca

Microsoft Orca is a database table editor that can be used for creating and editing Windows installer packages. We’re going to be using it to update the VMware Tools MSI file we just extracted in the previous steps, to allow it to be installed within a Hyper-V virtual machine.

Orca is part of the Windows SDK that can be downloaded from Microsoft (https://bit.ly/3d7aWoZ). Download the installer, and not the ISO (it’s easier to get exactly what you want this way).

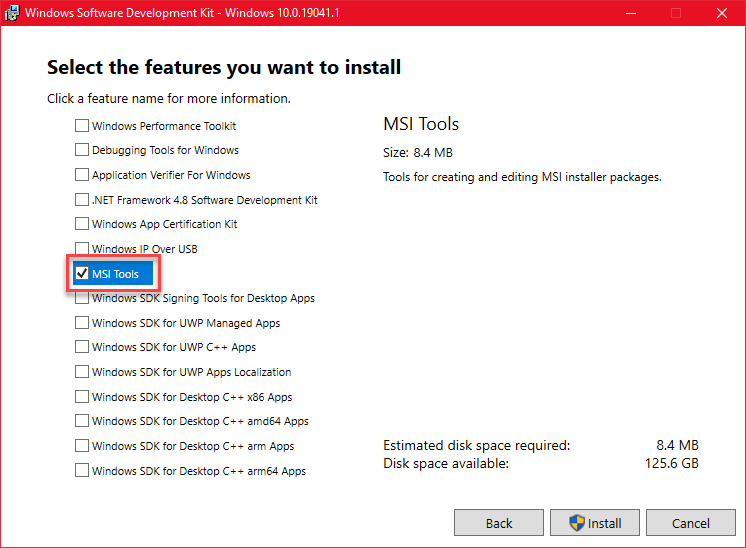
Run the installer and when you get to the screen where you’ll need to Select the features you want to install, select only MSI tools and complete the installation.

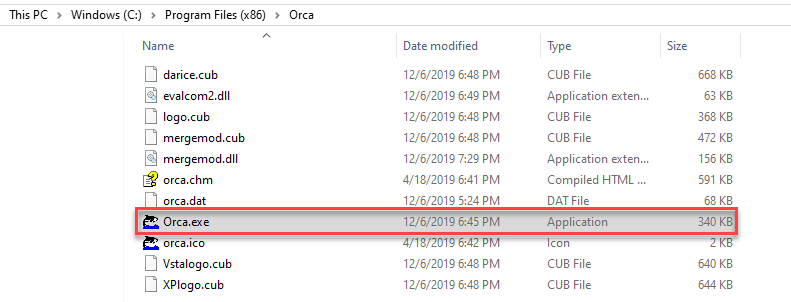
After installation is completed, you can search your start menu for “orca” or browse to where it was installed to and launch Orca.

Edit VMware Tools MSI with Orca

Now that we’ve got the necessary files we need, and Orca installed, we’re going to need to edit the VMware Tools MSI to remove an installer pre-check that prevents installation on any other platform than vSphere.

  1. Launch Orca
  2. Click Open, and browse to where you saved VMware Tools64.msi, select it, and click Open.

    Launch Orca and Open VMware Tools MSI
  3. In the left window pane labeled Tables, scroll down and click on InstallUISequence.
  4. In the right window pane, look for the line that says VM_CheckRequirements. Right-click on this entry, and select Drop Row.

    InstallUISequence srcset= VM_CheckRequirements > Drop Row”>
  5. Click save on the toolbar, and close the MSI file. You can also exit Orca now.

What next?

I’ve made you read all the way down to here to tell you that if you want to skip the previous steps and are looking to do this for vSphere 6.7, I have a copy of the MSI that is ready for installation on a Hyper-V virtual machine. If you need it, send me a message on Twitter: @eugenejtorres

Now that you’ve got an unrestricted copy of the VMware Tools MSI package. Copy the VMware Tools MSI along with the vc_redist(x86/x64) installers to your target Hyper-V VMs (or a network share they can all reach), and start installing.

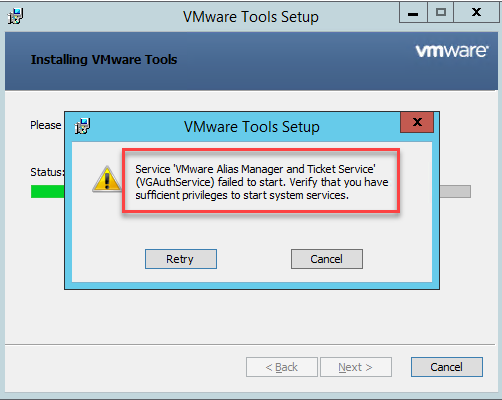
Important: When installing VMware Tools on the Hyper-V virtual machine, you may get the following error:

If you receive the error above, it means you’re missing Microsoft Visual C++ 2017 Redistributable (x64) on that VM.

If this is the case, click cancel and exit the VMware Tools installer. Run the vcredist_x64.exe installer that you copied earlier, and then retry the VMware Tools Installer.

Demo

Since you’ve gotten this far, the next step is to test to validate the procedure. Take a look at the video below to see what migration via Zerto looks like after you’ve taken the steps above.

If you have any questions or found this helpful, please comment. If you know someone that needs to see this, please share and socialize! Thanks for reading!

Share This:

How To: Migrate Windows Server 2003 to Azure via Zerto, Easily

So since Microsoft has officially ended extended support for Windows Server on July 15, 2015, that means that you may not be able to get support or any software updates. While many enterprises are working towards being able to migrate applications to more current versions of Windows, alongside initiatives to adopt more cloud services; being able to migrate the deprecated OS to Azure is an option to enable that strategy and provide a place for those applications to run in the meantime.

Be aware though that although Microsoft support (read this) may be able to help you troubleshoot running Windows Server 2003 in Azure, that doesn’t necessarily mean they will support the OS. That said, if you are running vSphere on-premises and still wish to get these legacy systems out of your data center and into Azure, keep reading and I’ll show you how to do it with Zerto.

Please note that I’ve only tested this with the 64-bit version of the OS (Windows Server 2003 R2). EDIT: this has also been verified to work on the 32-bit version of the OS – Thanks Frank!)

The Other Options…

While the next options are totally doable, think about the amount of time involved, especially if you have to migrate VMs at scale. Once you’re done taking a look at these procedures, head to the next section. Trust me, it can be done more easily and efficiently.

  • Migrate your VMs from VMware to Hyper-V
    • … Then migrate them to Azure. Yes, it’s an option, but from what I’ve read, it’s really just so you can get the Hyper-V Integration Services onto the VM before you move it to Azure. From there, you’ll need to manually upload the VHDs to Azure using the command line, followed by creating instances and mounting them to the disks. Wait – there’s got to be a better way, right?
  • Why migrate when you can just do all the work from vSphere, run a bunch of powershell code, hack the registry, convert the disk to VHD, upload, etc… and then rinse and repeat for 10’s or 100’s of servers?
    • While this is another way to do it, take a look at the procedure and let me know if you would want to go through all that for even JUST ONE VM?!
  • Nested Virtualization in Azure
    • Here’s another way to do it, which I can see working, however, you’re talking about nesting a virtual environment in the cloud and perhaps run production that way? While even if you have Zerto you can technically do this, there would have to be a lot of consideration that goes in to this… and likely headache.

Before You Start

Before you start walking through the steps below, this how-to assumes:

  1. You are running the latest version of Zerto at each site.
  2. You have already paired your Azure ZCA (Zerto Cloud Appliance) to your on-premises ZVM (Zerto Virtual Manager)
  3. You already know how to create a VPG in Zerto to replicate the workload(s) to your Azure subscription.

Understand that while this may work, this solution will not be supported by Zerto, this how-to is solely written by me, and I have tested and found this to work. It’s up to you to test it.

Additionally, this is likely not going to get any support from Microsoft, so you should test this procedure on your own and get familiar with it.

This does require you to download files to install (if you don’t have a Hyper-V environment), so although I have provided a download link below, you are responsible for ensuring that you are following security policies, best practices, and requirements whenever downloading files from the internet. Please do the right thing and be sure to scan any files you download that don’t come directly from the manufacturer.

Finally – yeah, you should really test it to make sure it works for you.

Migrating Legacy OS Using Zerto

Alright, you’ve made it this far, and now you want to know how I ended up getting a Windows Server 2003 R2 VM from vSphere to Azure with a few simple steps.

Step 1: Prepare the VM(s)

First of all, you will need to download the Hyper-V Integration Services (think of them as VMware Tools, but for Hyper-V, which will contain the proper drivers for the VM to function in Azure).

I highly suggest you obtain the file directly from Microsoft if at all possible, or from a trustworthy source. At the least, deploy a Hyper-V server and extract the installer from it yourself.

If you have no way to get the installer files for the Hyper-V Integration Services, you can download at your own risk from here. It is the exact same copy I used in my testing, and will work with Windows Server 2003 R2.

  1. Obtain the Hyper-V Integration Services ISO file. (hint: look above)
  2. Once downloaded, you can mount the ISO to the target VM and explore the contents. (don’t run it, because it will not allow you to run the tools installation on a VMware-hosted workload).
  3. Extract the Support folder and all of it’s contents to the root of C: or somewhere easily accessible.
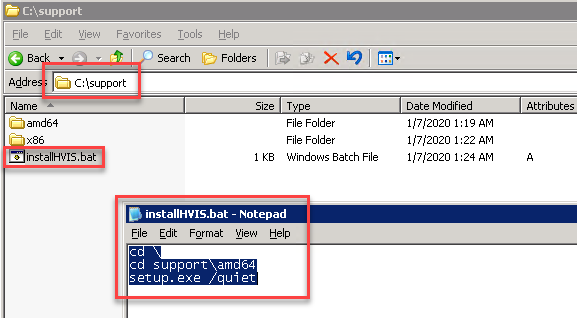
  4. Create a windows batch file (.bat) in the support folder that you have just extracted to your VM. I put the folder in the root of C:, so just be aware that I am working with the C:\Support folder on my system.
  5. For the contents of the batch file, change directory to the C:\Support\amd64 folder (use the x86 folder if on 32-bit), then on the next line type: setup.exe /quiet (see example below). The /quiet switch is very important, because you will need this to run without any intervention.

    Example of batch file contents and folder path
  6. Save the batch file.
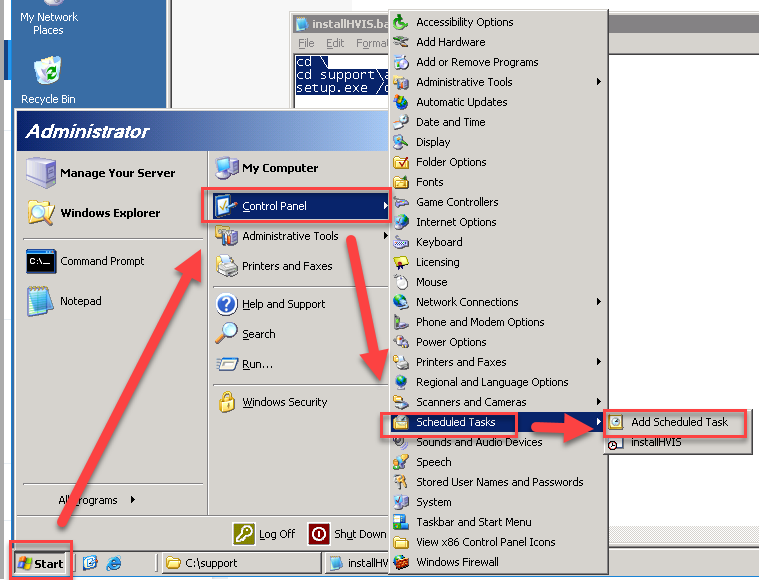
  7. On the same VM, go to Control Panel > Scheduled Tasks > Add Scheduled Task. Doing so will open the Scheduled Task Wizard.

    Create a scheduled task
  8. Click Next
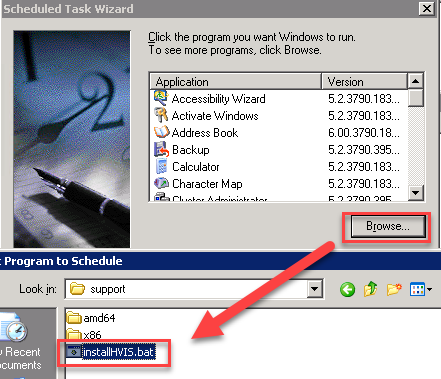
  9. Click browse and locate the batch file you created in step 5-6, and click open

    Browse to the batch file
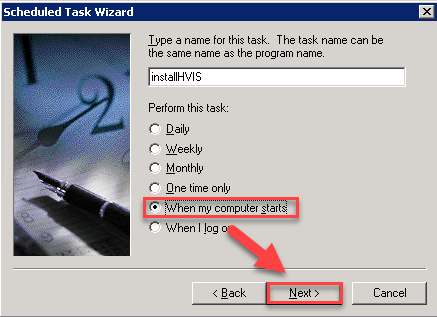
  10. Select when my computer starts, and click next

    Select when my computer starts
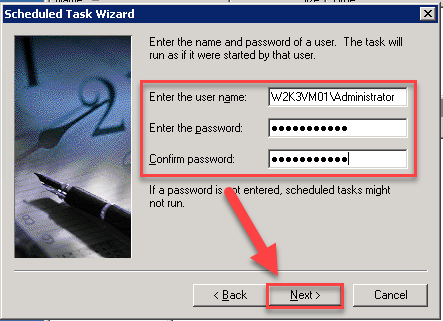
  11. Enter local administrator credentials (will be required because you will not initially have network connectivity), and click next

    enter admin credentials
  12. Click Finish

Step 2: Create a VPG in Zerto

The previous steps will now have your system prepared to start replicating to Azure. Furthermore, what we just did, basically will allow the Hyper-V Integration Services to install on the Azure instance upon boot, therefore enabling network access to manage it. It’s that simple.

Create the VPG (Virtual Protection Group) in Zerto that contains the Windows Server 2003 R2 VM(s) that you’ve prepped, and for your replication target, select your Microsoft Azure site.

If you need to learn how to create a VPG in Zerto, please refer to the vSphere Administration Guide – Zerto Virtual Manager documentation.

Step 3: Run a Failover Test for the VPG

Once your VPG is in a “Meeting SLA” state, you’re ready to start testing in Azure before you actually execute the migration, to ensure that the VM(s) will boot and be available.

Using the Zerto Failover Test operation will allow you to keep the systems running back on-premises, meanwhile booting them up in Azure for testing to get your results before you actually perform the Move operation to migrate them to their new home.

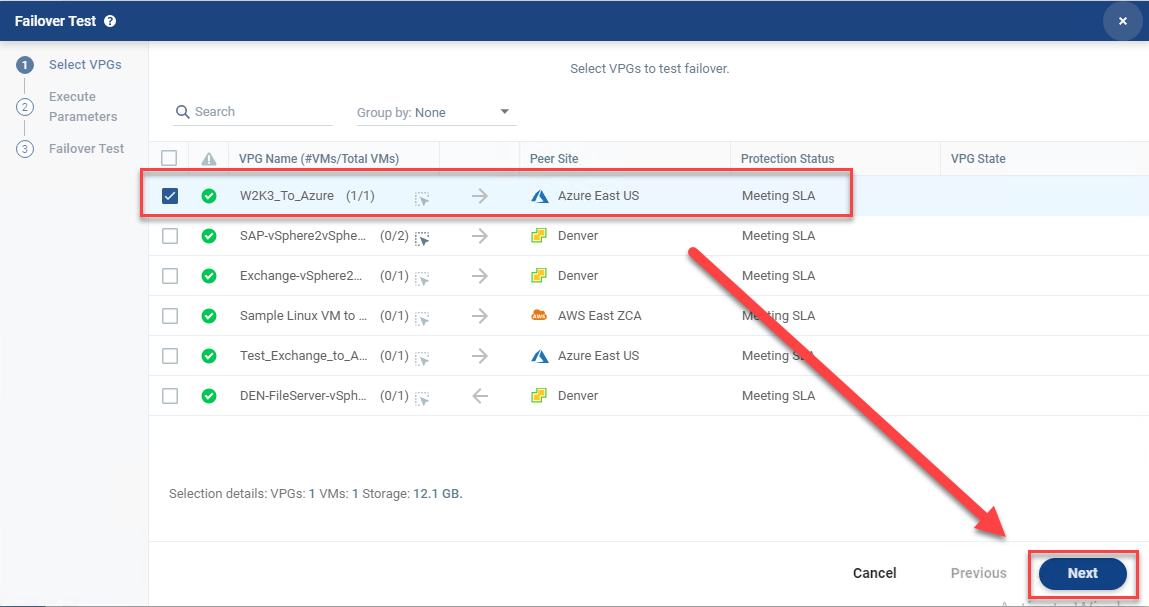
  1. In Zerto, select the VPG that contains the VM(s) you want to test in Azure (use the checkbox) and click the Test button.

    Select VPG, click Test
  2. Validate the VPG is still selected, and click Next.

    Validate VPG, click Next
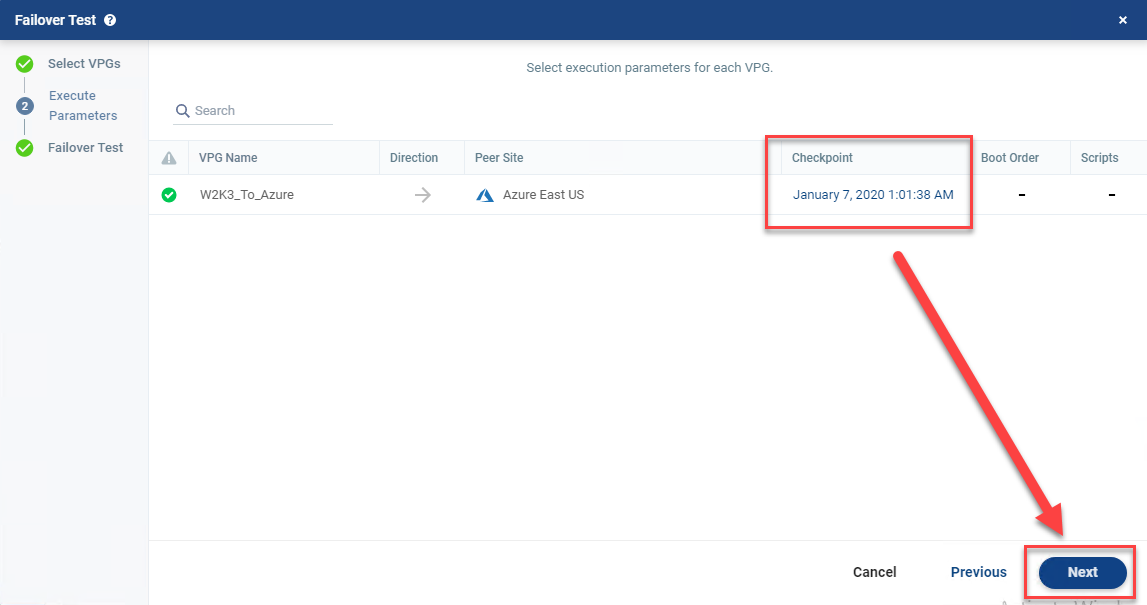
  3. The latest checkpoint should already be selected for you. Click Next

    Verify Checkpoint, click Next
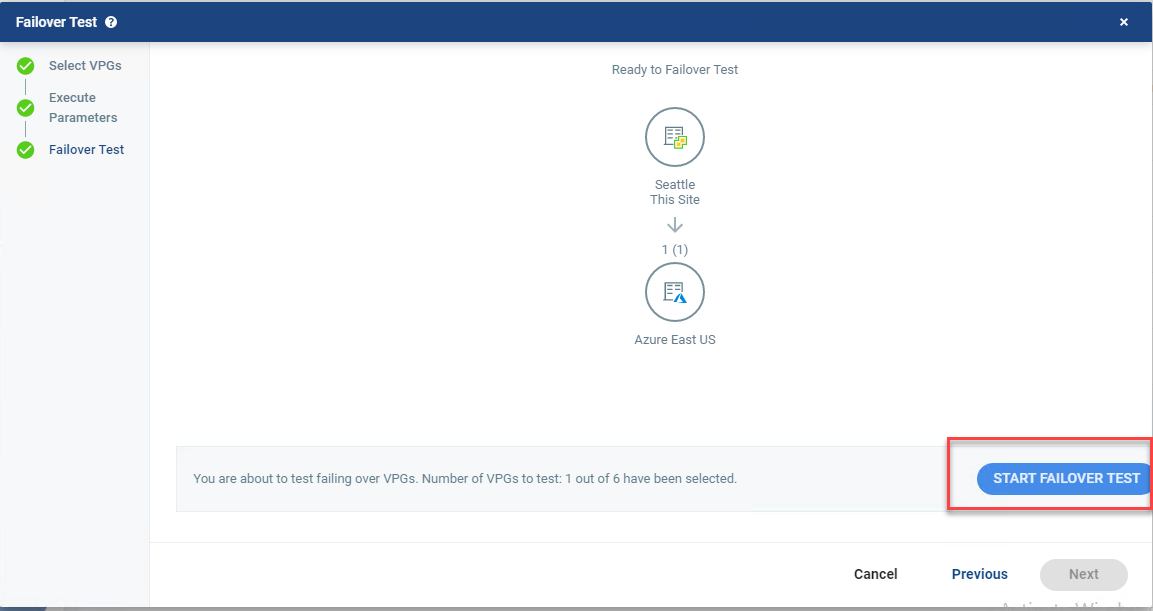
  4. Click Start Failover Test.

    Start Failover Test

After you click Start Failover Test, the testing operation will start. Once the VM is up in Azure, you can try pinging it. If it doesn’t ping the first time, reboot it, as the Integration Services may require a reboot before you can RDP to it (I had to reboot my test machine).

When you’re done testing, click the stop button in Zerto to stop the Failover Test, and wait for it to complete. At this point, if everything looks good, you’re ready to plan your migration.

If you did anything different than what I had done, remember to document it and make it repeatable :).

Next Steps

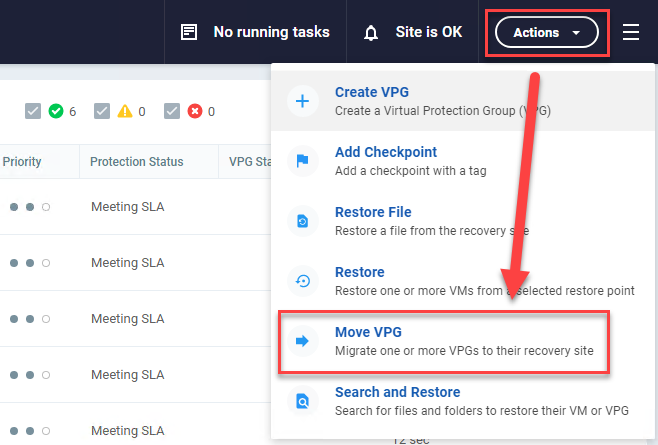
Once you’ve validated that your systems will successfully come up you can then schedule your migration. When you perform the migration into Azure, I recommend using the Move Operation (see image below), as that will be the cleanest way to get the system over to Azure in an application-consistent state with no data loss, as opposed to seconds of data loss and a crash-consistent state that the failover test, or failover live operations will give you.

Note: Before you run the Move Operation, it will be beneficial to uninstall VMware Tools on the VM(s) that you are moving to Azure. It has been found that not doing so will not allow you to uninstall them once in Azure.


Move Operation


Recommendations before you migrate:

  • Document everything you do to make this work. (it may come in handy when you’re looking for others to help you out)
  • Be sure to test the migration beforehand using the Failover Test Operation.
  • Check your Commit settings in Zerto before you perform the Move Operation to ensure that you allow yourself enough time to test before committing the workload to Azure. Current versions of Zerto default the commit policy to 60 minutes, so should you need more time, increase the commit policy time to meet your needs.
  • Be sure to right-size your VMs before moving them to the cloud. If they are oversized, you could be paying way more in consumption than you need to with bigger instance sizes that you may not necessarily need.

That’s it! Pretty simple and straightforward. To be honest, obtaining a working copy of Windows Server 2003 R2 and the Hyper-V Integration Services took longer than getting through the actual process, which actually worked the first time I tried it.

If this works for you let me know by leaving a comment, and if you find this to be valuable information that others can benefit from, please socialize it!

Cheers!

Share This:

Single vCenter, Single ZVM, and Recovering Zerto in a Failure Scenario

As a follow-up to my previous blog entry titled “Zerto Virtual Manger Outage, Replication, and Self-Healing“, which covers a ZVM failure scenario in an environment with paired ZVMs and two vCenters, I also decided to test and document what I found to be a useful solution to being able to recover from a failed ZVM in an environment where there is only one vCenter and one instance of Zerto Virtual Replication installed.  Granted, this is generally not a recommended deployment topology due to potentially having a single point of failure, this type of deployment does exist, and this should provide a suitable solution to allow recovery.

The following has been successfully tested in my lab, which is a vSphere environment, but I also do anticipate that this solution can also be carried over to a Hyper-V environment; which I’m hoping to test soon.

Since my lab originally consisted of two vCenters and two ZVMs, I first had to tear it down to become a single vCenter and single ZVM environment for the test.  Here is what I did, should you want to test this on your own before deciding whether or not you want to actually deploy it in your environment.

Disclaimer: 

Once again, this is not generally a recommended configuration, and there are some caveats similar to the referenced blog entry above, but with that said, this will allow you to be able to recover if you have Zerto deployed in your environment as described above.

Considerations

Please note that there may be some things to look out for when using this solution because of how the journal contains data until the checkpoints have been committed to the replica disk:

  • Journal disk being added at the time of a ZVM failure
  • VRA installation, new VRA installation at the time of a ZVM failure
  • Changes made to protected VMs (VMDK add) may not be captured if coinciding with a ZVM failure
  • VPG settings changed at the time of a ZVM failure, such as adding/removing a VM from a VPG


Based on additional testing I’ve done, it makes best sense to keep the journal size of the VPG protecting the ZVM as short as possible because any changes that occur to the ZVM (any of the above) will first go to the journal before aging out and being committed to the replica disk.  If those changes don’t commit to the disk, they will not appear in the UI when the ZVM is recovered using this method.

This was found by creating a VPG to protect another set of workloads, and then 10 minutes later, running through the recovery steps for the ZVM.  What I didn’t account for here is the FIFO (first-in-first-out) nature of the journal.  Because the change I had made resided within journal for the protected ZVM, it did not get a chance to age out to disk.  Recovering from the replica did not include the new VPG.

As a result, the recommendation for journal history when protecting the ZVM would be 1 hour (the minimum) – meaning your RPO for the ZVM will be 1 hour.

Setup the Test Environment

Before you can test this, you will need to configure your lab environment for it.  The following assumes your lab consists of two vCenters and 2 installations of Zerto Virtual Replication.  If your lab only has 1 vCenter, simply skip the “lab recovery site” section and move to the “lab protected site” steps.

In lab recovery site:

  1. Delete all existing VPGs
  2. Delete VRAs (via the ZVM UI)
  3. Un-pair the two ZVR sites (in the sites tab in ZVM UI)
  4. Remove hosts from recovery site vCenter

In lab protected site:

  1. [Optional] Create a new cluster, and add the hosts you removed from your recovery site.
  2. Deploy VRAs any hosts you’ll be using in for the test.
  3. Configure VPGs.

Protect the ZVM using Zerto

One thing I’ve wondered about that I finally got around to testing is actually protecting the ZVM itself using ZVR.  I’m happy to say, it appears to work just fine.  After all, Zerto does not make use of agents, snapshots, or disrupt production for that matter, as the technology basically replicates/mirrors block writes from the protected to the recovery site after they’re acknowledged via the virtual replication appliances, not touching the protected workload.

Protecting the ZVM is as simple as protecting any other application, via a VPG (Virtual Protection Group).  While you can likely protect the ZVM via storage snaps and replication, you’re still not going to get an RPO anywhere close to what Zerto itself can provide, which is typically in seconds – many cases single-digit seconds.  What this means, is that your amount of data loss, in the case of the ZVM, will likely be in minutes, even shorter if you can automate the recovery portion of this solution via scripting.

So, a few things to make this solution easier when creating the VPG to protect the ZVM:

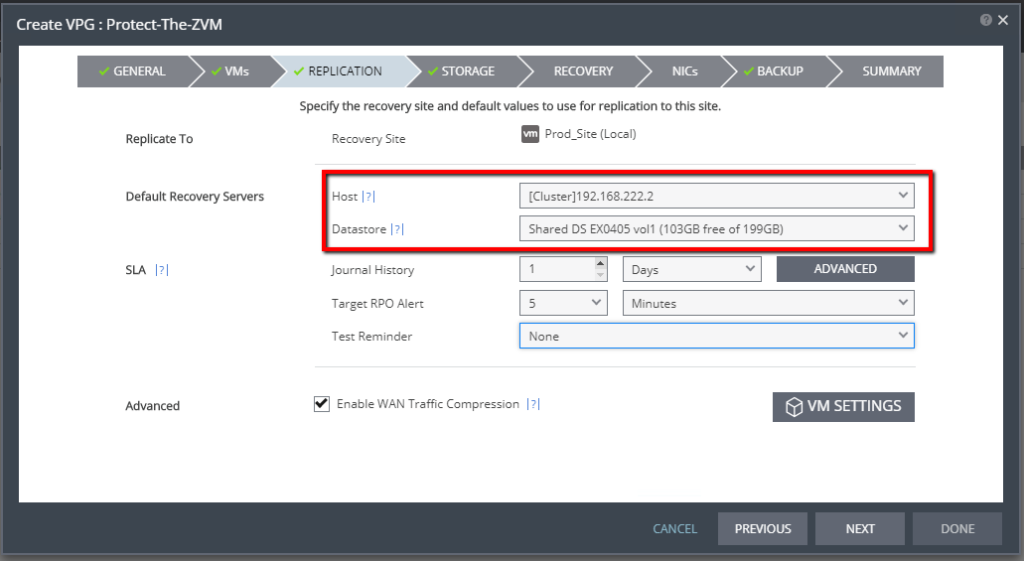
  1. When selecting your default recovery server for the VPG that protects the ZVM, select a host, as opposed to a cluster.  This allows you to easily locate the VRA responsible for protecting the ZVM.  Further on through this article, you’ll see why.
  2. Select a specific datastore for recovery.  You can select a datastore cluster, but for the same reasons as above, selecting a specific datastore allows you to easily locate the disk files for the “recovery replica” of the ZVM in the event of a failure.

    Replication Settings - VPG Creation Wizard

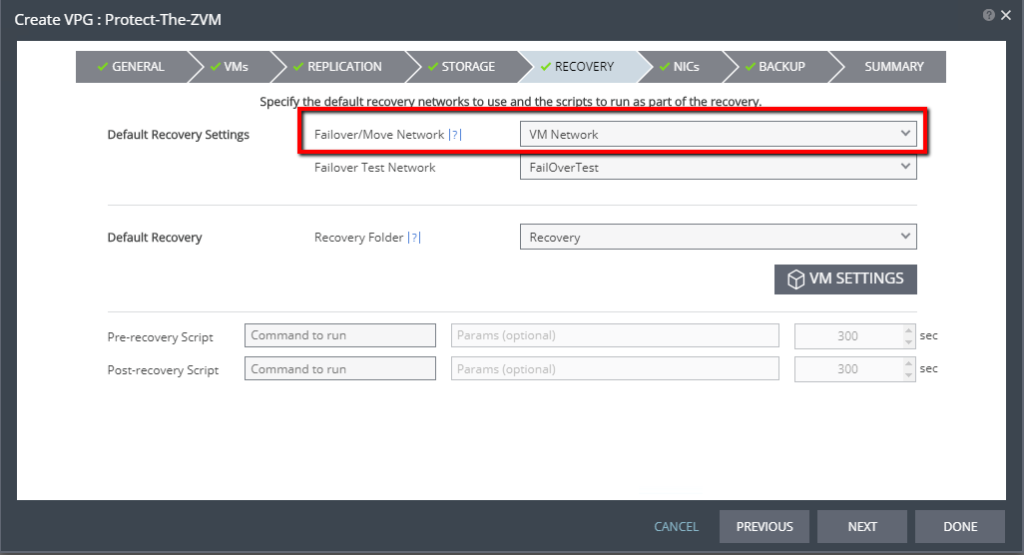
  3. Select the production network/portgroup that houses the production IP space for the ZVM (Recovery tab of VPG creation wizard).  We will not be changing the IP address.Recovery Tab - VPG Creation Wizard
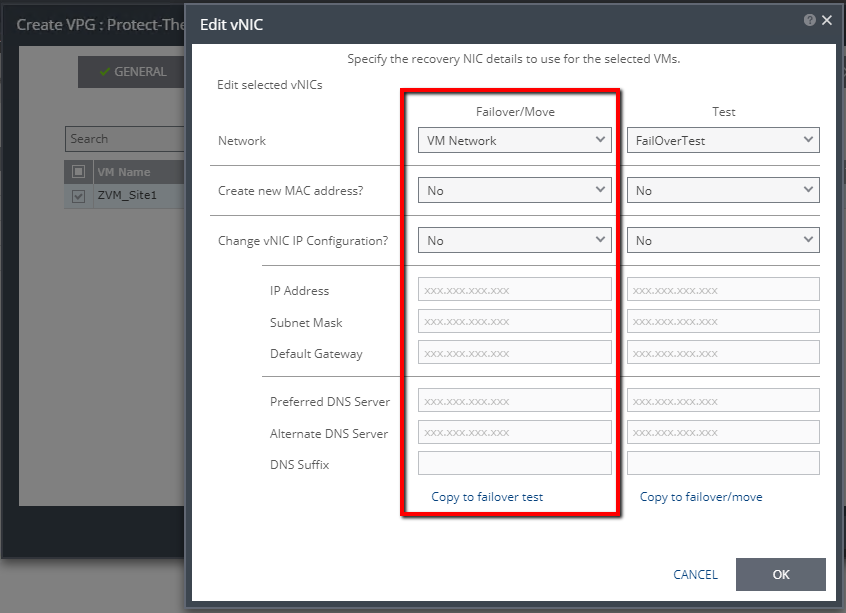
  4. Do not change the IP address for failover/move or test (in the NICs tab of the VPG creation wizard).

    NIC Settings - VPG Creation Wizard

Once you’ve created the VPG, allow initial sync to complete.  As you can see below, I now have a VPG containing the ZVM.  Please note that I’m protecting only the ZVM because I am using the embedded SQL CE database.  Using an external SQL server for the ZVR database will require additional planning.  Once initial sync has been completed, you’re ready to begin the actual failure test and recovery.

VPG List - Protecting ZVM

Simulate a Failure of the Primary ZVM

In order to test the recovery, we will need to simulate a failure of the Primary ZVM.

  1. Power off the ZVM.  Optionally, you can also go as far as deleting it from disk.  Now you know there’s no coming back from that scenario.  The ZVM will be gone.

Recover the ZVM Using the Replica

If you remember form the blog post linked at the beginning of this one, even if the ZVM is down, the VRAs are still replicating data.  Knowing that, the VRA in the recovery site (in this case on the recovery host) will have a lock on the VMDK(s) for the ZVM.  That is why I mentioned it would be good to know what host you’re replicating the ZVM to.

  1. IMPORTANT: Before you can start recovering, you will need to shutdown the VRA on the host specified for recovery.  Doing so will ensure that any lock on the VMDK(s) for the replica will be released.
  2. Once the VRA has been shutdown, open the datastore browser and move or copy the VMDK(s) out of the VRA folder to another folder.  By doing this, you’re making sure that if that VRA comes back up before you can delete the VPG protecting the ZVM, there will not be a conflict/lock.  If you select to copy the files, rather than move them, then you can use the existing replica as a pre-seed to re-protect the ZVM.
  3. Create a new VM using the vSphere client.
  4. Select to create a Custom virtual machine.

    Create VM - Custom

  5. Provide a name for the VM that doesn’t already exist in vCenter if you did not delete the original “failed” ZVM.  This ensures there won’t be a naming conflict.
  6. Select the datastore where you copied the replica VMDK(s) to.
  7. Select the Virtual Machine Version.  In this case, you can leave the default, which will be the latest version supported by vSphere version.

    Create VM - vHW Version

  8. Select the OS version for the ZVM.

    Create VM - OS Version

  9. Select the number of vCPUs required. (Match what the original ZVM had)
  10. Select the amount of memory to allocate to the VM. (Match what the original ZVM had)
  11. Select the PortGroup and Adapter type and make sure it’s set to connect at power on.  This should match the original.  My original ZVM had been configured with VMXNET3, so that’s what I selected.
  12. Select the SCSI controller to use.  Again, try to match the original.  Mine was LSI Logic SAS.
  13. On the Select a Disk screen, select Use an existing virtual disk.

    Create VM - Select Existing Disk

  14. Browse to the location of the ZVM replica’s VMDK(s) you copied, and select the disk and click OK.

    Create VM - Select existing disk file

  15. Leave the advanced options at default.
  16. On the summary screen, click Finish.
  17. When the creation is completed, power on the VM, open the console, and watch it boot up.  At this point, DO NOT power on the VRA that you previously shutdown.  There will be some cleanup, especially if you did not copy the VMDK(s) to another location.

Power on new VM created using existing disk.

Clean-up

Once the recovered ZVM has booted up, go ahead and log in to the Zerto UI.  Don’t be alarmed that everything is red.  This is because the ZVM is coming up from being down for a while, and it needs to run some checks, and get re-situated with the VRAs and begin creating new checkpoints again.  Once that process completes, as we saw in the previous blog article (referenced at the beginning of this one), things will start to go green and into a “Meeting SLA” state.
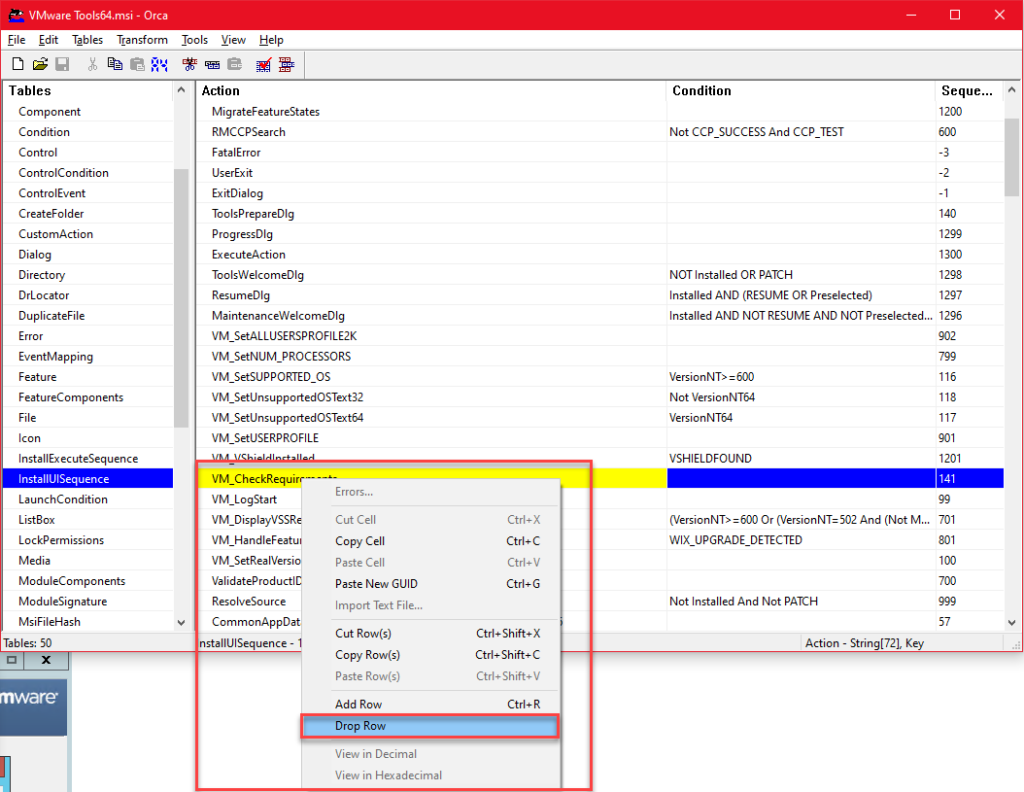
  1. Click on the VPGs tab.
  2. Locate the VPG previously created to protect the ZVM, and delete it.  If you want to retain the original replica disks as a pre-seed, make sure you select the checkbox labeled Keep the recovery disks at the peer site.  Please note that because the VRA that was protecting this VPG is still down, you may need to click delete again, and force the deletion of the VPG.

    Delete VPG - Preserve recovery disks.

  3. Once the VPG is deleted, go ahead and power on the VRA you previously shutdown.
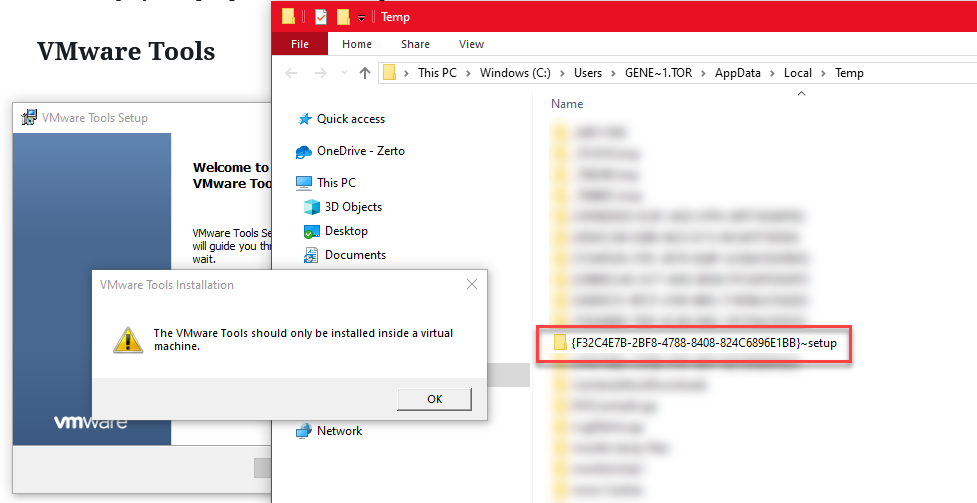
Verify ZVR Functionality

Now that we’ve cleaned up and powered the VRA back up, you can verify that ZVR is working again, and the ZVM is performing its duty of creating and tracking checkpoints in the journal again.  You can do this by starting to initiate a failover test and clicking to see what checkpoints are available, or by attempting to recover a file from the journal from any one of the VPGs.

Validate checkpoint functionality

(Above) you can see when the ZVM went down, and when it started creating and tracking checkpoints again.

Validate JFLR

(Above) Restored a file from the Journal.

Summary

While this is not an optimal/recommended configuration, through testing and validation, we have seen that even in a single ZVM, single vCenter environment, being able to recovery the platform that is providing your resiliency services is completely possible.  Granted, there will be some data loss (RPO) on the ZVM itself, despite being down for time between the failure and the recovery, Zerto Virtual Replication is clearly able to pick up where it left off, and resume protection of your environment.

If you found this to be useful, please share, comment, and let me if you’ve tried this for yourself!

Share This:

Zerto Automation with PowerShell and REST APIs

Zerto is simple to install and simple to use, but it gets better with automation!  While performing tasks within the UI can quickly become second nature, you can quickly find yourself spending a lot of time repeating the same tasks over and over again.  I get it, repetition builds memory, but it gets old.  As your environment grows, so does the amount of time it takes to do things manually.  Why do things manually when there are better ways to spend your time?

Zerto provides great documentation for automation via PowerShell and REST APIs, along with Zerto Cmdlets that you can download and install to add-on to  PowerShell to be able to do more from the CLI.  One of my favorite things is that the team has provided functional sample scripts that are pretty much ready to go; so you don’t have to develop them for common tasks, including:

  • Querying and Reporting
  • Automating Deployment
  • Automating VM Protection (including vRealize Orchestrator)
  • Bulk Edits to VPGs or even NIC settings, including Re-IP and PortGroup changes
  • Offsite Cloning

For automated failover testing, Zerto includes an Orchestrator for vSphere, which I will cover in a separate set of posts.

To get started with PowerShell and RESTful APIs, head over to the Technical Documentation section of My Zerto and download the Zerto PowerShell Cmdlets (requires MyZerto Login) and the following guides to get started, and stay tuned for future posts where I try these scripts out and offer a little insight to how to run them, and also learn how I’ve used them!

  • Rest APIs Online Help – Zerto Virtual Replication
    • The REST APIs provide a way to automate many DR related tasks without having to use the Zerto UI.
  • REST API Reference Guide – Zerto Virtual Replication
    • This guide will help you understand how to use the ZVR RESTful APIs.
  • REST API Reference Guide – Zerto Cloud Manager
    • This guide explains how to use the ZCM RESTful APIs.
  • PowerShell Cmdlets Guide – Zerto Virtual Replication
    • Installation and use guide for the ZVR Windows PowerShell cmdlets.
  • White Paper – Automating Zerto Virtual Replication with PowerShell and REST APIs
    • This document includes an overview of how to use ZVR REST APIs with PowerShell to automate your virtual infrastructure.  This is the document that also includes several functional scripts that take the hard work out of everyday tasks.

If you’ve automated ZVR using PowerShell or REST APIs, I’d like to hear how you’re using it and how it’s changed your overall BCDR strategy.

I myself am still getting started with automating ZVR, but am really excited to share my experiences, and hopefully, help others along the way!  In fact, I’ve already been working with bulk VRA deployment, so check back or follow me on twitter @EugeneJTorres for updates!

Share This: