Zerto 9.0 Introduces New Enhancements to LTR with Amazon S3, and Here’s What you Need to Know

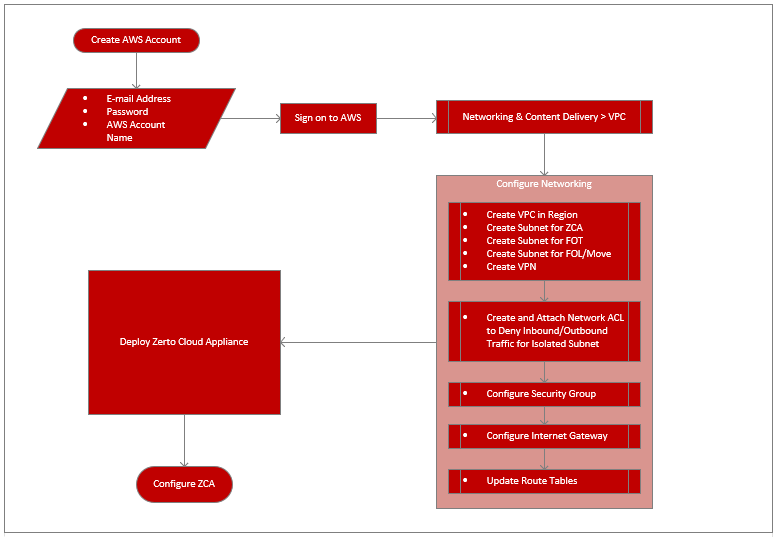
Zerto 9.0 went GA on July 13, 2021, and the official launch webinar was today (July 29, 2021), but if you missed it, you can head to the following URL and register to watch it on-demand:

https://www.zerto.com/page/zerto-9-live-demo-instant-ransomware-recovery/

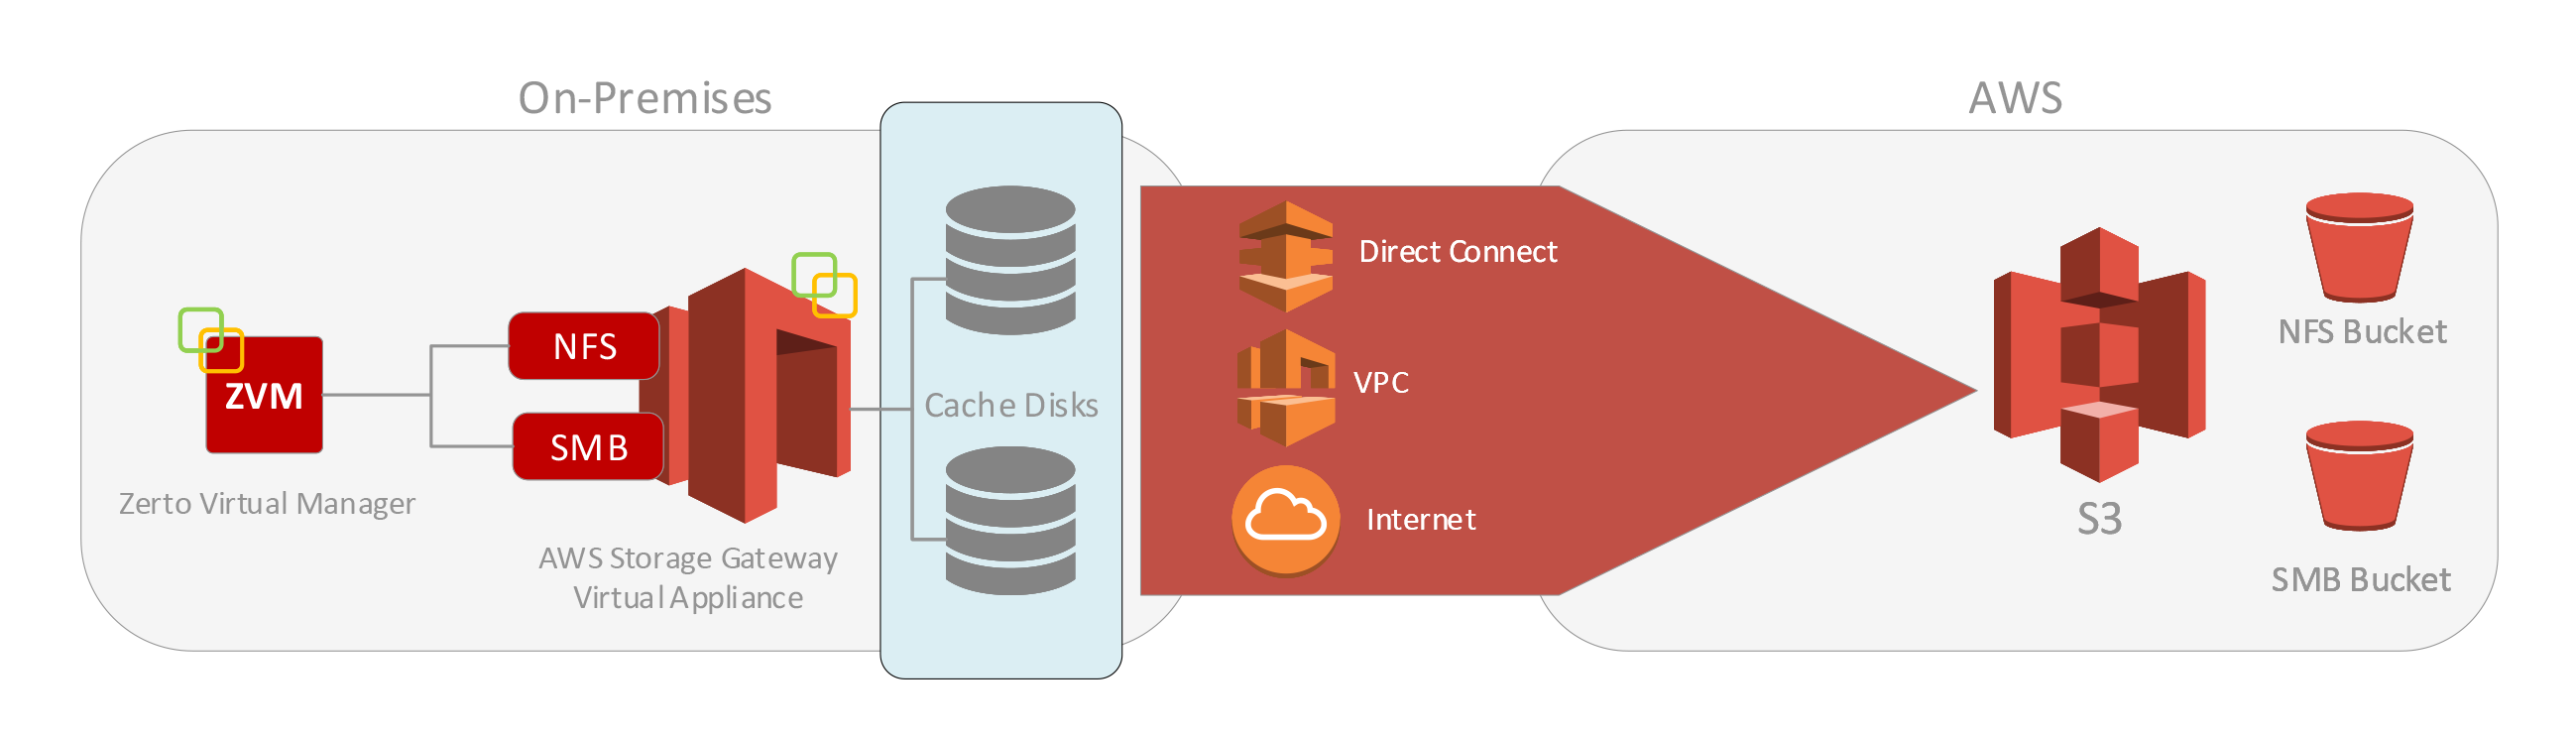
While there are many new enhancements that I’m not going to cover here, this blog is specifically related to the changes made to the product to bring even more value, cost savings, and security to Amazon S3 repositories used with Zerto’s Long-term Retention (Backup).

Along with these changes, you can sure expect an updated technical document that will cover all the steps and requirements (in detail) to take advantage of the new features. I will also update this post with a link to the updated document once it becomes available.

Update: The latest version of the published document I wrote to accommodate this blog post titled “Deploy & Configure Zerto Long-term Retention for Amazon S3” can be found here: https://bit.ly/ZLTRAWSS3

Auto-Tiering for Data Backed up to Amazon S3

The first enhancement I want to cover here is automatic tiering of retention sets after they’ve aged, meaning Zerto will automatically move backup data from Amazon S3 Standard to Amazon S3 Standard-Infrequent Access, and then again (if desired) to Amazon S3 Glacier.

Here is what it looks like when creating a repository in Zerto:

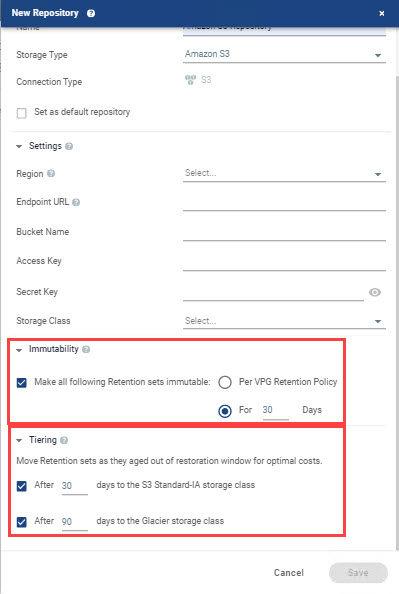
Now, when Zerto customers are backing up to Amazon S3, they can take advantage of better pricing as data ages, reducing cost and enabling more efficient use of storage. The new feature is enabled by default in a fresh install. If you are upgrading from a previous version, tiering will not be enabled by default, so you’ll need to enable it on an existing Amazon S3 repository, or create a new one. There are no additional configuration changes required to take advantage of this new feature.

Retention Set Immutability via Amazon S3 Object Lock

With Ransomware attacks continuing to rise (150% increase in 2020), the need to protect backup data via immutability becomes more important than ever. Customers can now specify whether or not they would like to enable immutability, which offers better protection from data either being deleted or otherwise compromised after it has been written.

While tiering doesn’t require any additional configuration, here are some things you’re going to need to know if you plan on using Zerto’s immutability feature with or without tiering:

  • You cannot enable S3 Object Lock on an existing S3 bucket. This is an AWS limitation. You will need to create a new S3 bucket to store immutable backups, and then create a new repository in Zerto.
  • You can have a repository that takes advantage of both of these new features, however, because of the object lock limitation on buckets (cannot be changed after the fact), you are still going to need a new repository (S3 bucket).
  • There are some additional permissions for the IAM policy (covered below) required in order to take advantage of immutability.
  • There are some additional features (covered below) you will need to enable on the S3 bucket to take advantage of immutability.
  • If you’ve enabled S3 bucket encryption per my previous blog post in an earlier version of Zerto, the good news is that you can still have encryption enabled along with these new features.

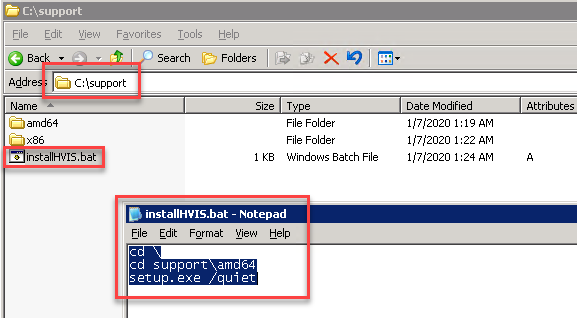
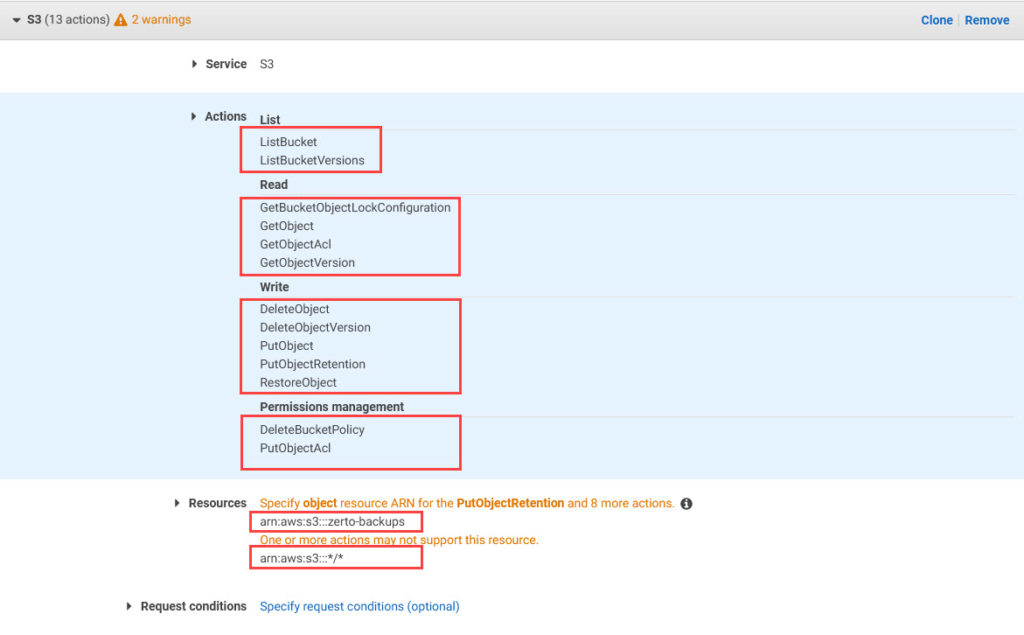
Updated IAM Policy Permissions Required for Amazon S3

Here is the updated list of S3 permissions required in your IAM policy to take advantage of these new features. If you have an existing policy in use today, I’ve highlighted the additional permissions required (in bold), so you can easily update that policy. If you’d like a JSON version of the permissions for use with Amazon IAM policy creation, you can get the file from Zerto’s GitHub repo:

https://github.com/ZertoPublic/Zerto9-LTR-AWS-IAM-JSON

  • S3:ListBucket
  • S3:ListBucketVersions
  • S3:GetBucketObjectLockConfiguration
  • S3:GetObject
  • S3:GetObjectAcl
  • S3:GetObjectVersion
  • S3:DeleteObject
  • S3:DeleteObjectVersion
  • S3:PutObject
  • S3:PutObjectRetention
  • S3:RestoreObject
  • S3:DeleteBucketPolicy
  • S3:PutObjectACL

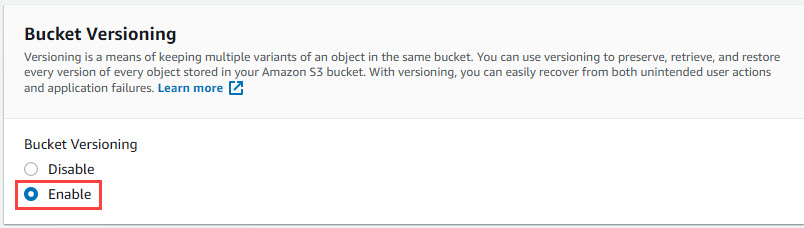
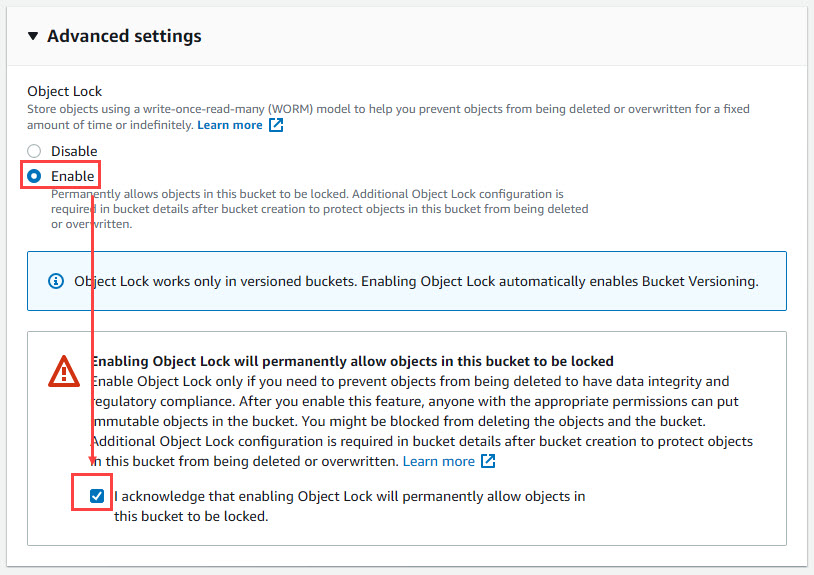
Amazon S3 Bucket Configuration for Immutability

In order to enable Immutability for the Amazon S3 bucket, you’re going to have to create a new bucket. Enabling S3 Object Lock has to be done at time of creation, so as you’re creating your new S3 bucket, be sure to include the following options:

  • Enable S3 Bucket Versioning (This is required in order to enable Object Lock – See the screenshots below)
  • Under Advanced Settings for the bucket, enable Object Lock, and tick the box to acknowledge that enabling Object Lock will permanently allow objects in this bucket to be locked.

There you have it! I’ve done quite a bit of testing with the new feature and am excited that we’re able to provide these new capabilities to meet our customer requirements and better safeguard them! We’ve also got similar enhancements for Azure users (however no immutability – yet), and I am planning on creating a technical document for setting this up in Azure, so stay tuned for that as well 🙂

If you have found this to be useful, please comment, or share so others are also aware. Thanks for reading 🙂

Share This:

Reduce the Cost of Backup Storage with Zerto 8.5 and Amazon S3

When Zerto 7.0 was released with Long-Term Retention, it was only the beginning of the journey to provide what feels like traditional data protection to meet compliance/regulations for data retention in addition to the 30-day short term journal that Zerto uses for blazing fast recovery.

A few versions later, Zerto (8.5) has expanded that “local repository” to include “remote repositories” in the public cloud. Today it’s Azure blob (hot/cold), and AWS S3 (with support for Standard S3, Standard S3-IA, or Standard One Zone-IA).

And to demonstrate how to do it, I’ve created some content, which includes video and a document that walks you through the process. In the video, I even go as far as running a retention job (backup) to AWS S3, and restoring data from S3 to test the recovery experience.

The published whitepaper can be found here: https://www.zerto.com/page/deploy-configure-zerto-long-term-retention-amazon-s3/

Update: I have just completed testing with S3 Bucket Encryption using Amazon S3 key (SSE-E3), and the solution works without any changes to the IAM policy (https://github.com/gjvtorres/Zerto-LTR-IAM-Policy). There are two methods to encrypt the S3 bucket, with Amazon S3 key as the first option (recommended), and AWS Key Management Service key (SSE-KMS) as the other. I suggest taking a look at the following AWS document that provides pricing examples of both methods. According to what I’ve found, you can cut cost by up to 99% by using the Amazon S3 key. So go ahead, give it a read!

https://aws.amazon.com/kms/pricing/

Now for the fun stuff…

The first option I have is the YouTube video below (or you can watch on my YouTube channel) .

I’ve also started branching out to live streaming of some of the work I’m doing on my Twitch channel.

If you find the information useful, I’d really appreciate a follow on both platforms, and hey, enable the notifications so when I post new content or go live, you can get notified and participate. I’m always working on producing new content, and feedback is definitely helpful to make sure I’m doing something that is beneficial for the community.

So, take a look, and let me know what you think. Please share, because information’s only useful if those who are looking for it are made aware.

Cheers!

Share This:

Using the AWS Storage Gateway to Backup to S3 using Zerto

This one took a while to get out there, but alas, it has been published for public consumption.

With that, I’m happy to be able to share this new whitepaper with the community, as it was not only great to hear that Zerto supports it, but it was also a blast testing and documenting the solution!

As a part of the Zerto 8.0 launch earlier this year (March 22, 2020 to be exact), the AWS Storage Gateway was officially announced as being supported as a Zerto LTR (Long Term Retention/Backup) target, which effectively enables you to send your Zerto backups to Amazon S3.

Sure, as of Zerto 8.5, you can actually configure Azure Blob (Hot/Cold) Storage or Amazon S3 (with Infrequent Access Tier support) for Zerto backups, which will effectively enable you to send backups directly to the public clouds via HTTPs.

That said, where does the AWS Storage Gateway fit into the picture? When or why should I use it as opposed to sending my backups directly to the cloud?

In a nutshell, the difference between what Zerto does in 8.5, and what you get by using the AWS Storage Gateway is that with the storage gateway, you are getting a cached copy of your backup data on-premises, which resides outside of Zerto’s short term journal. Here’s how that topology looks:

Topology for the AWS Storage Gateway in a Zerto Environment

What we see here is that the Storage Gateway sits on-premises, and serves as a cache location for most frequently accessed data. You connect it to Zerto as an NFS or SMB repository (SMB must be used for indexing, btw) and configure your Virtual Protection Groups to send backups to this repository.

What you will get is a Zerto backup that will complete locally, and then the Storage Gateway asynchronously replicates that data out to an S3 bucket of your choosing. If you need to restore something from the backups (if your short term journal doesn’t contain what you need), you can quickly restore that data from the storage gateway without having to pull the data back down from S3.

Now that I’ve set the stage – without further ado (yeah I googled this to be sure I used the correct term), here’s the link to the whitepaper: https://bit.ly/2Krs14y

As an added bonus, if you are strapped for time and don’t want to read, I’ve also created a video that walks through the same steps to install and configure the AWS Storage Gateway for use with Zerto:

If you have found this useful, please be social and share! As usual, thanks for reading, and watching. Please leave any comments and questions below!

Cheers!

Share This:

How To: Migrate Windows Server 2003 to Azure via Zerto, Easily

So since Microsoft has officially ended extended support for Windows Server on July 15, 2015, that means that you may not be able to get support or any software updates. While many enterprises are working towards being able to migrate applications to more current versions of Windows, alongside initiatives to adopt more cloud services; being able to migrate the deprecated OS to Azure is an option to enable that strategy and provide a place for those applications to run in the meantime.

Be aware though that although Microsoft support (read this) may be able to help you troubleshoot running Windows Server 2003 in Azure, that doesn’t necessarily mean they will support the OS. That said, if you are running vSphere on-premises and still wish to get these legacy systems out of your data center and into Azure, keep reading and I’ll show you how to do it with Zerto.

Please note that I’ve only tested this with the 64-bit version of the OS (Windows Server 2003 R2). EDIT: this has also been verified to work on the 32-bit version of the OS – Thanks Frank!)

The Other Options…

While the next options are totally doable, think about the amount of time involved, especially if you have to migrate VMs at scale. Once you’re done taking a look at these procedures, head to the next section. Trust me, it can be done more easily and efficiently.

  • Migrate your VMs from VMware to Hyper-V
    • … Then migrate them to Azure. Yes, it’s an option, but from what I’ve read, it’s really just so you can get the Hyper-V Integration Services onto the VM before you move it to Azure. From there, you’ll need to manually upload the VHDs to Azure using the command line, followed by creating instances and mounting them to the disks. Wait – there’s got to be a better way, right?
  • Why migrate when you can just do all the work from vSphere, run a bunch of powershell code, hack the registry, convert the disk to VHD, upload, etc… and then rinse and repeat for 10’s or 100’s of servers?
    • While this is another way to do it, take a look at the procedure and let me know if you would want to go through all that for even JUST ONE VM?!
  • Nested Virtualization in Azure
    • Here’s another way to do it, which I can see working, however, you’re talking about nesting a virtual environment in the cloud and perhaps run production that way? While even if you have Zerto you can technically do this, there would have to be a lot of consideration that goes in to this… and likely headache.

Before You Start

Before you start walking through the steps below, this how-to assumes:

  1. You are running the latest version of Zerto at each site.
  2. You have already paired your Azure ZCA (Zerto Cloud Appliance) to your on-premises ZVM (Zerto Virtual Manager)
  3. You already know how to create a VPG in Zerto to replicate the workload(s) to your Azure subscription.

Understand that while this may work, this solution will not be supported by Zerto, this how-to is solely written by me, and I have tested and found this to work. It’s up to you to test it.

Additionally, this is likely not going to get any support from Microsoft, so you should test this procedure on your own and get familiar with it.

This does require you to download files to install (if you don’t have a Hyper-V environment), so although I have provided a download link below, you are responsible for ensuring that you are following security policies, best practices, and requirements whenever downloading files from the internet. Please do the right thing and be sure to scan any files you download that don’t come directly from the manufacturer.

Finally – yeah, you should really test it to make sure it works for you.

Migrating Legacy OS Using Zerto

Alright, you’ve made it this far, and now you want to know how I ended up getting a Windows Server 2003 R2 VM from vSphere to Azure with a few simple steps.

Step 1: Prepare the VM(s)

First of all, you will need to download the Hyper-V Integration Services (think of them as VMware Tools, but for Hyper-V, which will contain the proper drivers for the VM to function in Azure).

I highly suggest you obtain the file directly from Microsoft if at all possible, or from a trustworthy source. At the least, deploy a Hyper-V server and extract the installer from it yourself.

If you have no way to get the installer files for the Hyper-V Integration Services, you can download at your own risk from here. It is the exact same copy I used in my testing, and will work with Windows Server 2003 R2.

  1. Obtain the Hyper-V Integration Services ISO file. (hint: look above)
  2. Once downloaded, you can mount the ISO to the target VM and explore the contents. (don’t run it, because it will not allow you to run the tools installation on a VMware-hosted workload).
  3. Extract the Support folder and all of it’s contents to the root of C: or somewhere easily accessible.
  4. Create a windows batch file (.bat) in the support folder that you have just extracted to your VM. I put the folder in the root of C:, so just be aware that I am working with the C:\Support folder on my system.
  5. For the contents of the batch file, change directory to the C:\Support\amd64 folder (use the x86 folder if on 32-bit), then on the next line type: setup.exe /quiet (see example below). The /quiet switch is very important, because you will need this to run without any intervention.

    Example of batch file contents and folder path
  6. Save the batch file.
  7. On the same VM, go to Control Panel > Scheduled Tasks > Add Scheduled Task. Doing so will open the Scheduled Task Wizard.

    Create a scheduled task
  8. Click Next
  9. Click browse and locate the batch file you created in step 5-6, and click open

    Browse to the batch file
  10. Select when my computer starts, and click next

    Select when my computer starts
  11. Enter local administrator credentials (will be required because you will not initially have network connectivity), and click next

    enter admin credentials
  12. Click Finish

Step 2: Create a VPG in Zerto

The previous steps will now have your system prepared to start replicating to Azure. Furthermore, what we just did, basically will allow the Hyper-V Integration Services to install on the Azure instance upon boot, therefore enabling network access to manage it. It’s that simple.

Create the VPG (Virtual Protection Group) in Zerto that contains the Windows Server 2003 R2 VM(s) that you’ve prepped, and for your replication target, select your Microsoft Azure site.

If you need to learn how to create a VPG in Zerto, please refer to the vSphere Administration Guide – Zerto Virtual Manager documentation.

Step 3: Run a Failover Test for the VPG

Once your VPG is in a “Meeting SLA” state, you’re ready to start testing in Azure before you actually execute the migration, to ensure that the VM(s) will boot and be available.

Using the Zerto Failover Test operation will allow you to keep the systems running back on-premises, meanwhile booting them up in Azure for testing to get your results before you actually perform the Move operation to migrate them to their new home.

  1. In Zerto, select the VPG that contains the VM(s) you want to test in Azure (use the checkbox) and click the Test button.

    Select VPG, click Test
  2. Validate the VPG is still selected, and click Next.

    Validate VPG, click Next
  3. The latest checkpoint should already be selected for you. Click Next

    Verify Checkpoint, click Next
  4. Click Start Failover Test.

    Start Failover Test

After you click Start Failover Test, the testing operation will start. Once the VM is up in Azure, you can try pinging it. If it doesn’t ping the first time, reboot it, as the Integration Services may require a reboot before you can RDP to it (I had to reboot my test machine).

When you’re done testing, click the stop button in Zerto to stop the Failover Test, and wait for it to complete. At this point, if everything looks good, you’re ready to plan your migration.

If you did anything different than what I had done, remember to document it and make it repeatable :).

Next Steps

Once you’ve validated that your systems will successfully come up you can then schedule your migration. When you perform the migration into Azure, I recommend using the Move Operation (see image below), as that will be the cleanest way to get the system over to Azure in an application-consistent state with no data loss, as opposed to seconds of data loss and a crash-consistent state that the failover test, or failover live operations will give you.

Note: Before you run the Move Operation, it will be beneficial to uninstall VMware Tools on the VM(s) that you are moving to Azure. It has been found that not doing so will not allow you to uninstall them once in Azure.


Move Operation


Recommendations before you migrate:

  • Document everything you do to make this work. (it may come in handy when you’re looking for others to help you out)
  • Be sure to test the migration beforehand using the Failover Test Operation.
  • Check your Commit settings in Zerto before you perform the Move Operation to ensure that you allow yourself enough time to test before committing the workload to Azure. Current versions of Zerto default the commit policy to 60 minutes, so should you need more time, increase the commit policy time to meet your needs.
  • Be sure to right-size your VMs before moving them to the cloud. If they are oversized, you could be paying way more in consumption than you need to with bigger instance sizes that you may not necessarily need.

That’s it! Pretty simple and straightforward. To be honest, obtaining a working copy of Windows Server 2003 R2 and the Hyper-V Integration Services took longer than getting through the actual process, which actually worked the first time I tried it.

If this works for you let me know by leaving a comment, and if you find this to be valuable information that others can benefit from, please socialize it!

Cheers!

Share This:

Zerto: Can Failover Live Be Used for a Datacenter Migration, Consolidation, or HW Refresh?

The answer is yes, if you really wanted to… however, there’s another feature of Zerto that will allow you to perform a much “cleaner” migration of your VM(s) with a more planned approach.

This feature may not be easily located, as it’s found within the Actions menu in the Zerto UI, but it’s actually a very valuable one that basically allows you to migrate VMs from one location to another (cluster to cluster, vCenter to vCenter, vSphere <> Hyper-V, On-Prem to Public Cloud, Site to Site – even from one vendor’s hardware to another) with no data loss.  That’s right, an RPO of ZERO.

Failover Live (FOL)

First off, since the title of this blog post mentions “Failover Live”, or as we abbreviate it as FOL, lets talk about that method first.  What is the FOL process, and how does it work?

The FOL process is an operation that should be used following a disaster to recover your protected VMs in a recovery site, or in the event the protected site ZVM is not available.  The main thing to note here is that when you execute a FOL, Zerto will default to the latest checkpoint, or you can select a previous checkpoint in time to recover to (usually within seconds of each other).  Additionally, you have the option to either leave the VMs in the group running, power them off, or force a shutdown.

Essentially what this means is that when using FOL, Zerto is expecting that there’s been an unplanned environment disruption of some sort and  you need to resume production as quickly as possible in your recovery site.

Here’s the workflow for a failover operation.  You can download a PDF version of this diagram here.

Zerto Virtual Replication Failover Live Workflow Diagram

Please note, that the workflow objects in yellow include some decisions you will need to make based on your type of disruption as it relates to the power state of the VMs in your protected site (Shutdown (gracefully), Leave Powered On, or Force Shutdown).

Regarding my earlier comment about ZERO data loss, this method will only get you to the latest checkpoint when the outage was detected, or a previous checkpoint.  You can choose what point in time to recover to, which in either option, will be a crash-consistent state which may not be desired for something like a migration project.

For additional detail about the Failover Live (FOL) process and how it works, including considerations, see the Zerto Virtual Manager Administration Guide for vSphere.

Move VPG

As opposed to an unplanned disruption to your environment, the “Move VPG” operation in Zerto is recommended when you’re performing a planned migration whether it be your DR site, public cloud, new hardware, or other datacenter.  The difference here is that when you perform a planned migration of your virtual machine(s) to a recovery site, Zerto assumes that both sites are up and healthy and that you are performing a relocation of the virtual machine(s) in a controlled/orderly fashion – with the expectation of no data loss.

Here is the workflow for a Move VPG operation.  You can download a PDF version of this diagram here.

Zerto Virtual Replication Move VPG Workflow Diagram

So as you can see from the workflow above, the steps are a bit different than a failover live, as there are actually some steps taken in the protected site before VMs are brought up in the recovery site to ensure that what is booted is in the exact same state as the source copy.

For additional detail about the Move VPG process and how it works, see the Zerto Virtual Manager Administration Guide for vSphere.

Summary

While you can still use the FOL process to migrate VMs from one location to another, there is still going to be some level of data loss and a crash consistent boot.

To ensure you don’t lose any data (even data that may be in memory at the time you perform a FOL), the “Move VPG” operation will take care of automating the safe/graceful shutdown of a VM and replicate any remaining data before powering up in the recovery site.

When performing either operation, be sure to verify your commit policy as well, because you would want to make sure that the recovered/migrated VM is in a usable state before committing it to the recovery location because once you commit the change, you must wait for promotion and reverse protection (delta sync) to take place before you can perform a failback.  Both options will allow you the ability to rollback without commit, but behave differently in terms of the expected state of the protected site.


Share This:

Configuring AWS for Zerto Virtual Replication

By now, it’s no secret that the IT Resilience Platform that Zerto has come to be known as offers complete flexibility when it comes to multi-cloud agility.  This agility allows businesses to accelerate their digital transformation and truly take advantage of what the public cloud platform offers – ensuring even more freedom to choose your cloud and to be able to replicate workloads to, from, and even between public clouds.  As there have been great improvements in Zerto’s any-to-any story, one in particular I’d like to focus on in this article is AWS (Amazon Web Services).

Starting with Zerto Virtual Replication 6.0, customers now have:

  • Orchestration allowing not only targeting AWS for DR or for workload migration, but now the ability to come back out of AWS to on-premises datacenters, or even the ability to replicate between public cloud providers (AWS, Microsoft Azure, IBM Public Cloud) and Cloud Service Providers (CSPs).
  • Zerto Analytics visibility between all sites, including public cloud, now with network statistics and 30-day history.

Now, while these improvements are exciting and offer even more cloud agility to customers, one can’t help but realize that before you can actually start taking advantage of ZVR 6.0 to achieve a hybrid cloud architecture or DR in the cloud (specifically AWS), there are some pre-requisites to complete before doing so.  That said, meeting those requirements may not seem as intuitive as you’d hope at first glance.

While having a cloud use-case is usually the first step, and is determined by business requirements – the challenge lies within understanding what exactly needs to be configured in AWS for ZVR functionality, and how to accomplish it. If you take a look below, the workflow itself is a multi-step process that may not be very easy to perform, until now.

ZVR AWS Workflow
Figure 1: Configuring AWS for ZVR – Workflow

In my usual fashion of wanting to know exactly how things are done and then sharing it with everyone else, I’ve written a how-to document for configuring AWS for Zerto Virtual Replication, which I am happy to say has been turned into an official Zerto whitepaper and is now available for download!

>> Whitepaper – Configuring AWS for Zerto Virtual Replication <<

As usual, feedback, is welcomed with open arms. If you find this useful, please share and be social!

Share This: