
It’s a new year, and along with that comes a whole lot of “new things.” New things may come in the form of resolutions, new gym memberships, new jobs… you get the point. And while it’s not so new today, Zerto 10 has delivered a new architecture for the Zerto Virtual Manager. So to some, a new year’s resolution could mean finally moving off of Windows, and onto a more secure and capable Linux-based Zerto Virtual Manager.
And if you’re like me, new things make us remember old things. In fact, I had totally forgotten that I wrote an article about bolting on (virtually) a second network interface to my ZVM back in 2016 to meet a network security requirement. Apparently, that was found useful to others, and it has come full circle, so I’ll share how to get that specific configuration from Windows to Linux without breaking Zerto (for too long). You can read the original post here.
The “Good to Know” Stuff
The blog post contains a lot of information related to the tasks performed, so it will be helpful to be familiar with a few things. I also did not write this as an in-depth “how to build your lab” write-up. Also, this is specific to vSphere environments and does not cover any public cloud Zerto environments.
If you want to build a lab to try this out, you can build it according to the diagram below in the “Lab Configuration” section. Then follow my Dual NIC ZVM post to configure your Windows in-guest routing.
Zerto Resources and Documentation
There is quite a bit of information that you’re required to understand before migrating from the ZVM to the ZVMA, and it’s the usual stuff like version compatibility, pre-requisites, etc, etc… So I’ve put everything here in case you need to review or are in planning.
- Zerto Interoperability Matrix: Understand what Zerto is and isn’t compatible with in your environment.
- Zerto Virtual Manager Appliance (Linux-based): Understand the pre-requisites for running the ZVM Appliance in your environment. Refer to the interoperability matrix to see what is compatible with Zerto 10+
- Zerto Migration Utility Pre-requisites: This is a must read so you can fully understand how the Windows ZVM to Linux ZVMA migration utility works.
- Zerto KB Article: How to Separate ‘Management’ and ‘Replication’ Networks using Dual NICs ZVM Setup – the official KB article for running a dual-NIC ZVM/ZVMA.
- Zerto Port Usage: You will need to familiar with this in order to create the proper network separation, including any firewall ports required to segregate traffic for Zerto management and replication networks.
.
The Lab Configuration
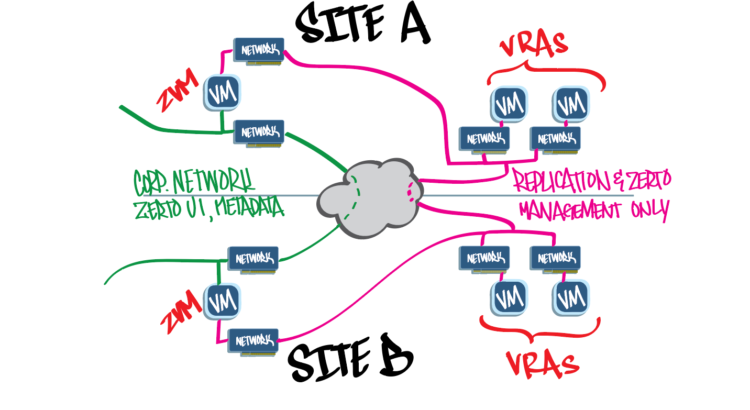
Below you’ll see a very high-level diagram of what this setup looks like in my lab if you’d like to build a lab out to follow along. How you achieve the network separation is up to you. In my lab, I didn’t have multiple subnets in each site, so I got creative and used a combination of Windows Defender firewall policies and in-guest persistent routes based on IP addresses. The main goal of this post is to get you migrated from a dual-NIC Windows ZVM to a dual-NIC Linux ZVMA.
What you’re seeing below is that the network interfaces connected to the green lines are all meant to communicate “administrative” traffic with each other. This is the network where your OS patches will be delivered, domain authentication takes place, and/or users will access the Zerto UI. They are also the interfaces over which you will pair Zerto sites.
The interfaces connected to the magenta lines are all meant for VRA-related traffic. This includes things like ZVM management control of VRAs, managing checkpoints, and log collection. The actual data being replicated for protection by Zerto will also flow on this network and is being managed by the VRAs through direct connections the source and target VRAs make with each other. Again, refer to the Zerto Ports Usage link above for more information.
Windows ZVM to Linux ZVMA Migration
If you’ve made it this far in, you’re likely already running Zerto in your environment in a dual-NIC configuration and are looking to migrate to the Linux ZVMA, and have probably read this kb article. At the very bottom of that article, there’s some text stating that migrating a dual-NIC ZVM is not supported and that the recommendation was to “move” to a single NIC prior to migrating, then add it back afterwards. This is also called out in the Migration Utility Pre-requisites documentation.
What that really means is that during the migration, the utility will not allow you to migrate if there is still a second NIC on your Windows ZVM. I have included the steps below to get past that, but you’re still going to have to build that second NIC on the Linux ZVM post-migration, and I also cover that in detail.
The Migration Steps, In order
Below you will find a high-level set of steps to take to complete the migration. This procedure assumes you have two (2) NICs on each ZVM that needs to be migrated over to Linux, and that you have read the Zerto Migration Utility Pre-requisites documentation. Having some networking experience and being able to configure routing in Windows or Linux would also be helpful.
Tip: Have at least four IP addresses available to use as temporary IP addresses (two per site) during the migration process.
If you don’t want to read through these steps or want a more detailed demonstration of a complete migration, there’s a video at the end of this post that I created to walk you through the entire process. If there is any section that requires configuration text, I will include that below.
Important: Always complete the migration on one site before starting the second site. The steps below will only pertain to the site you’re working through migration on. When you are done with that first site, start again at step 1 for each remaining site.
- If this is being done for production – it helps to open a proactive (lower severity) support case with Zerto for visibility to let them know you’re going to start migrating your ZVM to Linux. This way, should you run into any issues along the way, you can call Zerto support and reference the existing case.
- For each site that you will be migrating, make sure you upgrade the Windows ZVM to the latest Windows version of Zerto. The last version of Zerto supported on Windows is 9.7U4p2, which was released on November 28, 2023.
- Again when upgrading, be sure to complete the upgrade on one site before moving to the next. Don’t forget to upgrade the VRAs as well.
- Again when upgrading, be sure to complete the upgrade on one site before moving to the next. Don’t forget to upgrade the VRAs as well.
- Download the Linux-based ZVMA (version 10.0U2, released November 28, 2023) from MyZerto
- Deploy the OVF in the vCenter that has the Windows ZVM you are going to migrate to Linux.
- You’re going to need 1 temporary IP address for the ZVMA.
- After you delpoy the OVF, power the ZVMA on, and login using the zadmin user. The default password can be found in the Appliance Manager Menu documentation.
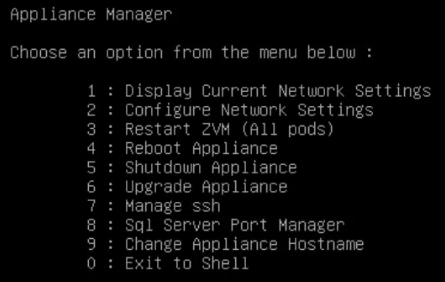
- Once logged in, you will see the Appliance Manager menu.
- Select option 2 to configure a static IP address using the temporary IP address from above.
- Reboot when prompted
- After the reboot, log back in and this time use option 7 from the Appliance Manager Menu and enable SSH (this is required by the migration utility).
- Download the Zerto Migration utility (version 10.0U2, released December 4, 2023) from MyZerto
- Save the .zip file to the desktop of the Windows ZVM
- Extract the contents of the zip file to the desktop of the Windows ZVM
- Optional, but recommended: In vCenter, take a snapshot of the Windows ZVM to give yourself a point in time you can recover to should you need to.
- Open an RDP connection to the ZVM open the folder that contains the migration utility.
- Before you run the migration utility:
- You will need 1 temporary IP address for this Windows ZVM.
- Because the migration utility doesn’t support migration when there are two NICs on the Windows ZVM, you will need to disable the second NIC.
- Go to the Network Connections in Windows.
- Right-click on and disable the second NIC. This NIC will stay disabled throughout the rest of the process. The migration utility will not do anything to this second NIC.
- Run the migration utility entering the required inputs throughout the wizard.
- At the summary screen, un-check the box to Upgrade VRAs because the VRAs reside on the network managed by your second NIC, you won’t be able to get to them, so it’s best to wait until you’ve re-applied that second NIC on the ZVMA after the migration has been completed.
- Once the migration utility starts to run, you will get disconnected from your RDP session. This is normal because the IP address has been changed.
- Log back in to the Windows ZVM via RDP using the alternative IP address you provided.
- The migration utility will still be running.
- Exit when the migration completes.
- If the migration succeeded, shutdown the Windows ZVM that you have just migrated. DO NOT ATTEMPT TO UNINSTALL ZERTO FROM THIS WINDOWS ZVM.
- If the migration doesn’t succeed, the utility will actually rollback the changes. If you don’t wish to proceed, re-enable that second NIC after the original IP address is re-instated to the Windows ZVM (original IP re-instatement will be done by the migration utility).
- More importantly, if you encounter the error in the image below, it is not a show-stopper. This check can be bypassed, however, you will need to contact Zerto support to obtain the necessary fix. Unfortunately, I’m not authorized to post that fix publicly.
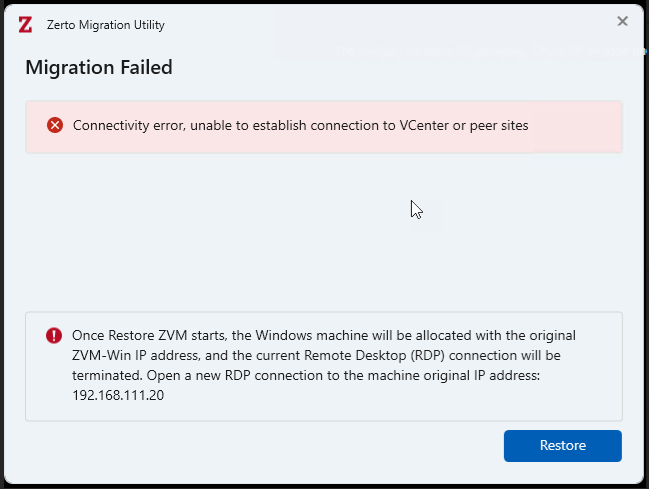
- More importantly, if you encounter the error in the image below, it is not a show-stopper. This check can be bypassed, however, you will need to contact Zerto support to obtain the necessary fix. Unfortunately, I’m not authorized to post that fix publicly.
- If the migration doesn’t succeed, the utility will actually rollback the changes. If you don’t wish to proceed, re-enable that second NIC after the original IP address is re-instated to the Windows ZVM (original IP re-instatement will be done by the migration utility).
- Before you run the migration utility:
- Next, we will need to work with the Linux ZVMA, so open up either the vSphere console or a PuTTy session to the ZVMA. Remember, after successful completion of the migration utility, the IP address for the ZVMA will be the original IP address that the Windows ZVMA had.
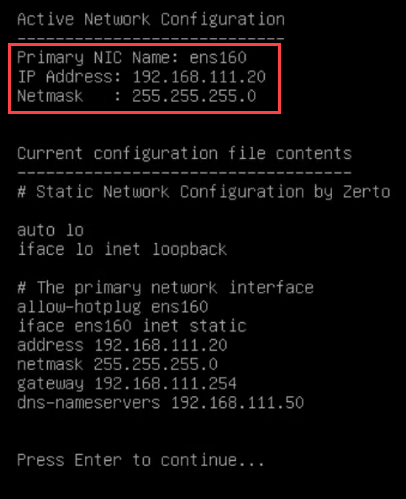
- Once logged onto the ZVMA, you’ll see the appliance manager menu. Use option 1 to display the current network settings. You’ll see that the primary IP address is the old IP address of the Windows ZVM. Take note of the Primary NIC Name, as this will be helpful to know when we configure the second NIC.
- Press enter to return to the main menu.
- Because we have not yet added the second virtual NIC to the ZVMA, select option 5 to shutdown the appliance.
- Once the appliance is shutdown, edit the VM settings and add a second virtual network adapter, and put it on the network that the old Windows ZVM secondary NIC was on. Save the VM settings and power on the ZVMA.
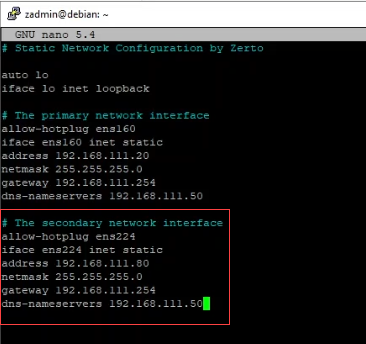
- Log back in to the ZVMA, and select option ‘0’ to Exit to the Shell. We will now start configuring the second NIC. The steps we will take are also listed in this KB article, so you can follow along with that to get your second NIC configured and saved. The screenshot below will show the format to use when entering the NIC settings since they are not formatted in the KB article.
- Once you’ve saved the configuration file and exited nano, we will configure the persistent routing required to make this new NIC route traffic to your replication network correctly (similar to what you have done on your Windows ZVM, but because it’s Linux, it’s a bit different).
If you are watching the my video on this - you will need to skip toward the end (22:28) to watch the routing configuration section. In this write-up, this is the point where you will be configuring routing.
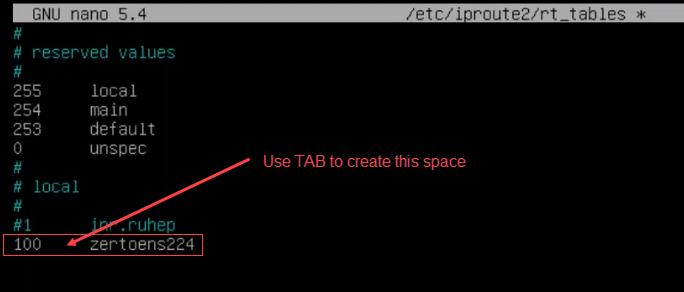
While there are different ways to create the routing in Linux, the steps below will ensure they are persistent through reboots of the appliance. - From the shell, we’re going to first create a routing table to use in later steps:
sudo nano /etc/iproute2/rt_tables - In the rt_tables file, add a line to create a routing table to use. Follow the format in the image below. The number you use can be anything, but must be unique – don’t use the same number as any existing entries. The name can be anything you want it to be, just remember both the number and name, because it will be needed in the next steps.
- Use CTRL+O to write out (save) the file, then CTRL+X to exit nano.
- Now we’re going to go back in to the /etc/network/interfaces file and add our routing configuration.
sudo nano /etc/network/interfaces - Go to the end of the file and add the following lines. Replace “100 zertoens224” and any instance of “zertoens224” with whatever you used in the previous step to create the routing table.
There’s also an image for you to reference at the end of this step:
Use this if you want to route to specific IP addresses:#create the routing table on boot for the rules to use
post-up echo "100 zertoens224" >> /etc/iproute2/rt_tables
#create the ip rule for this interface and add it to the table
post-up ip rule add from [your ens224 IP address] table zertoens224
post-up ip route add [IP Address of the VRA] dev ens224 table zertoens224
post-up ip route add [IP Address of the VRA] dev ens224 table zertoens224
[add more lines as needed]
Use this if you want to route to entire subnet(s) – replace [0.0.0.0/24] with your own network:#create the routing table on boot for the rules to use
post-up echo "100 zertoens224" >> /etc/iproute2/rt_tables
#create the ip rule for this interface and add it to the table
post-up ip rule add from [your ens224 IP address] table zertoens224
post-up ip route add [0.0.0.0/24] dev ens224 table zertoens224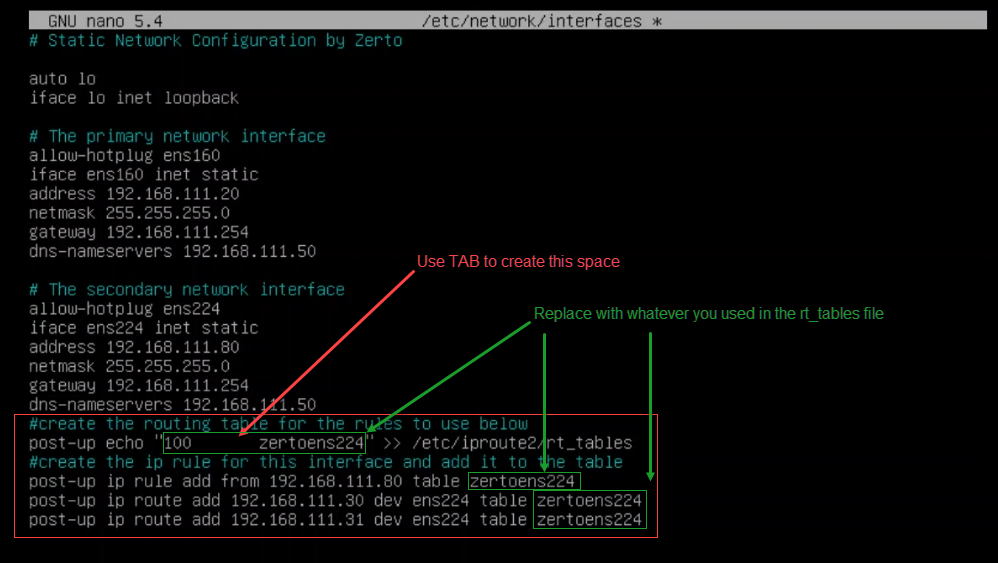
- Use CTRL+O to write out (save) the file. Use CTRL+X to exit nano.
- At the shell type appliance-manager to return to the appliance manager.
- Select option ‘4’ to reboot the ZVMA.
- To verify the settings, log back into the ZVMA, and select ‘1’ from the appliance manager to show the current configuration file contents for the network. You will see all the new routing entries in there.
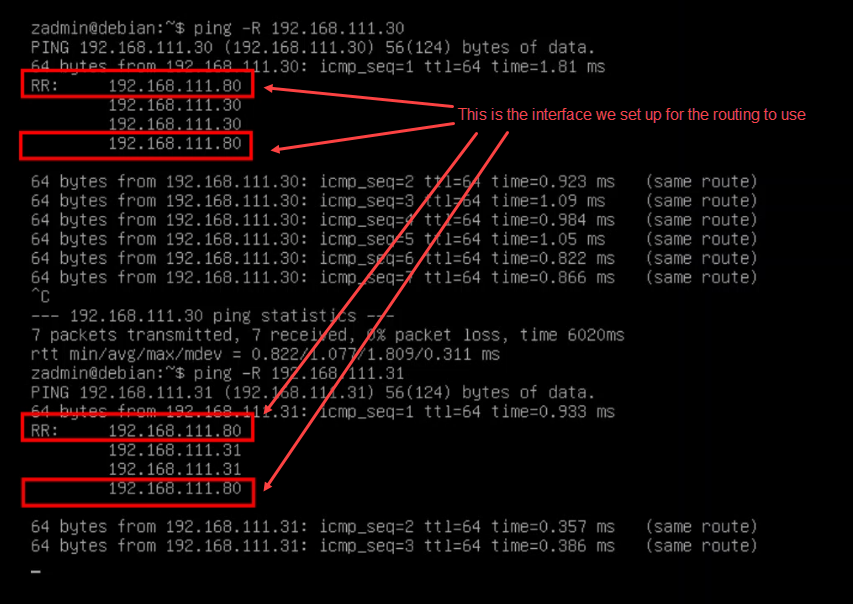
- To test connectivity, you can run ping -R [destination VRA IP address] from the shell and you’ll see what interface the ping goes out of and returns on (example image below).
- You can now exit the shell and close your session with the ZVMA.
- Log onto the Zerto UI at https://[PrimaryIPaddressOfZVMA]
Username: admin
Password: admin - Since this is the first time you’re logging into the Zerto UI on the ZVMA, you will be required to change the password, so set it to something appropriate for your environment or to meet your password requirements.
- Verify the dashboard shows everything as healthy – just note that because we just added that second NIC, it might take a few minutes for things to right themselves, so you might see some alerts regarding site connectivity. Because the primary NIC was online, it’s unlikely at this point you’d see a site connectivity alert.
- Go to the Setup tab, and you will notice that the VRAs all state that there is an upgrade available. At this time, you can start upgrading the VRAs.
- After all VRAs are upgraded, monitor Zerto to make sure things are returning to green/normal. If you see any issues, contact Zerto support and reference your support case opened in Step 1.
- Once everything returns to “normal” you can now turn your attention to your second site and go back to step 1 in this procedure to repeat the process until you’ve completed the migration in each environment/site.
Summary
I get it, change isn’t always welcomed, but without change and without innovation, we become stagnant and comfortable with accepting what’s “normal.” Hopefully, the past few years have changed our impression of change and what’s “normal.” I figure, since it’s also a new year, let’s meet some new challenges and overcome them clear any obstacles for the year, so we can keep moving forward!
With planning and reading up on the documentation to perform the migration from the Windows ZVM to the Linux ZVMA, the process is very straightforward. My recommendation is to gather all the pre-requisites, and verify that you meet all the version requirements prior to getting started for the most efficient route to completion. Its also helpful if you are fortunate enough to have a lab environment to go through this at least once to see how it works for yourself and document any differences in your own environment that need to be accounted for before pulling the trigger on this migration.
If you’ve performed the migration, or have any questions before you do, please leave a comment below, or in the video comments on YouTube (video below). Thanks for reading, and if you’ve found this useful or know anyone who could benefit from this, please share!
Thanks! -G