How To: Migrate Windows Server 2003 to Azure via Zerto, Easily

So since Microsoft has officially ended extended support for Windows Server on July 15, 2015, that means that you may not be able to get support or any software updates. While many enterprises are working towards being able to migrate applications to more current versions of Windows, alongside initiatives to adopt more cloud services; being able to migrate the deprecated OS to Azure is an option to enable that strategy and provide a place for those applications to run in the meantime.

Be aware though that although Microsoft support (read this) may be able to help you troubleshoot running Windows Server 2003 in Azure, that doesn’t necessarily mean they will support the OS. That said, if you are running vSphere on-premises and still wish to get these legacy systems out of your data center and into Azure, keep reading and I’ll show you how to do it with Zerto.

Please note that I’ve only tested this with the 64-bit version of the OS (Windows Server 2003 R2). EDIT: this has also been verified to work on the 32-bit version of the OS – Thanks Frank!)

The Other Options…

While the next options are totally doable, think about the amount of time involved, especially if you have to migrate VMs at scale. Once you’re done taking a look at these procedures, head to the next section. Trust me, it can be done more easily and efficiently.

  • Migrate your VMs from VMware to Hyper-V
    • … Then migrate them to Azure. Yes, it’s an option, but from what I’ve read, it’s really just so you can get the Hyper-V Integration Services onto the VM before you move it to Azure. From there, you’ll need to manually upload the VHDs to Azure using the command line, followed by creating instances and mounting them to the disks. Wait – there’s got to be a better way, right?
  • Why migrate when you can just do all the work from vSphere, run a bunch of powershell code, hack the registry, convert the disk to VHD, upload, etc… and then rinse and repeat for 10’s or 100’s of servers?
    • While this is another way to do it, take a look at the procedure and let me know if you would want to go through all that for even JUST ONE VM?!
  • Nested Virtualization in Azure
    • Here’s another way to do it, which I can see working, however, you’re talking about nesting a virtual environment in the cloud and perhaps run production that way? While even if you have Zerto you can technically do this, there would have to be a lot of consideration that goes in to this… and likely headache.

Before You Start

Before you start walking through the steps below, this how-to assumes:

  1. You are running the latest version of Zerto at each site.
  2. You have already paired your Azure ZCA (Zerto Cloud Appliance) to your on-premises ZVM (Zerto Virtual Manager)
  3. You already know how to create a VPG in Zerto to replicate the workload(s) to your Azure subscription.

Understand that while this may work, this solution will not be supported by Zerto, this how-to is solely written by me, and I have tested and found this to work. It’s up to you to test it.

Additionally, this is likely not going to get any support from Microsoft, so you should test this procedure on your own and get familiar with it.

This does require you to download files to install (if you don’t have a Hyper-V environment), so although I have provided a download link below, you are responsible for ensuring that you are following security policies, best practices, and requirements whenever downloading files from the internet. Please do the right thing and be sure to scan any files you download that don’t come directly from the manufacturer.

Finally – yeah, you should really test it to make sure it works for you.

Migrating Legacy OS Using Zerto

Alright, you’ve made it this far, and now you want to know how I ended up getting a Windows Server 2003 R2 VM from vSphere to Azure with a few simple steps.

Step 1: Prepare the VM(s)

First of all, you will need to download the Hyper-V Integration Services (think of them as VMware Tools, but for Hyper-V, which will contain the proper drivers for the VM to function in Azure).

I highly suggest you obtain the file directly from Microsoft if at all possible, or from a trustworthy source. At the least, deploy a Hyper-V server and extract the installer from it yourself.

If you have no way to get the installer files for the Hyper-V Integration Services, you can download at your own risk from here. It is the exact same copy I used in my testing, and will work with Windows Server 2003 R2.

  1. Obtain the Hyper-V Integration Services ISO file. (hint: look above)
  2. Once downloaded, you can mount the ISO to the target VM and explore the contents. (don’t run it, because it will not allow you to run the tools installation on a VMware-hosted workload).
  3. Extract the Support folder and all of it’s contents to the root of C: or somewhere easily accessible.
  4. Create a windows batch file (.bat) in the support folder that you have just extracted to your VM. I put the folder in the root of C:, so just be aware that I am working with the C:\Support folder on my system.
  5. For the contents of the batch file, change directory to the C:\Support\amd64 folder (use the x86 folder if on 32-bit), then on the next line type: setup.exe /quiet (see example below). The /quiet switch is very important, because you will need this to run without any intervention.

    Example of batch file contents and folder path
  6. Save the batch file.
  7. On the same VM, go to Control Panel > Scheduled Tasks > Add Scheduled Task. Doing so will open the Scheduled Task Wizard.

    Create a scheduled task
  8. Click Next
  9. Click browse and locate the batch file you created in step 5-6, and click open

    Browse to the batch file
  10. Select when my computer starts, and click next

    Select when my computer starts
  11. Enter local administrator credentials (will be required because you will not initially have network connectivity), and click next

    enter admin credentials
  12. Click Finish

Step 2: Create a VPG in Zerto

The previous steps will now have your system prepared to start replicating to Azure. Furthermore, what we just did, basically will allow the Hyper-V Integration Services to install on the Azure instance upon boot, therefore enabling network access to manage it. It’s that simple.

Create the VPG (Virtual Protection Group) in Zerto that contains the Windows Server 2003 R2 VM(s) that you’ve prepped, and for your replication target, select your Microsoft Azure site.

If you need to learn how to create a VPG in Zerto, please refer to the vSphere Administration Guide – Zerto Virtual Manager documentation.

Step 3: Run a Failover Test for the VPG

Once your VPG is in a “Meeting SLA” state, you’re ready to start testing in Azure before you actually execute the migration, to ensure that the VM(s) will boot and be available.

Using the Zerto Failover Test operation will allow you to keep the systems running back on-premises, meanwhile booting them up in Azure for testing to get your results before you actually perform the Move operation to migrate them to their new home.

  1. In Zerto, select the VPG that contains the VM(s) you want to test in Azure (use the checkbox) and click the Test button.

    Select VPG, click Test
  2. Validate the VPG is still selected, and click Next.

    Validate VPG, click Next
  3. The latest checkpoint should already be selected for you. Click Next

    Verify Checkpoint, click Next
  4. Click Start Failover Test.

    Start Failover Test

After you click Start Failover Test, the testing operation will start. Once the VM is up in Azure, you can try pinging it. If it doesn’t ping the first time, reboot it, as the Integration Services may require a reboot before you can RDP to it (I had to reboot my test machine).

When you’re done testing, click the stop button in Zerto to stop the Failover Test, and wait for it to complete. At this point, if everything looks good, you’re ready to plan your migration.

If you did anything different than what I had done, remember to document it and make it repeatable :).

Next Steps

Once you’ve validated that your systems will successfully come up you can then schedule your migration. When you perform the migration into Azure, I recommend using the Move Operation (see image below), as that will be the cleanest way to get the system over to Azure in an application-consistent state with no data loss, as opposed to seconds of data loss and a crash-consistent state that the failover test, or failover live operations will give you.

Note: Before you run the Move Operation, it will be beneficial to uninstall VMware Tools on the VM(s) that you are moving to Azure. It has been found that not doing so will not allow you to uninstall them once in Azure.


Move Operation


Recommendations before you migrate:

  • Document everything you do to make this work. (it may come in handy when you’re looking for others to help you out)
  • Be sure to test the migration beforehand using the Failover Test Operation.
  • Check your Commit settings in Zerto before you perform the Move Operation to ensure that you allow yourself enough time to test before committing the workload to Azure. Current versions of Zerto default the commit policy to 60 minutes, so should you need more time, increase the commit policy time to meet your needs.
  • Be sure to right-size your VMs before moving them to the cloud. If they are oversized, you could be paying way more in consumption than you need to with bigger instance sizes that you may not necessarily need.

That’s it! Pretty simple and straightforward. To be honest, obtaining a working copy of Windows Server 2003 R2 and the Hyper-V Integration Services took longer than getting through the actual process, which actually worked the first time I tried it.

If this works for you let me know by leaving a comment, and if you find this to be valuable information that others can benefit from, please socialize it!

Cheers!

Share This:

Zerto: Can Failover Live Be Used for a Datacenter Migration, Consolidation, or HW Refresh?

The answer is yes, if you really wanted to… however, there’s another feature of Zerto that will allow you to perform a much “cleaner” migration of your VM(s) with a more planned approach.

This feature may not be easily located, as it’s found within the Actions menu in the Zerto UI, but it’s actually a very valuable one that basically allows you to migrate VMs from one location to another (cluster to cluster, vCenter to vCenter, vSphere <> Hyper-V, On-Prem to Public Cloud, Site to Site – even from one vendor’s hardware to another) with no data loss.  That’s right, an RPO of ZERO.

Failover Live (FOL)

First off, since the title of this blog post mentions “Failover Live”, or as we abbreviate it as FOL, lets talk about that method first.  What is the FOL process, and how does it work?

The FOL process is an operation that should be used following a disaster to recover your protected VMs in a recovery site, or in the event the protected site ZVM is not available.  The main thing to note here is that when you execute a FOL, Zerto will default to the latest checkpoint, or you can select a previous checkpoint in time to recover to (usually within seconds of each other).  Additionally, you have the option to either leave the VMs in the group running, power them off, or force a shutdown.

Essentially what this means is that when using FOL, Zerto is expecting that there’s been an unplanned environment disruption of some sort and  you need to resume production as quickly as possible in your recovery site.

Here’s the workflow for a failover operation.  You can download a PDF version of this diagram here.

Zerto Virtual Replication Failover Live Workflow Diagram

Please note, that the workflow objects in yellow include some decisions you will need to make based on your type of disruption as it relates to the power state of the VMs in your protected site (Shutdown (gracefully), Leave Powered On, or Force Shutdown).

Regarding my earlier comment about ZERO data loss, this method will only get you to the latest checkpoint when the outage was detected, or a previous checkpoint.  You can choose what point in time to recover to, which in either option, will be a crash-consistent state which may not be desired for something like a migration project.

For additional detail about the Failover Live (FOL) process and how it works, including considerations, see the Zerto Virtual Manager Administration Guide for vSphere.

Move VPG

As opposed to an unplanned disruption to your environment, the “Move VPG” operation in Zerto is recommended when you’re performing a planned migration whether it be your DR site, public cloud, new hardware, or other datacenter.  The difference here is that when you perform a planned migration of your virtual machine(s) to a recovery site, Zerto assumes that both sites are up and healthy and that you are performing a relocation of the virtual machine(s) in a controlled/orderly fashion – with the expectation of no data loss.

Here is the workflow for a Move VPG operation.  You can download a PDF version of this diagram here.

Zerto Virtual Replication Move VPG Workflow Diagram

So as you can see from the workflow above, the steps are a bit different than a failover live, as there are actually some steps taken in the protected site before VMs are brought up in the recovery site to ensure that what is booted is in the exact same state as the source copy.

For additional detail about the Move VPG process and how it works, see the Zerto Virtual Manager Administration Guide for vSphere.

Summary

While you can still use the FOL process to migrate VMs from one location to another, there is still going to be some level of data loss and a crash consistent boot.

To ensure you don’t lose any data (even data that may be in memory at the time you perform a FOL), the “Move VPG” operation will take care of automating the safe/graceful shutdown of a VM and replicate any remaining data before powering up in the recovery site.

When performing either operation, be sure to verify your commit policy as well, because you would want to make sure that the recovered/migrated VM is in a usable state before committing it to the recovery location because once you commit the change, you must wait for promotion and reverse protection (delta sync) to take place before you can perform a failback.  Both options will allow you the ability to rollback without commit, but behave differently in terms of the expected state of the protected site.


Share This:

Configuring AWS for Zerto Virtual Replication

By now, it’s no secret that the IT Resilience Platform that Zerto has come to be known as offers complete flexibility when it comes to multi-cloud agility.  This agility allows businesses to accelerate their digital transformation and truly take advantage of what the public cloud platform offers – ensuring even more freedom to choose your cloud and to be able to replicate workloads to, from, and even between public clouds.  As there have been great improvements in Zerto’s any-to-any story, one in particular I’d like to focus on in this article is AWS (Amazon Web Services).

Starting with Zerto Virtual Replication 6.0, customers now have:

  • Orchestration allowing not only targeting AWS for DR or for workload migration, but now the ability to come back out of AWS to on-premises datacenters, or even the ability to replicate between public cloud providers (AWS, Microsoft Azure, IBM Public Cloud) and Cloud Service Providers (CSPs).
  • Zerto Analytics visibility between all sites, including public cloud, now with network statistics and 30-day history.

Now, while these improvements are exciting and offer even more cloud agility to customers, one can’t help but realize that before you can actually start taking advantage of ZVR 6.0 to achieve a hybrid cloud architecture or DR in the cloud (specifically AWS), there are some pre-requisites to complete before doing so.  That said, meeting those requirements may not seem as intuitive as you’d hope at first glance.

While having a cloud use-case is usually the first step, and is determined by business requirements – the challenge lies within understanding what exactly needs to be configured in AWS for ZVR functionality, and how to accomplish it. If you take a look below, the workflow itself is a multi-step process that may not be very easy to perform, until now.

ZVR AWS Workflow
Figure 1: Configuring AWS for ZVR – Workflow

In my usual fashion of wanting to know exactly how things are done and then sharing it with everyone else, I’ve written a how-to document for configuring AWS for Zerto Virtual Replication, which I am happy to say has been turned into an official Zerto whitepaper and is now available for download!

>> Whitepaper – Configuring AWS for Zerto Virtual Replication <<

As usual, feedback, is welcomed with open arms. If you find this useful, please share and be social!

Share This:

Single vCenter, Single ZVM, and Recovering Zerto in a Failure Scenario

As a follow-up to my previous blog entry titled “Zerto Virtual Manger Outage, Replication, and Self-Healing“, which covers a ZVM failure scenario in an environment with paired ZVMs and two vCenters, I also decided to test and document what I found to be a useful solution to being able to recover from a failed ZVM in an environment where there is only one vCenter and one instance of Zerto Virtual Replication installed.  Granted, this is generally not a recommended deployment topology due to potentially having a single point of failure, this type of deployment does exist, and this should provide a suitable solution to allow recovery.

The following has been successfully tested in my lab, which is a vSphere environment, but I also do anticipate that this solution can also be carried over to a Hyper-V environment; which I’m hoping to test soon.

Since my lab originally consisted of two vCenters and two ZVMs, I first had to tear it down to become a single vCenter and single ZVM environment for the test.  Here is what I did, should you want to test this on your own before deciding whether or not you want to actually deploy it in your environment.

Disclaimer: 

Once again, this is not generally a recommended configuration, and there are some caveats similar to the referenced blog entry above, but with that said, this will allow you to be able to recover if you have Zerto deployed in your environment as described above.

Considerations

Please note that there may be some things to look out for when using this solution because of how the journal contains data until the checkpoints have been committed to the replica disk:

  • Journal disk being added at the time of a ZVM failure
  • VRA installation, new VRA installation at the time of a ZVM failure
  • Changes made to protected VMs (VMDK add) may not be captured if coinciding with a ZVM failure
  • VPG settings changed at the time of a ZVM failure, such as adding/removing a VM from a VPG


Based on additional testing I’ve done, it makes best sense to keep the journal size of the VPG protecting the ZVM as short as possible because any changes that occur to the ZVM (any of the above) will first go to the journal before aging out and being committed to the replica disk.  If those changes don’t commit to the disk, they will not appear in the UI when the ZVM is recovered using this method.

This was found by creating a VPG to protect another set of workloads, and then 10 minutes later, running through the recovery steps for the ZVM.  What I didn’t account for here is the FIFO (first-in-first-out) nature of the journal.  Because the change I had made resided within journal for the protected ZVM, it did not get a chance to age out to disk.  Recovering from the replica did not include the new VPG.

As a result, the recommendation for journal history when protecting the ZVM would be 1 hour (the minimum) – meaning your RPO for the ZVM will be 1 hour.

Setup the Test Environment

Before you can test this, you will need to configure your lab environment for it.  The following assumes your lab consists of two vCenters and 2 installations of Zerto Virtual Replication.  If your lab only has 1 vCenter, simply skip the “lab recovery site” section and move to the “lab protected site” steps.

In lab recovery site:

  1. Delete all existing VPGs
  2. Delete VRAs (via the ZVM UI)
  3. Un-pair the two ZVR sites (in the sites tab in ZVM UI)
  4. Remove hosts from recovery site vCenter

In lab protected site:

  1. [Optional] Create a new cluster, and add the hosts you removed from your recovery site.
  2. Deploy VRAs any hosts you’ll be using in for the test.
  3. Configure VPGs.

Protect the ZVM using Zerto

One thing I’ve wondered about that I finally got around to testing is actually protecting the ZVM itself using ZVR.  I’m happy to say, it appears to work just fine.  After all, Zerto does not make use of agents, snapshots, or disrupt production for that matter, as the technology basically replicates/mirrors block writes from the protected to the recovery site after they’re acknowledged via the virtual replication appliances, not touching the protected workload.

Protecting the ZVM is as simple as protecting any other application, via a VPG (Virtual Protection Group).  While you can likely protect the ZVM via storage snaps and replication, you’re still not going to get an RPO anywhere close to what Zerto itself can provide, which is typically in seconds – many cases single-digit seconds.  What this means, is that your amount of data loss, in the case of the ZVM, will likely be in minutes, even shorter if you can automate the recovery portion of this solution via scripting.

So, a few things to make this solution easier when creating the VPG to protect the ZVM:

  1. When selecting your default recovery server for the VPG that protects the ZVM, select a host, as opposed to a cluster.  This allows you to easily locate the VRA responsible for protecting the ZVM.  Further on through this article, you’ll see why.
  2. Select a specific datastore for recovery.  You can select a datastore cluster, but for the same reasons as above, selecting a specific datastore allows you to easily locate the disk files for the “recovery replica” of the ZVM in the event of a failure.

    Replication Settings - VPG Creation Wizard

  3. Select the production network/portgroup that houses the production IP space for the ZVM (Recovery tab of VPG creation wizard).  We will not be changing the IP address.Recovery Tab - VPG Creation Wizard
  4. Do not change the IP address for failover/move or test (in the NICs tab of the VPG creation wizard).

    NIC Settings - VPG Creation Wizard

Once you’ve created the VPG, allow initial sync to complete.  As you can see below, I now have a VPG containing the ZVM.  Please note that I’m protecting only the ZVM because I am using the embedded SQL CE database.  Using an external SQL server for the ZVR database will require additional planning.  Once initial sync has been completed, you’re ready to begin the actual failure test and recovery.

VPG List - Protecting ZVM

Simulate a Failure of the Primary ZVM

In order to test the recovery, we will need to simulate a failure of the Primary ZVM.

  1. Power off the ZVM.  Optionally, you can also go as far as deleting it from disk.  Now you know there’s no coming back from that scenario.  The ZVM will be gone.

Recover the ZVM Using the Replica

If you remember form the blog post linked at the beginning of this one, even if the ZVM is down, the VRAs are still replicating data.  Knowing that, the VRA in the recovery site (in this case on the recovery host) will have a lock on the VMDK(s) for the ZVM.  That is why I mentioned it would be good to know what host you’re replicating the ZVM to.

  1. IMPORTANT: Before you can start recovering, you will need to shutdown the VRA on the host specified for recovery.  Doing so will ensure that any lock on the VMDK(s) for the replica will be released.
  2. Once the VRA has been shutdown, open the datastore browser and move or copy the VMDK(s) out of the VRA folder to another folder.  By doing this, you’re making sure that if that VRA comes back up before you can delete the VPG protecting the ZVM, there will not be a conflict/lock.  If you select to copy the files, rather than move them, then you can use the existing replica as a pre-seed to re-protect the ZVM.
  3. Create a new VM using the vSphere client.
  4. Select to create a Custom virtual machine.

    Create VM - Custom

  5. Provide a name for the VM that doesn’t already exist in vCenter if you did not delete the original “failed” ZVM.  This ensures there won’t be a naming conflict.
  6. Select the datastore where you copied the replica VMDK(s) to.
  7. Select the Virtual Machine Version.  In this case, you can leave the default, which will be the latest version supported by vSphere version.

    Create VM - vHW Version

  8. Select the OS version for the ZVM.

    Create VM - OS Version

  9. Select the number of vCPUs required. (Match what the original ZVM had)
  10. Select the amount of memory to allocate to the VM. (Match what the original ZVM had)
  11. Select the PortGroup and Adapter type and make sure it’s set to connect at power on.  This should match the original.  My original ZVM had been configured with VMXNET3, so that’s what I selected.
  12. Select the SCSI controller to use.  Again, try to match the original.  Mine was LSI Logic SAS.
  13. On the Select a Disk screen, select Use an existing virtual disk.

    Create VM - Select Existing Disk

  14. Browse to the location of the ZVM replica’s VMDK(s) you copied, and select the disk and click OK.

    Create VM - Select existing disk file

  15. Leave the advanced options at default.
  16. On the summary screen, click Finish.
  17. When the creation is completed, power on the VM, open the console, and watch it boot up.  At this point, DO NOT power on the VRA that you previously shutdown.  There will be some cleanup, especially if you did not copy the VMDK(s) to another location.

Power on new VM created using existing disk.

Clean-up

Once the recovered ZVM has booted up, go ahead and log in to the Zerto UI.  Don’t be alarmed that everything is red.  This is because the ZVM is coming up from being down for a while, and it needs to run some checks, and get re-situated with the VRAs and begin creating new checkpoints again.  Once that process completes, as we saw in the previous blog article (referenced at the beginning of this one), things will start to go green and into a “Meeting SLA” state.

  1. Click on the VPGs tab.
  2. Locate the VPG previously created to protect the ZVM, and delete it.  If you want to retain the original replica disks as a pre-seed, make sure you select the checkbox labeled Keep the recovery disks at the peer site.  Please note that because the VRA that was protecting this VPG is still down, you may need to click delete again, and force the deletion of the VPG.

    Delete VPG - Preserve recovery disks.

  3. Once the VPG is deleted, go ahead and power on the VRA you previously shutdown.

Verify ZVR Functionality

Now that we’ve cleaned up and powered the VRA back up, you can verify that ZVR is working again, and the ZVM is performing its duty of creating and tracking checkpoints in the journal again.  You can do this by starting to initiate a failover test and clicking to see what checkpoints are available, or by attempting to recover a file from the journal from any one of the VPGs.

Validate checkpoint functionality

(Above) you can see when the ZVM went down, and when it started creating and tracking checkpoints again.

Validate JFLR

(Above) Restored a file from the Journal.

Summary

While this is not an optimal/recommended configuration, through testing and validation, we have seen that even in a single ZVM, single vCenter environment, being able to recovery the platform that is providing your resiliency services is completely possible.  Granted, there will be some data loss (RPO) on the ZVM itself, despite being down for time between the failure and the recovery, Zerto Virtual Replication is clearly able to pick up where it left off, and resume protection of your environment.

If you found this to be useful, please share, comment, and let me if you’ve tried this for yourself!

Share This:

Zerto Virtual Manager Outage, Replication, and Self-Healing

I’ve decided to explore what happens when a ZVM (Zerto Virtual Manager) in either the protected site or the recovery site is down for a period of time, and what happens when it is back in service, and most importantly, how an outage of either ZVM affects replication, journal history, and the ability to recover a workload.

Before getting in to it, I have to admit that I was happy to see how resilient the platform is through this test, and how the ability to self-heal is a built in “feature” that rarely gets talked about.

Questions:

  • Does ZVR still replicate when a ZVM goes down?
  • How does a ZVM being down affect checkpoint creation?
  • What can be recovered while the ZVM is down?
  • What happens when the ZVM is returned to service?
  • What happens if the ZVM is down longer than the configured Journal History setting?

Acronym Decoder & Explanations

ZVMZerto Virtual Manager
ZVRZerto Virtual Replication
VRAVirtual Replication Appliance
VPGVirtual Protection Group
RPORecovery Point Objective
RTORecovery Time Objective
BCDRBusiness Continuity/Disaster Recovery
CSPCloud Service Provider
FOTFailover Test
FOLFailover Live

Does ZVR still replicate when a ZVM goes down?

The quick answer is yes.  Once a VPG is created, the VRAs handle all replication.    The ZVM takes care of inserting and tracking checkpoints in the journal, as well as automation and orchestration of Virtual Protection Groups (VPGs), whether it be for DR, workload mobility, or cloud adoption.

In the protected site, I took the ZVM down for over an hour via power-off to simulate a failure.  Prior to that, I made note of the last checkpoint created.  As the ZVM went down, within a few seconds, the protected site dashboard reported RPO as 0 (zero), VPG health went red, and I received an alert stating “The Zerto Virtual Manager is not connected to site Prod_Site…”

The Zerto Virtual Manager is not connected to site Prod_Site


Great, so the protected site ZVM is down now and the recovery site ZVM noticed.  The next step for me was to verify that despite the ZVM being down, the VRA continued to replicate my workload.  To prove this, I opened the file server and copied the fonts folder (C:\Windows\Fonts) to C:\Temp (total size of data ~500MB).

As the copy completed, I then opened the performance tab of the sending VRA and went straight to see if the network transmit rate went up, indicating data being sent:

VRA Performance in vSphere, showing data being transmitted to remote VRA in protected site.

Following that, I opened the performance monitor on the receiving VRA and looked at two stats: Data receive rate, and Disk write rate, both indicating activity at the same timeframe as the sending VRA stats above:

Data receive rate (Network) on receiving/recovery VRA Disk write rate on receiving/recovery VRA

As you can see, despite the ZVM being down, replication continues, with caveats though, that you need to be aware of:

  • No new checkpoints are being created in the journal
  • Existing checkpoints up to the last one created are all still recoverable, meaning you can still recover VMs (VPGs), Sites, or files.

Even if replication is still taking place, you will only be able to recover to the latest (last recorded checkpoint) before the ZVM went down.  When the ZVM returns, checkpoints are once again created, however, you will not see checkpoints created for the entire time that ZVM was unavailable.  In my testing, the same was true for if the recovery site ZVM went down while the protected site ZVM was still up.

How does the ZVM being down affect checkpoint creation?

If I take a look at the Journal history for the target workload (file server), I can see that since the ZVM went away, no new checkpoints have been created.  So, while replication continues on, no new checkpoints are tracked due to the ZVM being down, since one of it’s jobs is to track checkpoints.

Last checkpoint created over 30 minutes ago, right before the ZVM was powered off.


What can be recovered while the ZVM is down?

Despite no new checkpoints being created – FOT or FOL – VPG Clone, Move, and File Restore services are still available for the existing journal checkpoints.  Given this was something I’ve never tested before, this was really impressive.

One thing to keep in mind though is that this will all depend on how long your Journal history is configured for, and how long that ZVM is down.  I provide more information about this specific topic further down in this article.

What happens when the ZVM is returned to service?

So now that I’ve shown what is going on when the ZVM is down, let’s see what happens when it is back in service.  To do this, I just need to power it back up, and allow the services to start, then see what is reported in the ZVM UI on either site.

As soon as all services were back up on the protected site ZVM, the recovery site ZVM alerted that a Synchronization with site Prod_Site was initiated:

Synchronizing with site Prod_Site

Recovery site ZVM Dashboard during site synchronization.

The next step here is to see what our checkpoint history looks like.  Taking a look at the image below, we can see when the ZVM went down, and that there is a noticeable gap in checkpoints, however, as soon as the ZVM was back in service, checkpoint creation resumed, with only the time during the outage being unavailable.

Checkpoints resume


What happens if the ZVM is down longer than the configured Journal History setting?

In my lab, for the above testing, I set the VPG history to 1 hour.  That said, if you take a look at the last screen shot, older checkpoints are still available (showing 405 checkpoints).  When I first tried to run a failover test after this experiment, I was presented with checkpoints that go beyond an hour.  When I selected the oldest checkpoint in the list, a failover test would not start, even if the “Next” button in the FOT wizard did not gray out.  What this has lead me to believe is that it may take a minute or two for the journal to be cleaned up.

Because I was not able to move forward with a failover test (FOT), I went back in to select another checkpoint, and this time, the older checkpoints were gone (from over an hour ago).  Selecting the oldest checkpoint at this time, allowed me to run a successful FOT because it was within range of the journal history setting.  Lesson learned here – note to self: give Zerto a minute to figure things out, you just disconnected the brain from the spine!

Updated Checkpoints within Journal History Setting

Running a failover test to validate successful usage of checkpoints after ZVM outage:

File Server FOT in progress, validating fonts folder made it over to recovery site.

And… a recovery report to prove it:

Recovery Report - Successful FOT Recovery Report - Successful FOT


Summary and Next Steps

So in summary, Zerto is self-healing and can recover from a ZVM being down for a period of time.  That said, there are some things to watch out for, which include known what your configured journal setting is, and how a ZVM being down longer than the configured history setting affects your ability to recover.

You can still recover, however, you will start losing older checkpoints as time goes on while the ZVM is down.  This is because of the first-in-first-out (FIFO) nature of how the journal works.  You will still have the replica disks and journal checkpoints committing to it as time goes on, so losing history doesn’t mean you’re lost, you will just end up breaching your SLA for history, which will re-build over time as soon as the ZVM is back up.

As a best practice, it is recommended you have a ZVM in each of your protected sites, and in each of your recovery sites for full resilience.  Because after all, if you lose one of the ZVMs, you will need at least either the protected or recovery site ZVM available to perform a recovery.  The case is different if you have a single ZVM.  If you must have a single ZVM, put it into the recovery site, and not on the protected site, because chances are, your protected site is what you’re accounting for going down in any planned or unplanned event.  It makes most sense to have the single ZVM in the recovery site.

In the next article, I’ll be exploring this very example of a single ZVM and how that going down affects your resiliency.  I’ll also be testing some ways to potentially protect that single ZVM in the event it is lost.

Thanks for reading!  Please comment and share, because I’d like to hear your thoughts, and am also interested in hearing how other solutions handle similar outages.

Share This:

Zerto Automation with PowerShell and REST APIs

Zerto is simple to install and simple to use, but it gets better with automation!  While performing tasks within the UI can quickly become second nature, you can quickly find yourself spending a lot of time repeating the same tasks over and over again.  I get it, repetition builds memory, but it gets old.  As your environment grows, so does the amount of time it takes to do things manually.  Why do things manually when there are better ways to spend your time?

Zerto provides great documentation for automation via PowerShell and REST APIs, along with Zerto Cmdlets that you can download and install to add-on to  PowerShell to be able to do more from the CLI.  One of my favorite things is that the team has provided functional sample scripts that are pretty much ready to go; so you don’t have to develop them for common tasks, including:

  • Querying and Reporting
  • Automating Deployment
  • Automating VM Protection (including vRealize Orchestrator)
  • Bulk Edits to VPGs or even NIC settings, including Re-IP and PortGroup changes
  • Offsite Cloning

For automated failover testing, Zerto includes an Orchestrator for vSphere, which I will cover in a separate set of posts.

To get started with PowerShell and RESTful APIs, head over to the Technical Documentation section of My Zerto and download the Zerto PowerShell Cmdlets (requires MyZerto Login) and the following guides to get started, and stay tuned for future posts where I try these scripts out and offer a little insight to how to run them, and also learn how I’ve used them!

  • Rest APIs Online Help – Zerto Virtual Replication
    • The REST APIs provide a way to automate many DR related tasks without having to use the Zerto UI.
  • REST API Reference Guide – Zerto Virtual Replication
    • This guide will help you understand how to use the ZVR RESTful APIs.
  • REST API Reference Guide – Zerto Cloud Manager
    • This guide explains how to use the ZCM RESTful APIs.
  • PowerShell Cmdlets Guide – Zerto Virtual Replication
    • Installation and use guide for the ZVR Windows PowerShell cmdlets.
  • White Paper – Automating Zerto Virtual Replication with PowerShell and REST APIs
    • This document includes an overview of how to use ZVR REST APIs with PowerShell to automate your virtual infrastructure.  This is the document that also includes several functional scripts that take the hard work out of everyday tasks.

If you’ve automated ZVR using PowerShell or REST APIs, I’d like to hear how you’re using it and how it’s changed your overall BCDR strategy.

I myself am still getting started with automating ZVR, but am really excited to share my experiences, and hopefully, help others along the way!  In fact, I’ve already been working with bulk VRA deployment, so check back or follow me on twitter @EugeneJTorres for updates!

Share This:

Changing a VM’s Recovery VRA When a Host Crashes or Prior to Recovery Site Maintenance

Yesterday, we had one host in our recovery site PSOD, and that caused all kinds of errors in Zerto, primarily related to VPGs.  In our case, this particular host had both inbound and outbound VPGs attached to it’s VRA, and we were unable to edit (edit button in VPG view was grayed out, along with the “Edit VPG” link when clicking in to the VPG) any of them to recover from the host failure.  Previously when this would happen, we would just delete the VPG(s) and recreate it/them, preserving the disk files as pre-seeded data.

When you have a few of these to re-do, it’s not a big deal, however, when you have 10 or more, it quickly becomes a problem.

One thing that I discovered that I didn’t know was in the product, is that if you click in to the VRA associated with the failed host, and go do the MORE link, there’s an option in there to “Change Recovery VRA.”  This option will allow you to tell Zerto that anything related to this VRA should now be pointed at X. Once I did that, I was able to then edit the VPGs.  I needed to edit the VPGs that were outbound, because they were actually reverse-protected workloads that were missing some configuration details (NIC settings and/or Journal datastore).

Additionally – If you are planning on host maintenance in the recovery site (replacing a host(s), patching, etc…), these steps should be taken prior to taking the host and VRA down to ensure non-disrupted protection.


Here’s how:

  1. Log on to the Zerto UI.
  2. Once logged on, click on the Setup tab.
  3. In the “VRA Name” column, locate the VRA associated with the failed host, and then click the link (name of VRA) to open the VRA in a new tab in the UI.
  4. Click on the tab at the top that contains VRA: Z-VRA-[hostName].
  5. Once you’re looking at the VRA page, click on the MORE link.
  6. From the MORE menu, click Change VM Recovery VRA.
  7. In the Change VM Recovery VRA dialog, check the box beside the VPG/VM, then select a replacement host. Once all VPGs have been udpated, click Save.

Once you’ve saved your settings, validate that the VPG can be edited, and/or is once again replicating.


Share This:

Zerto: Dual NIC ZVM

Something I recently ran into with Zerto (and this can happen for anything else) was the dilemma of being able to protect remote sites that (doesn’t happen often) happen to have IP addresses that are identical in both the protected and recovery sites.  And no, this wasn’t planned for, it was just discovered during my Zerto deployment in what we’ll call the protected sites.

Luckily, our network team had provisioned two new networks that are isolated, and connected to these protected sites via MPLS.  Those two new networks do not have the ability to talk back to our existing enterprise network without firewalls getting involved, and this is by design since we are basically consolidating data centers while absorbing assets and virtual workloads from a recently acquired company.

When I originally installed the ZVM in my site (which we’ll call the recovery site), I had used IP addresses for the ZVM and VRAs that were part of our production network, and not the isolated network set aside for this consolidation.  Note: I installed the Zerto infrastructure in the recovery site ahead of time before discussions about the isolated networks was brought up.  So, because I needed to get this onto the isolated network in order to be able to replicate data from the protected sites to the recovery site, I set out to re-IP the ZVM, and re-IP the VRAs.  Before I could do that, I needed to provide justification for firewall exceptions in order for the ZVM in the recovery site to link to the vCenter, communicate with ESXi hosts for VRA deployment, and also to be able to authenticate the computer, users, service accounts in use on the ZVM.  Oh, and I also needed DNS and time services.

The network and security teams asked if they could NAT the traffic, and my answer was “no” because Zerto doesn’t support replication using NAT.  That was easy, and now the network team had to create firewall exceptions for the ports I needed.

Well,  as expected, they delivered what I needed.  To make a long story short, it all worked, and then about 12 hours before we were scheduled to perform our first VPG move, it all stopped working, and no one knew why.  At this point, it was getting really close to us pulling the plug on the migration the following day, but I was determined to get this going and prevent another delay in the project.

When looking for answers, I contacted my Zerto SE, reached out on twitter, and also contacted Zerto Support.  Well, at the time I was on the phone with support, we couldn’t do anything because communication to the resources I needed was not working.  We couldn’t perform a Zerto re-configure to re-connect to the vCenter, and at this point, I had about 24VPGs that were reporting they were in sync (lucky!), but ZVM to ZVM communication wasn’t working, and recovery site ZVM was not able to communicate with vCenter, so I wouldn’t have been able to perform the cutover.  So since support couldn’t help me out in that instance, I scoured the Zerto KB looking for an alternate way of configuring this where I could get the best of both worlds, and still be able to stay isolated as needed.

I eventually found this KB article that explained that not only is it supported, but it’s also considered a best practice in CSP or large environments to dual-NIC the ZVM to separate management from replication traffic.  I figured, I’m all out of ideas, and the back-and-forth with firewall admins wasn’t getting us anywhere; I might as well give this a go.  While the KB article offers the solution, it doesn’t tell you exactly how to do it, outside of adding a second vNIC to the ZVM.  There were some steps missing, which I figured out within a few minutes of completing the configuration.  Oh, and part of this required me to re-IP the original NIC back to the original IP I used, which was on our production network.  Doing this re-opened the lines of communication to vCenter, ESXi hosts, AD, DNS, SMTP, etc, etc… Now I had to focus on the vNIC that was to be used for all ZVM to ZVM as well as replication traffic.  In a few short minutes, I was able to get communication going the way I needed it, so the final thing I needed to do was re-configure Zerto to use the new vNIC for it’s replication-related activities.  I did that, and while I was able to re-establish the production network communications I needed, now I wasn’t able to access the remote sites (ZVM to ZVM) or access the recovery site VRAs.

It turns out, what I needed here were some static, persistent routes to the remote networks, configured to use the specific interface I created for it.

Here’s how:

The steps I took are below the image.  If the image is too small, consider downloading the PDF here.

zerto_dual_nic_diagram


On the ZVM:

  1. Power it down, add 2nd vNIC and set it’s network to the isolated network.  Set the primary vNIC to the production network.
  2. Power it on.  When it’s booted up, log in to Windows, and re-configure the IP address for the primary vNIC.  Reboot to make sure everything comes up successfully now that it is on the correct production network.
  3. After the reboot, edit the IP configuration of the second vNIC (the one on the isolated network).  DO NOT configure a default gateway for it.
  4. Open the Zerto Diagnostics Utility on the ZVM. You’ll find this by opening the start menu and looking for the Zerto Diagnostics Utility.  If you’re on Windows Server 2008 or 2012, you can search for it by clicking the start menu and starting to type “Zerto.”
    zerto_dual_nic_1_4
  5. Once the Zerto Diagnostics Utility loads, select “Reconfigure Zerto Virtual Manager” and click Next.
    zerto_dual_nic_1_5
  6. On the vCenter Server Connectivity screen, make any necessary changes you need to and click Next.  (Note: We’re only after changing the IP address the ZVM uses for replication and ZVM-to-ZVM communication, so in most cases, you can just click Next on this screen.)
  7. On the vCloud Director (vCD) Connectivity screen, make any necessary changes you need to and click Next. (Note: same note in step 6)
  8. On the Zerto Virtual Manager Site Details screen, make any necessary changes you need to  and click Next. (Note: same as note in step 6)
  9. On the Zerto Virtual Manager Communication screen, the only thing to change here is the “IP/Host Name Used by the Zerto User Interface.”  Change this to the IP Address of your vNIC on the isolated Network, then click Next.zerto_dual_nic_1_9
  10. Continue to accept any defaults on following screens, and after validation completes, click Finish, and your changes will be saved.
  11. Once the above step has completed, you will now need to add a persistent, static route to the Windows routing table.  This will tell the ZVM that for any traffic destined for the protected site(s), it will need to send that traffic over the vNIC that is configured for the isolated network.
  12. Use the following route statement from the Windows CLI to create those static routes:
    route ADD [Destination IP] MASK [SubnetMask] [LocalGatewayIP] IF [InterfaceNumberforIsolatedNetworkNIC] -p
    Example:>
    route ADD 192.168.100.0 MASK 255.255.255.0 10.10.10.1 IF 2 -p
    route ADD 102.168.200.0 MASK 255.255.255.0 10.10.10.1 IF 2 -p
    
    Note: To find out what the interface number is for your isolated network vNIC, run route print from the Windows CLI.  It will be listed at the top of what is returned.


zerto_dual_nic_1_10

Once you’ve configured your route(s), you can test by sending pings to remote site IP addresses that you would normally not be able to see.

After performing all of these steps, my ZVMs are now communicating without issue and replications are all taking place.  A huge difference from hours before when everything looked like it was broken.  The next day, we were able to successfully move our VPGs from protected sites to recovery sites without issue, and reverse protect (which we’re doing for now as a failback option until we can guarantee everything is working as expected).

If this is helpful or you have any questions/suggestions, please comment, and please share! Thanks for reading!


Share This:

Product Comparison: VMware SRM & Zerto Virtual Replication

Introduction

Obviously, based on my previous blog posts, it’s apparent that I’ve been spending some time in the past few months testing VMware Site Recovery Manager and Zerto Virtual Replication to see which product best meets our business continuity and disaster recovery requirements.  My task was to compare the two products, feature for feature based on our use cases, which are primarily protection, recovery, re-protection, and workload migration.

Get comfortable, this could take a while…

Blue vs. Red

As of today, SRM and Zerto have been tested in a sandbox environment, consisting of 2 sites (Seattle and Denver), 2 vCenters, 2 physical hosts in a cluster in each site, and 1 test workload which consisted of a Windows Server VM with auto-generated files of different sizes.  The two sites, being geographically separated are joined by a dual 20 Gb/s connection, and there are no bandwidth throttling mechanisms in place outside of what’s available in the software, and it’s only used to throttle down during business hours.  The physical networking at the host level in both sites is 10GbE.

VMware’s Site Recovery Manager is the only one of the two products that has the array-based replication feature, so to make this more of an “apples-to-apples” comparison, that feature isn’t heavily reported on here, but has been tested, and it works well, so I’m happy.

Both hypervisor-based product tests that were performed have been completed in each direction, in terms of recovery testing, failover, re-protection, and migration.  The results of both solutions are similar, however, based on results, we are leaning more toward one product in terms of simplicity, flexibility, scalability, monitoring capabilities, and user experience.

Below are images of what the topology for both test environments looks like, with SRM on the left, and Zerto on the right.

If you are interested in seeing these diagrams up close, you can download the PDFs for each here:

topology_showdown_generic

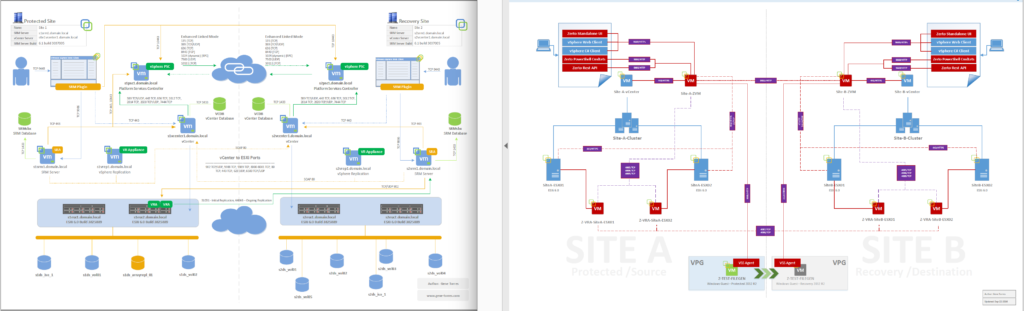
^^ Not pictured in the Zerto Diagram: External PSCs for vCenter, vCenter SQL Servers, and all port communication native to vCenter components.

Product Comparison

While VMware Site Recovery Manager creates a complete solution with vSphere Replication (which can also be used without SRM), Zerto also protects using hypervisor replication.  But to compare the two, we must first compare the capabilities of each solution by comparing vSphere Replication (without SRM) to Zerto Virtual Replication.  Note that without SRM, vSphere Replication can be rather limited when it comes to several features.  The tables will lay out the use cases for either product, and their features.

Use Cases

VMware vSphere Replication Use CasesZerto Virtual Replication Use Cases
  • Data protection and disaster recovery within the same site and across sites
  • Data center migration
  • Replication engine for VMware vCloud Air Disaster Recovery
  • Replication Engine for VMware vCenter Site Recovery Manager
  • Replication & Disaster Recovery
  • Offsite Backup and Data Protection
  • Data Migrations & Workload Mobility
  • Automated Failover, Failback & Testing
  • Reduce RTO/RPO
  • Complete BC/DR solution: Business Continuity and Disaster Recovery
  • Storage Savings
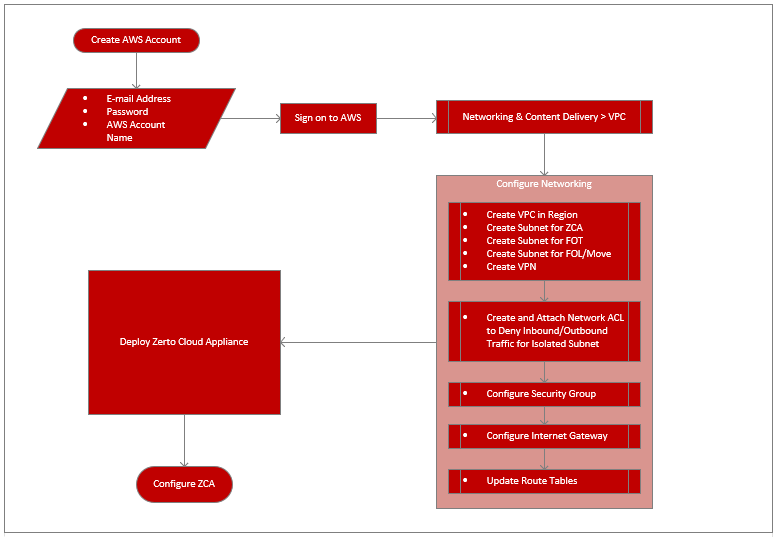
  • AWS Migrations: Cloud migration to Amazon Web Services (ZVR 5.0 introduces DRaaS to Azure)
  • Cross-Hypervisor Replication: MS Hyper-V to VMware vSphere/VMware vSphere to MS Hyper-V


Feature Comparison: vSphere Replication (Without SRM) and Zerto Virtual Replication

VMware vSphere ReplicationFeatures & BenefitsZerto Virtual Replication Features & Benefits
Licensing RequirementVMware Essentials Plus and AboveVMware Essentials
Automation/Orchestration of Disaster RecoveryManual, PowerCLI to get basic automation (add to inventory, power on/off) ; otherwise, use SRM with vSphere Replication Full automation/orchestration features
Version CompatibilityvSphere Replication version must match vCenter versionZerto can be used with vSphere 4.0 and later, no ties to having every component match versions in respect to hypervisor/vCenter.
Automated Recovery CapabilitiesEach VM in the recovery site will need to manually be powered on. Fully automated recovery capabilities.
Automated Connection to correct network(s)Manually done when recovering with vSphere Replication. For automation of post-recovery tasks, use SRM. Fully automated
WAN CompressionNetwork compression capable with 6.1 at the cost of vSphere replication appliance CPU resources. Note: 1 vR appliance per vCenter instance is supported for a maximum of 2000 VMs protected per appliance. Built-in, often seeing a 50% compression ratio. Replication appliances are assigned a 1:1 ratio (host to VRA) with automated resource reservations to ensure best performance of replication appliances.
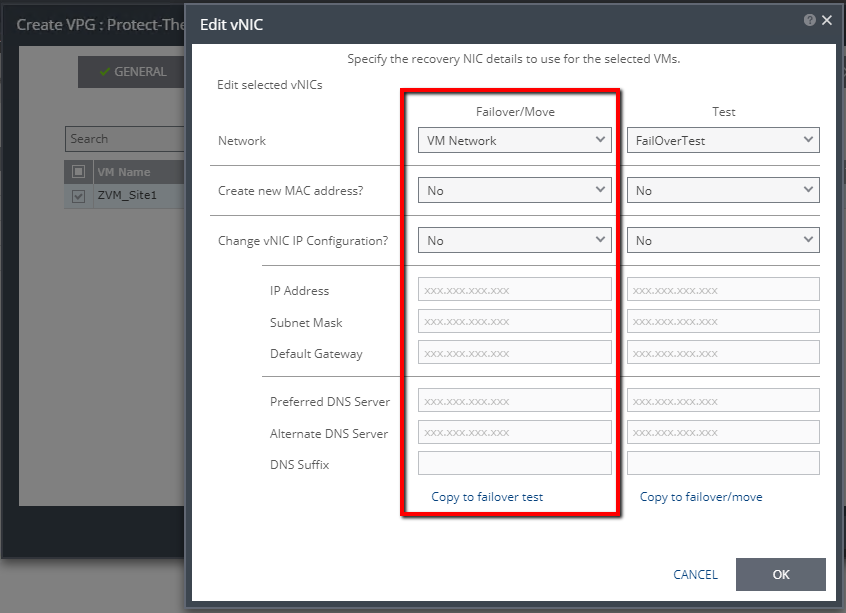
IP Re-AddressingManual process. For automated re-IP, use SRMBuilt in to failover plan (assigned in VPG)
Non-Disruptive TestingNot available since you cannot power on the replica VM if the original VM is still running and reachable. Use SRM with vSphere Replication to allow for recovery testing. Real or bubble networks can be used for recovery testing and isolation.
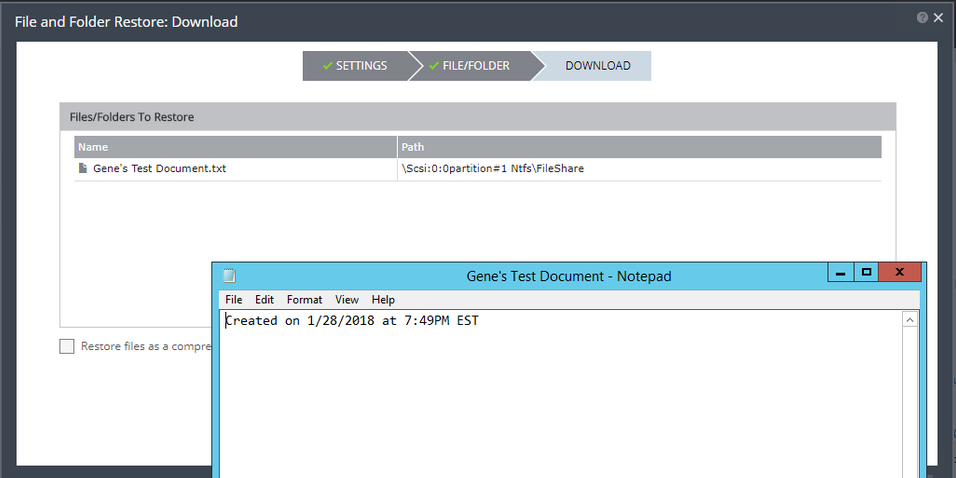
Cloning CapabilityNoneAllows for recovery site clones. This allows for full long-term archival backups of the VMs or file-level recovery from a point-in-time clone.
Failback OptionNone - SRM required.Automated failback workflow capability
Point-in-Time RecoveryAvailable with vSphere Replication 6.x - maximum of 24 PIT instances. Uses VMware Snapshots. Configurable, however, when using Offsite Backup Feature, up to 1 year. Does not use VMware Snapshots.
RDM (Raw Device Mapping) Support No physical RDM support, but virtual RDMs are supported.Both physical and virtual mode RDMs are supported.
Bandwidth ControlNoneThrottling and priorities are available in Zerto to reduce bandwidth consumption during certain times, and unlimited at others, via schedule.
vApp SupportNot SupportedZerto leverages vApps to make administration easier. If a vApp is configured for protection with a VPG, then any VM added to the vApp is automatically protected.
Storage DRS SupportNot supported, SRM is required.Storage DRS is supported and works with Zerto.
RPO Range15 minutes to 24 hoursSeconds
How VMs are ChosenSelected individually or through multi-selecting in the interface, but protection grouping is not available. VMs can be organized into Virtual Protection Groups.


Feature Comparison: vSphere Replication (with SRM) and Zerto Virtual Replication

VMware vSphere Replication with SRMZerto Virtual Replication
Provides planning, testing, and execution of disaster recovery for vSphere:YesYes
Designed for:SRM was designed for disaster recovery orchestration only Designed for hypervisor-based replication AND disaster recovery orchestration
Licensed:Per-VMPer-VM
Replication granularity:Per-VM or multi-select but virtual protection grouping is not available Per-VM and/or Per-Virtual Protection Group
Configure consistency groups (virtual protection groups)NoYes
Replication recovery points:Yes, up to 24 snapshotsYes, up to 14 days with standard recovery, up to 1 year with extended recovery using the Offsite Backup feature.
Compatibility:vSphere Replication works with ESX 5.x and above. SRM requires the same version of vCenter and SRM be installed at both sites. Zerto works with ESXi 4.0 U1 and above. Zerto can replicate between different versions of vCenter. Zerto can also protect and recover from vSphere to Hyper-V, Hyper-V to vSphere, and either virtualization platform to the cloud (AWS, Azure(Zerto v5.0)).
Managed with:vSphere Client PluginvSphere Client Plugin and standalone browser UI
Replication is performed with:vSphere ReplicationZerto HyperVisor-based replication through VRAs deployed to each host with protected VMs


Feature Comparison: VMware Site Recovery Manager & Zerto Virtual Replication API Availability

The following table displays the availability, use cases, and capabilities of both the VMware Site Recovery Manager and Zerto Virtual Replication APIs for access, integration, and automation.

VMware Site Recovery ManagerZerto Virtual Replication
Availability
  • Similar to vSphere API, uses web service that allows access to the API in Java C#, or any language that supports WSDL (Web Services Definition Language).
  • REST APIs are available to automate virtual infrastructure, allowing for benefits of software defined replication and recovery.
Use Cases
  • Automation of protection operations
  • Automation of protection operations
  • Automation of product deployment
  • Querying and Reporting
Capabilities
  • Create protection groups
  • Initiate testing
  • Initiate recovery
  • Re-protection
  • Revert Operations
  • Collect Results
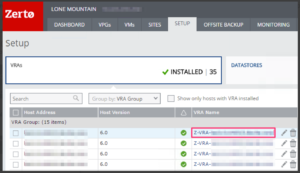
  • Bulk automated VRA deployment
  • Bulk automated VPG creation
  • Automating VM protection by vSphere Folder
  • Automating VM protection with vRealize Orchestrator
  • Listing unprotected VMs
  • Listing protected VMs & VPGs
  • Long Term RPO & Storage Reporting to CSV
  • Resource reports
  • VPG, VM, VMNIC & Re-IP settings report
  • Emailing Reports
Programming Environments/Supported Languages
  • Java JAX-WS Framework
  • C# and Visual Studio
  • Java Axis Framework
  • Managed Objects as WSDL
  • All require SDK installation for each environment
  • PowerShell
  • cURL
  • Python
  • C#


System Requirements

The following tables below outline system requirements for both VMware Site Recovery Manager and Zerto Virtual Replication.

VMware Site Recovery Manager 6.1Zerto Virtual replication 4.5 U3
Virtualization Management
  • VMware vCenter 6.0 U2 in both protected and recovery sites.
  • VMware vCenter 4.0 U1
  • Microsoft SCVMM 2012 R2
  • As long as protected and recovery sites meet minimum versions, cross-version protection and recovery is supported.
Hypervisor
  • Minimum VMware vSphere ESXi 5.0
  • Minimum VMware vSphere ESXi 4.0 U1
  • Microsoft Windows Server 2012 R2 and Server Core
vSphere Replication Appliance
  • Minimum vSphere Replication 6.0
  • Not Required
Storage Replication Adapter
  • Depends on SAN vendor and code level, availability, and support.
  • Not Required
Client
  • vSphere Web Client - by default will match currently installed version that matches vCenter requirement for SRM.
  • vSphere Client Console (Thick Client) 4.0 and higher
  • vSphere Web Client 5.0 - 5.0 U3 - Not supported
  • vSphere Web Client 5.1 and up - Supported
  • Zerto Standalone Web UI
vSphere Replication Appliance Resource Requirements (per site)
  • 2 vCPU
  • 4 GB RAM
  • 18 GB Storage
  • According to VMware, CPU and memory resources consumed by vSphere Replication on a host or guest OS is negligible.
  • The numbers seen above are how the appliance is configured by default.
  • N/A
Zerto Virtual Replication Appliance (VRA)
  • N/A
  • 1 vCPU
  • 2GB RAM (minimum)
  • 12.5GB Storage
  • 1 of these appliances needs to be deployed (via Zerto UI) to each host that will be protecting VMs in VPGs.
  • DRS Affinity rules are created automatically by Zerto during the deployment process, so VRAs always stay on the hosts they are installed to.
Recovery Orchestration Provided By
  • Site Recovery Manager 6.1 (see versions above for compatibility) or review VMware's product interoperability matrix for all version information.
  • Zerto Virtual Replication (required before VRAs can be deployed)
SRM6.1/ZVM 4.5U3 Server Requirements (1 per site)
  • At least 2 CPUs, 4 for large environments
  • 2 GB RAM minimum - at least 6 GB if including OS requirements
  • 5 GB storage (in addition to OS requirements)
  • At least 1Gb/s NIC
    • Windows Server 2008 R2 (64-bit)
    • Windows Server 2012 R2 (64-bit)
  • Protecting up to 750 VMs and up to 5 peer sites:
    • 2 CPU (reserved)
    • 4GB RAM (reserved)
  • Protecting 751-2000 VMs and up to 15 peer sites:
    • 4 CPU (reserved)
    • 4GB RAM (reserved)
  • Protecting over 2000 VMs and over 15 peer sites:
    • 8 CPUs (reserved)
    • 8GB RAM (reserved)
  • 2GB Storage space for binaries
Supported Databases
  • Microsoft SQL Server
  • 2008 Express R2 SP2,SP3 (32-bit and 64-bit)
  • 2008 Standard/Enterprise R2 SP3 (32-bit and 64-bit)
  • 2008 Standard/Enterprise/Datacenter R2 SP2 (32-bit and 64-bit)
  • 2008 Standard/Enterprise R2 SP1 (32-bit and 64-bit)
  • 2012 Express SP2 (32-bit and 64-bit)
  • 2012 Standard/Enterprise SP2 (32-bit and 64-bit)
  • 2012 Standard/Enterprise SP1 (32-bit and 64-bit)
  • 2012 Enterprise (64-bit)
  • 2014 Standard/Enterprise (32-bit and 64-bit)
  • Oracle
    • 11g Standard ONE Edition, R2 (32-bit and 64-bit)
    • 11g Standard/Enterprise Edition, R2 (32-bit and 64-bit)
    • 12C Standard ONE Edition, R1 (32-bit and 64-bit)
    • 12C Standard/Enterprise Edition (32-bit and 64-bit)
    • Embedded SQL database for protecting up to 4 sites, 40 hosts, and 400 VMs/li>
    • Microsoft SQL Server Standard & Enterprise Editions for anything more than the above
    • Microsoft SQL Server Express
    • Supported MSSQL Database versions:
      • 2008
      • 2008 R2
      • 2012
      • 2014
    Bandwidth Requirements
    • > 10Mb/s (dedicated to move 40GB in an hour)
    • > 5Mb/s
    Number of Firewall Ports for Cross-site Communication, Replication, and Recovery
    • WAN - 7 (in addition to all vCenter related ports) See topology diagram for port listings.
    • WAN - 3 (in addition to all vCenter related ports) - See topology diagram for port listings.


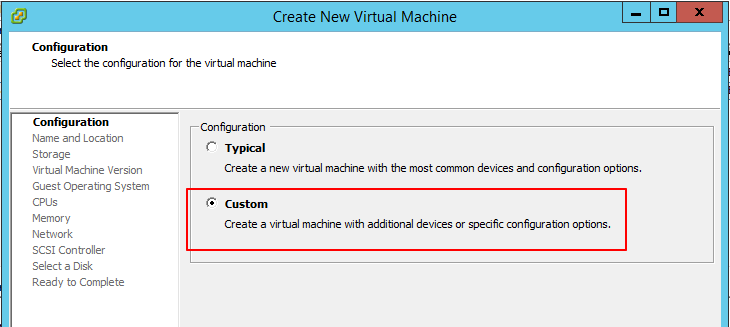
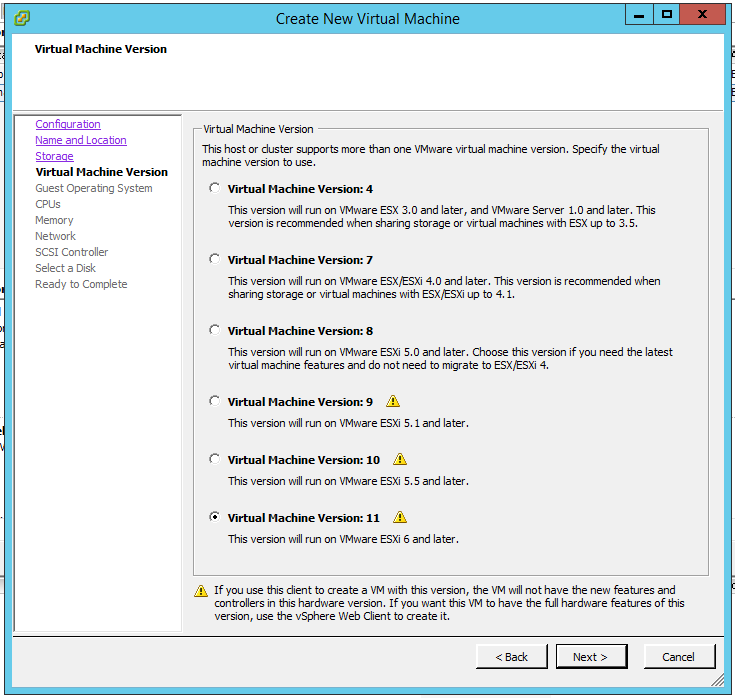
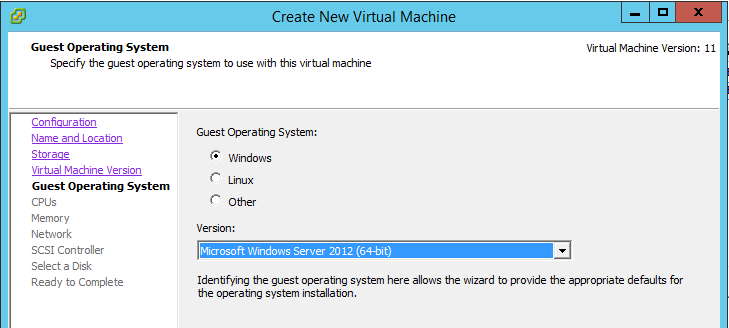
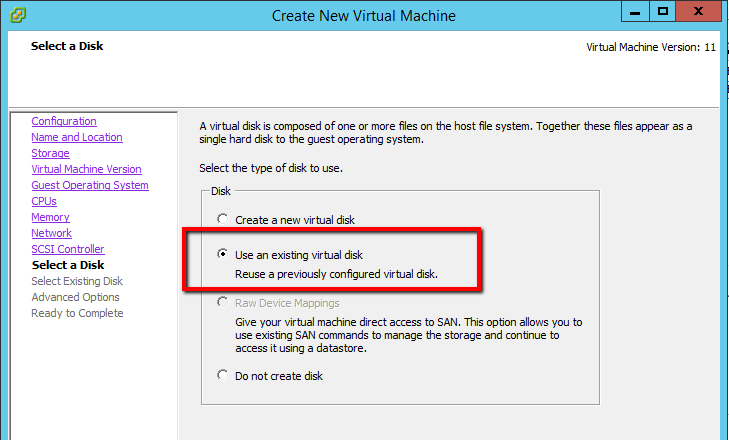
    Steps from Installation to Protection

    The following table compares the high-level installation tasks/steps for VMware Site Recovery Manager and Zerto Virtual Replication.  These steps assume necessary pre-requisites such as vCenter installation and firewall rules have been created.

    Please note, that SRM appears to have many more steps, because SRM supports both array-based replication, in addition to vSphere Replication. If you don’t use one or the other, these steps are dramatically decreased.  In my test environment, both features have been tested, and because of that, SRM has more steps.

    VMware Site Recovery ManagerZerto Virtual Replication
    1. Build Windows VMs to host SRM in each site
    2. Build SQL Server/leverage existing, or use embedded vPostgress db.
    3. Install SRM in Protected and Recovery Sites and license
    4. Connect SRM instances in Protected and Recovery Sites
      Note: This requires a functional error-free vCenter/PSC infrastructure. PSCs should be in-sync with no errors.
    5. Pair SRM instances
    6. Install & configure Storage Replication Adapters (SRA)
    7. Pair Array Managers
    8. Configure inventory mappings
    9. Create Protection Groups and Recovery Plans
    10. Test, validate, protect, test recovery, monitor, and alert.
    11. If using vSphere Replication - Install, configure, & pair vSphere Replication Appliances in each site
    1. Build Windows VMs to host Zerto in each site
    2. Install Zerto on each ZVM and apply license on login
    3. Optional: Build/leverage existing SQL Server, or use the embedded database
      • See Database requirements in the above table for explanation on sizing the DB and when to use an external SQL server.
    4. Pair the Zerto instances
    5. Edit site settings, schedule throttling if using a shared WAN connection, and configure alerts, thresholds, etc...
    6. Deploy ZRAs (Zerto Replication Appliance - one per host that will be protecting VMs)
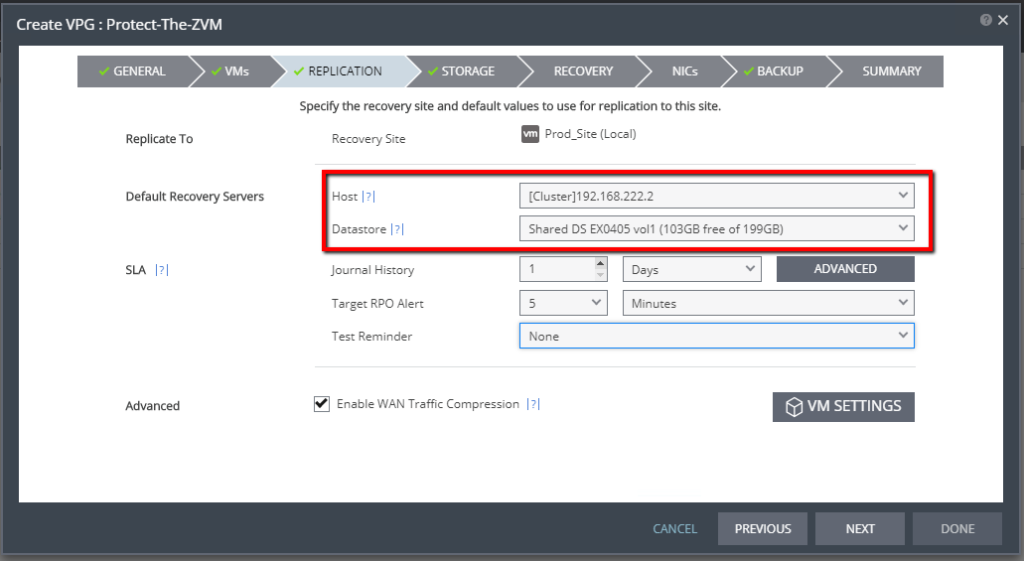
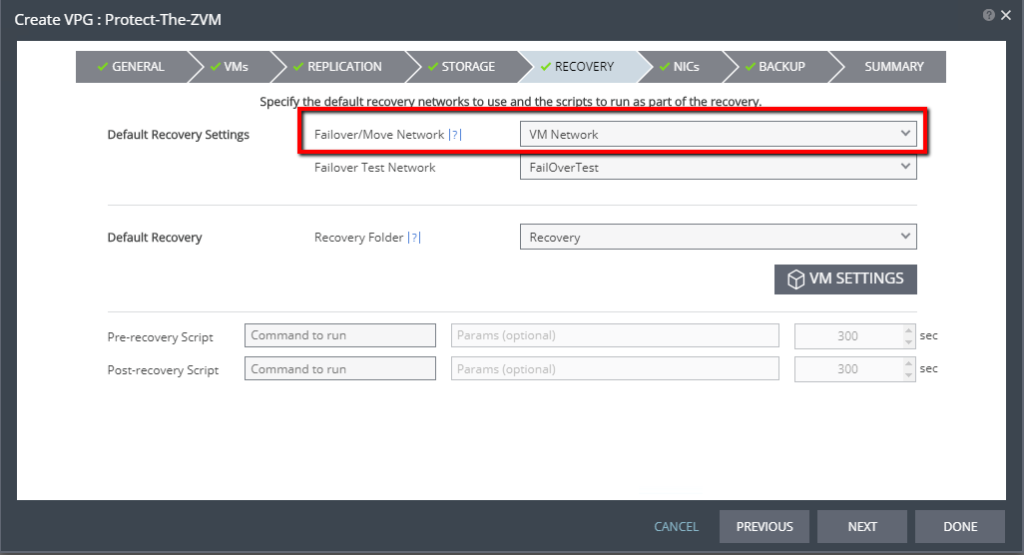
    7. Build Virtual Protection Groups (the VPG configuration also includes recovery options such as re-IP or pre/post scripts).
    8. Test, validate, protect, test recovery, monitor, and alert.


    Protection Workflow

    The following workflows have been created to illustrate the process involved in protecting virtual workloads using VMware Site Recovery Manager with vSphere Replication, and Zerto Virtual Replication.
    Individual files for each protection workflow in full-size view are here:

    srm_zerto_protection_workflows

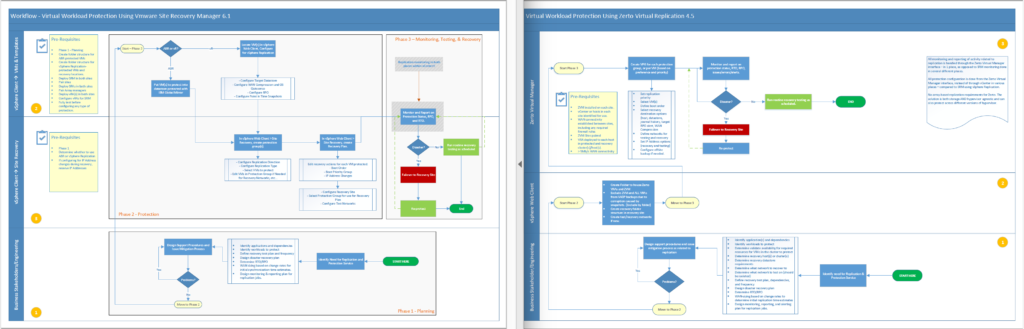
    In the above images, SRM on the left, and Zerto on the right; visually, you can see that SRM clearly has many more steps performed in multiple places, compared to Zerto. Majority of the additional steps in the SRM protection workflow deal with the multiple layers where protection is configured via the vSphere Web Client for a single VM using vSphere Replication. On the right side (Zerto), you see that most of the steps (if not all) for protecting virtual workloads takes place at the top layer, which is the Zerto Virtual Manager UI.

    In SRM, protecting a single VM using vSphere Replication involves selecting the VM enabling vSphere Replication, going into Site Recovery, building a protection group and configuring it, followed by creating a recovery plan and configuring. The recovery plan portion of that is where customization such as boot priority and IP address changes are completed.

    In Zerto, protecting a single VM is as easy as logging into the ZVM UI, creating a VPG, and providing protection and recovery settings all within one wizard.


    Recovery Workflow

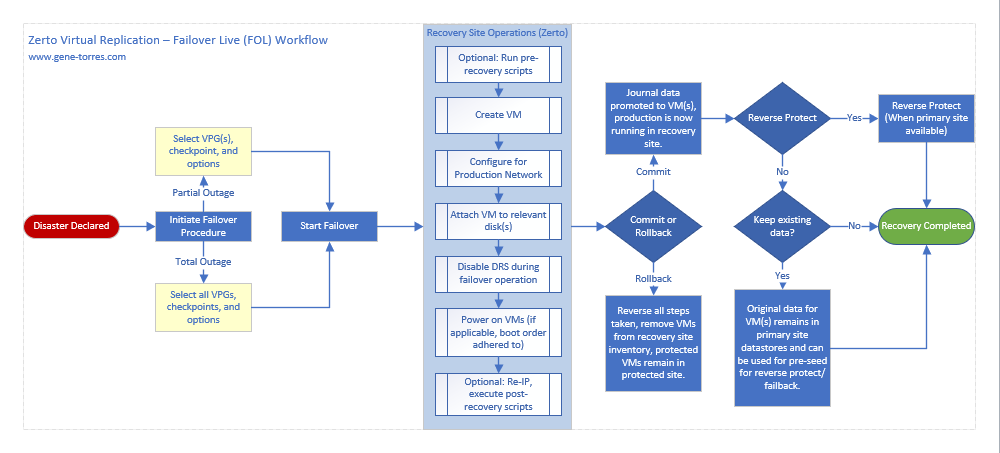
    The following workflows have been created to illustrate the process involved in recovering from a site failure using VMware Site Recovery Manager with vSphere Replication, and Zerto Virtual Replication.

    Individual files for each protection workflow in full-size view are here:

    srm_zerto_recovery_workflows


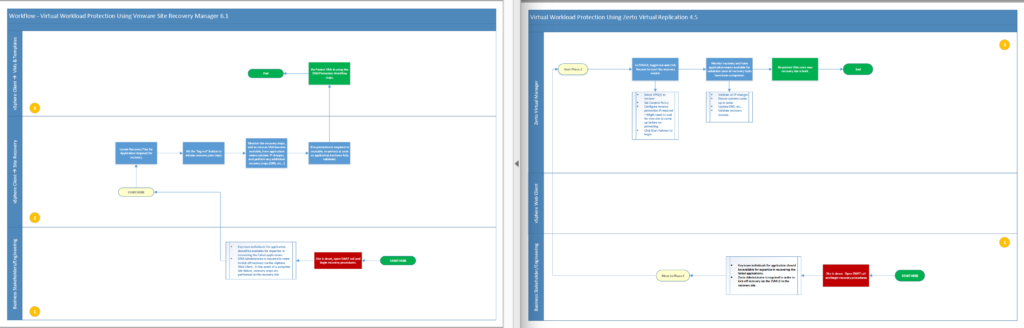
    In the above images, SRM on the left, and Zerto on the right; visually you can see that the steps to recovery are fairly similar, with the exception that recovery in SRM is performed via the vSphere Web Client, while recovery from Zerto is performed from the ZVM UI (recovery performed at the recovery site in both scenarios). The most complex part about recovering in any scenario is the organization of admins/engineers/business stakeholders to recover, re-configure, and validate the recovery process. Of course, if routine recovery testing had been taking place, a failure should basically mimic a recovery test, although, more of a commitment at this point, instead of an exercise.

    In SRM, there really is one place to take care of a recovery, and that is in Site Recovery > Recovery Plans. Locate the recovery plan for the application(s) you want to recover, and click the red button – its a no-brainer!

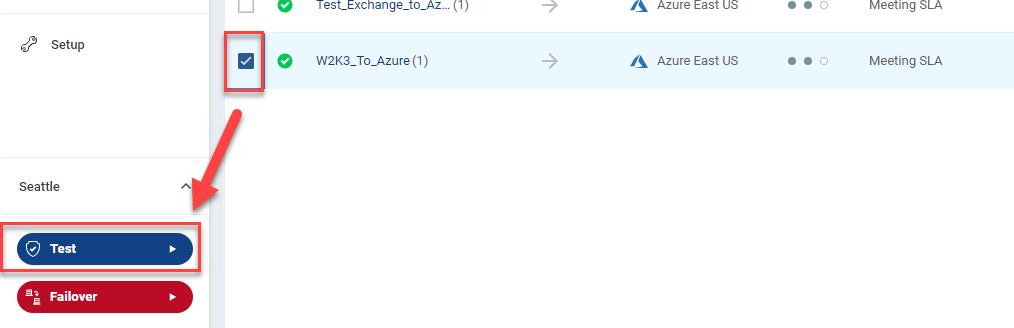
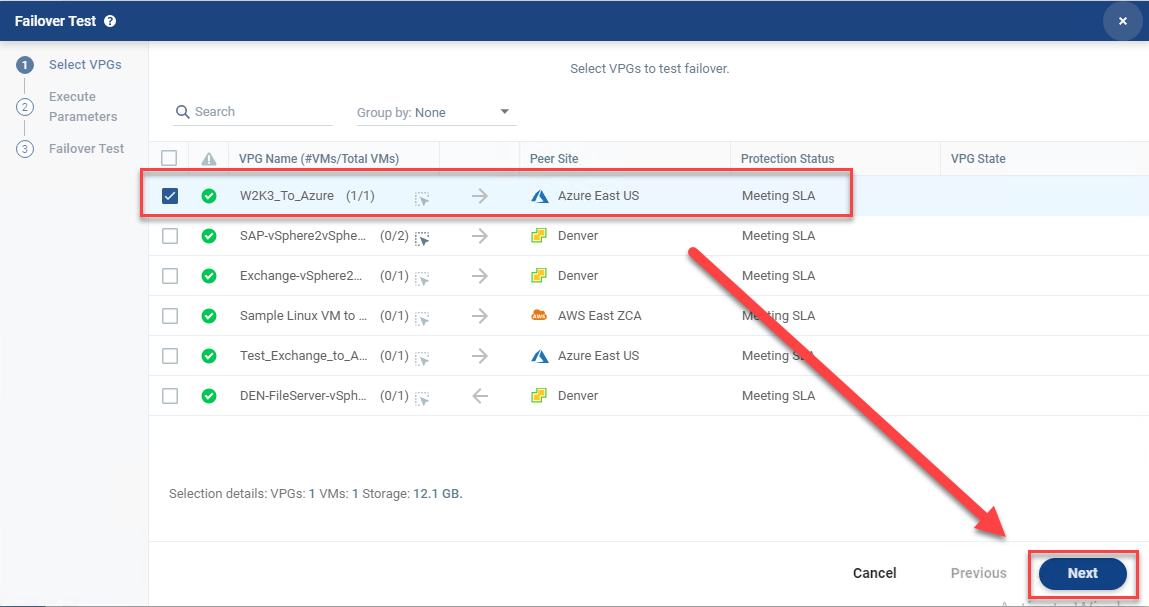
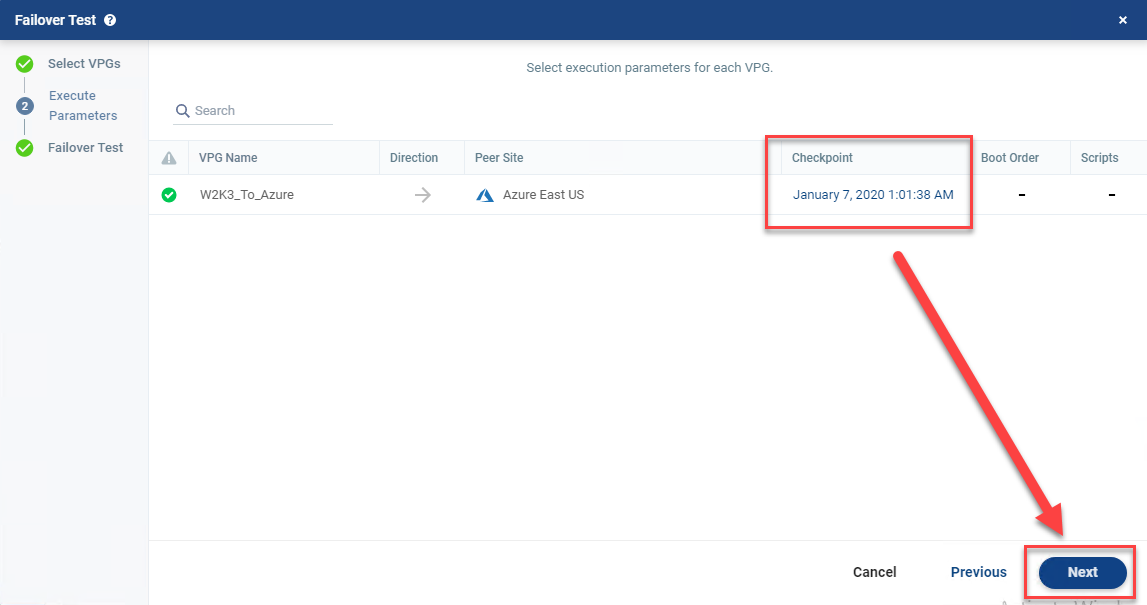
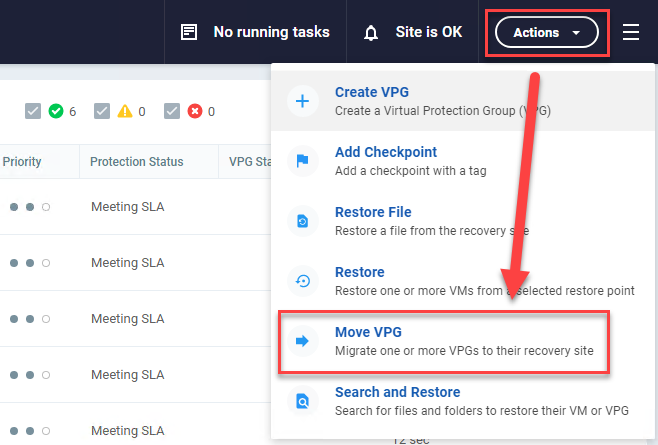
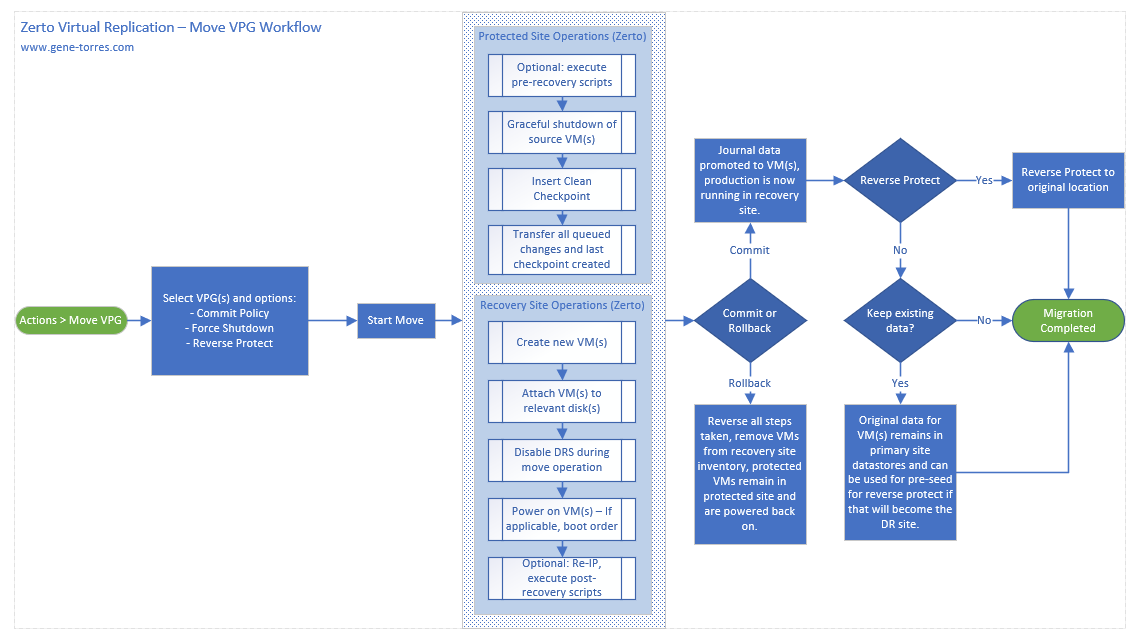
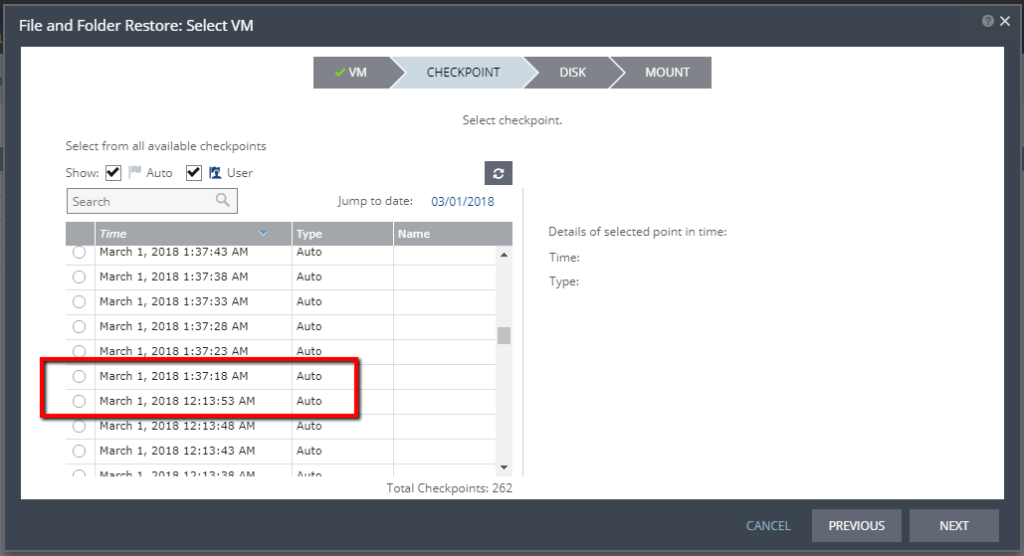
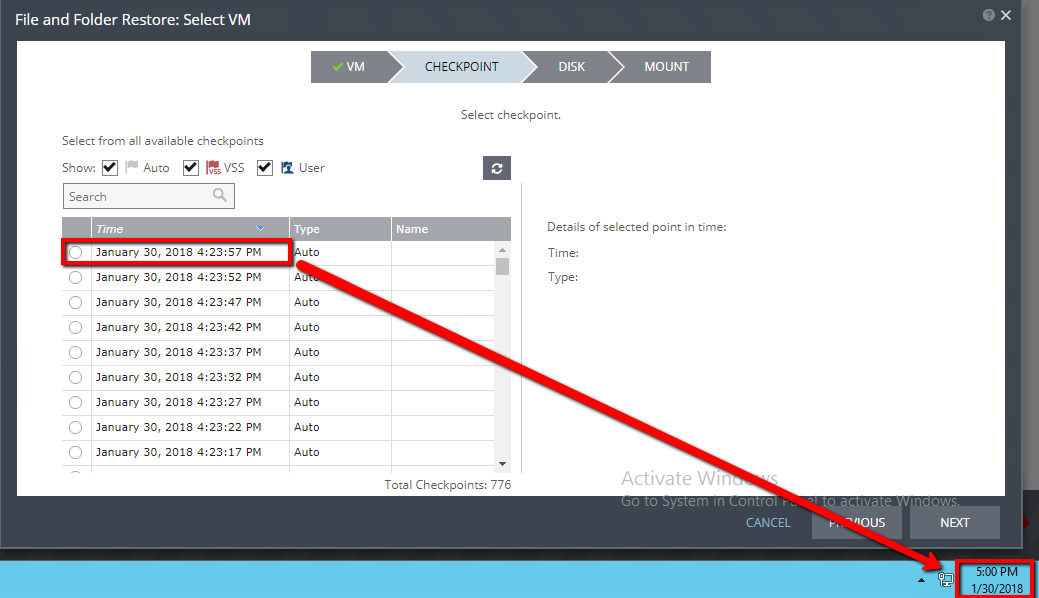
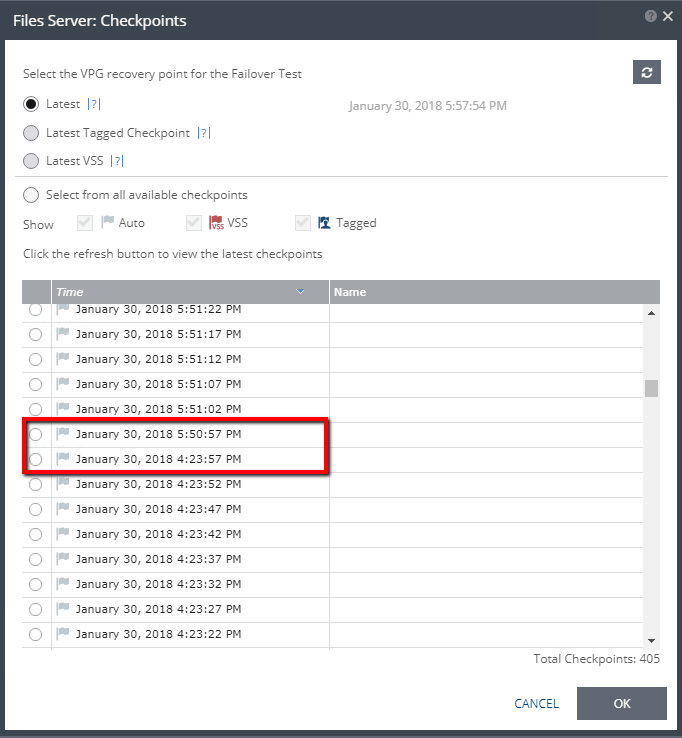
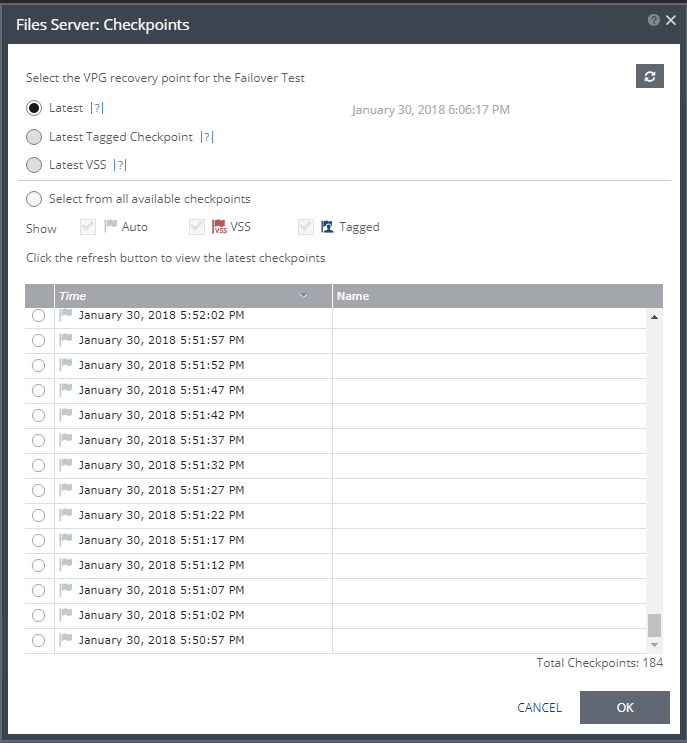
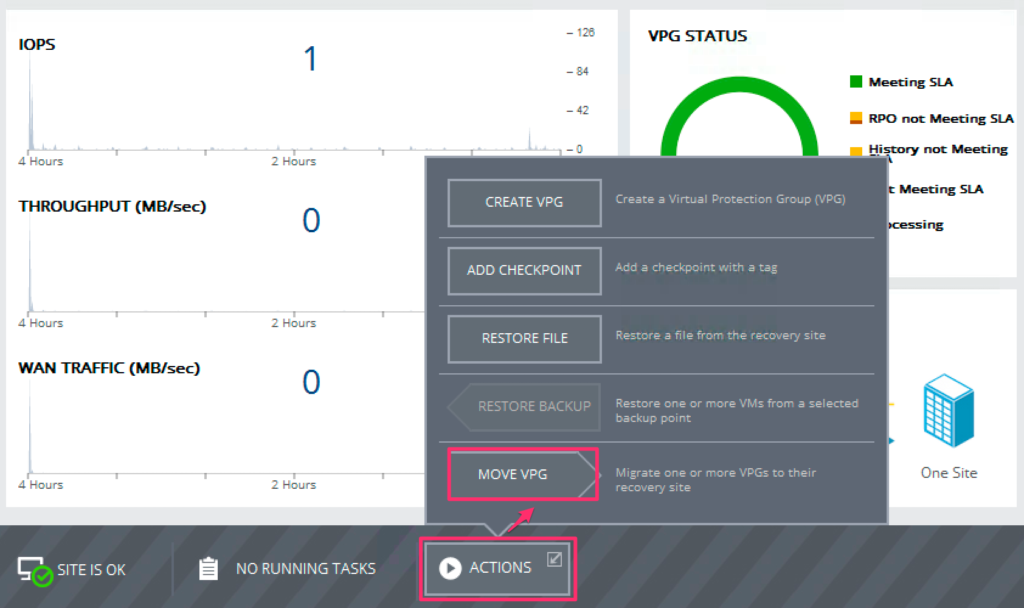
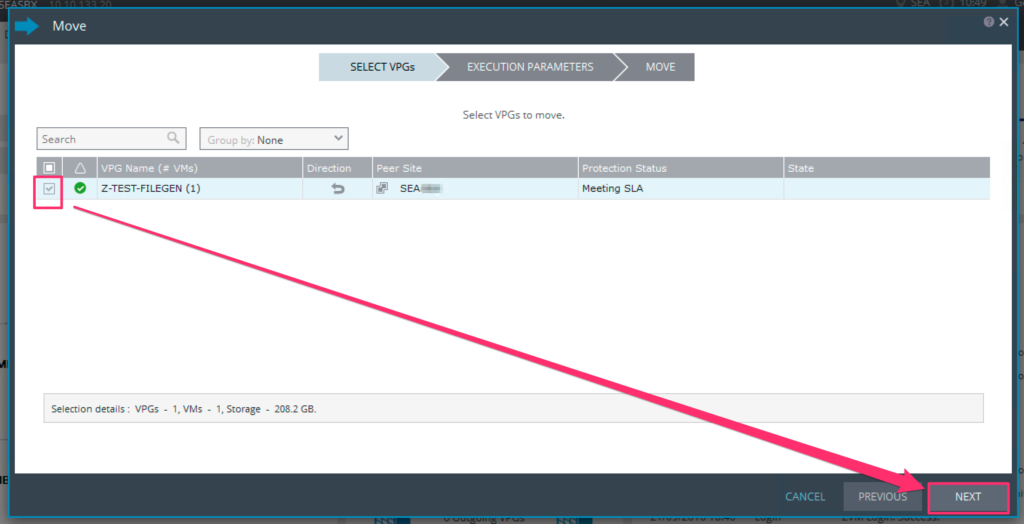
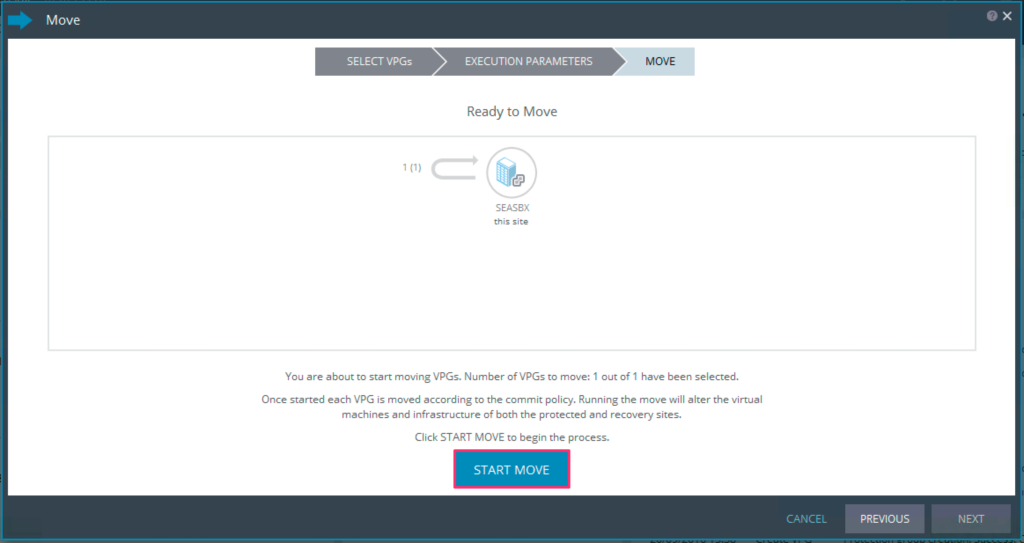
    In the Zerto UI home screen, toggle the failover type from test to “live”, and click the recover button. When you click the button, you will be presented with a 3 step wizard, where you will select the VPG(s) to recover; select the checkpoint to recover from, set the commit policy, re-protect; and click the “start failover” button. Recovery and re-protection all in 1 place.  The re-protection process in either product is straightforward, however, if there already isn’t a site built to re-protect to, there will be some work to do (in either case).


    Implementation Time and Complexity

    Planning, designing, and implementing either of these two products shouldn’t be difficult for anyone, except there are several pre-requisites that take time, change management processes and schedules to follow, or firewall rules to create and verify. With SRM, I’ve found that since this product ties to closely in to vSphere and version matching is a requirement, this could delay anyone who doesn’t have a version-aligned environment; or doesn’t have experience with vSphere or SRM. The biggest requirement for SRM? vSphere – you will have to have a vSphere deployment fully functional, and at an exact minimum version in both sites, in order to deploy SRM successfully.  Zerto doesn’t care if the vCenter/ESXi versions on both sites match, as long as the minimum supported version is in use.

    Granular requirements can make for administrative overhead and total team collaboration in the case of upgrades, maintenance, recovery, etc… because SRM relies heavily on version compatibility (as do other VMware products). In cases like this, there are specific orders of operations required for upgrades or power-on operations. These requirements are out of scope, but it pays to understand that they exist; so be sure to do some research, and if you can, test it before performing in production.

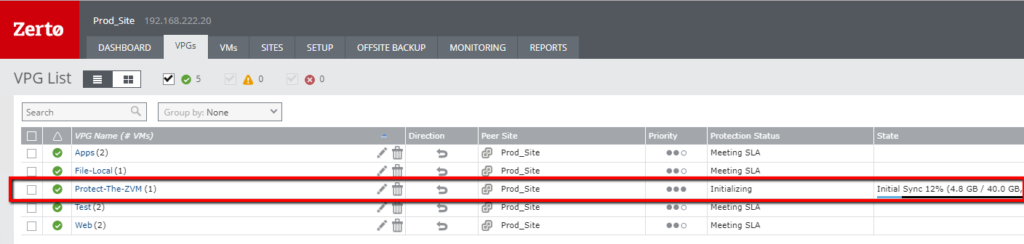
    When installing Zerto, what took the most amount of time was building the Windows VMs (a few hours x 2) to house ZVM in each site… that and firewall rules (about 2 weeks, in my case following approval, change management, and implementation). Once the VMs were built and the firewall rules were in place, the actual time taken to install Zerto was about 10-15 minutes per ZVM, and approximately 10 minutes to deploy each VRA, which can also be bulk scripted. Zerto works as long as the hypervisor and vCenter are at a minimum version supported by Zerto, but it can protect across versions, or even hypervisors (VMware vSphere & Microsoft Hyper-V)! VPG creation can vary, depending on how many VMs per VPG you want to protect, and customization of all options, with one of the longer taking items being recovery and test IP settings. That’s it. Once you have a VPG created, initial synchronization starts, and as soon as the sites are in sync,  you’ll ready to test, recover, or migrate and re-protect.


    Monitoring and Reporting


    Monitoring and Reporting with VMware Site Recovery Manager

    VMware Site Recovery Manager provides monitoring and reporting, however, is limited depending on where you are in the object hierarchy (but the data is there!):

    • number of replicated VMs per host
    • amount of data transferred
    • number of RPO violations
    • replication count
    • number of sites successfully connected

    These reports can also be expanded to show more detail, and data range can be modified. In my experience during testing, monitoring replication status and information isn’t as intuitive and centrally located as you would expect. There are several different places to monitor protection status and get additional information.

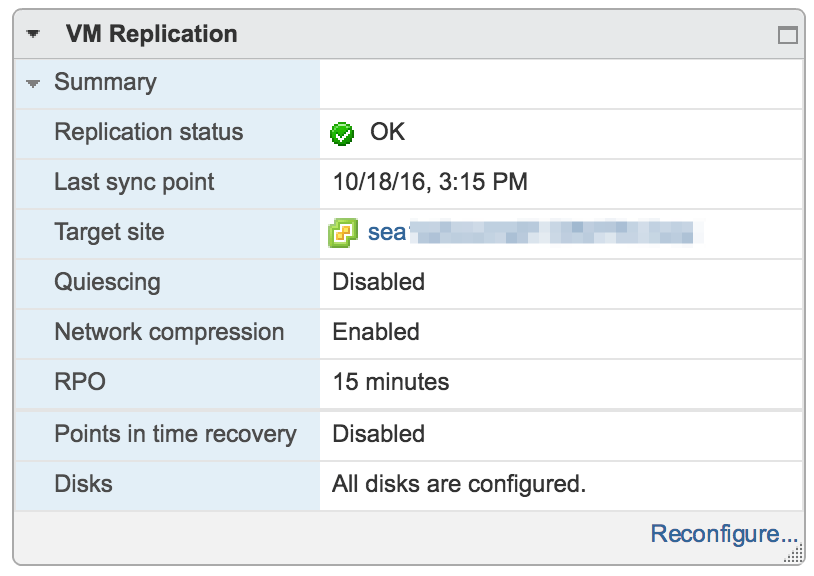
    Some of this is at the VM level, where you will see replication status, last sync point, target site, quiescing (enabled/disabled), network compression (enabled/disabled), RPO, Points in time recovery (enabled/disabled), disk status.


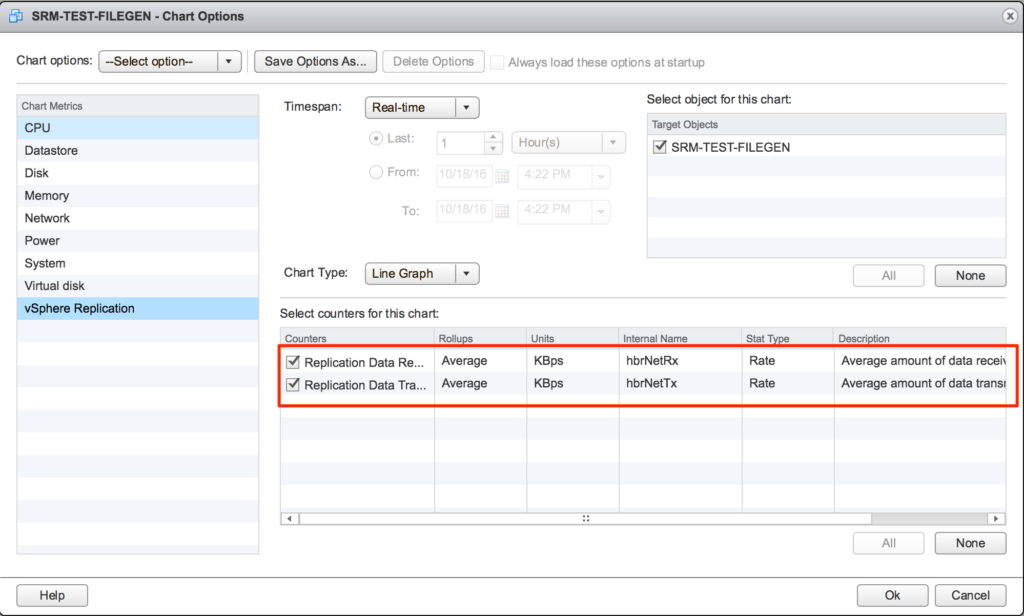
    Monitoring at the VM Object

    vm_replication_status

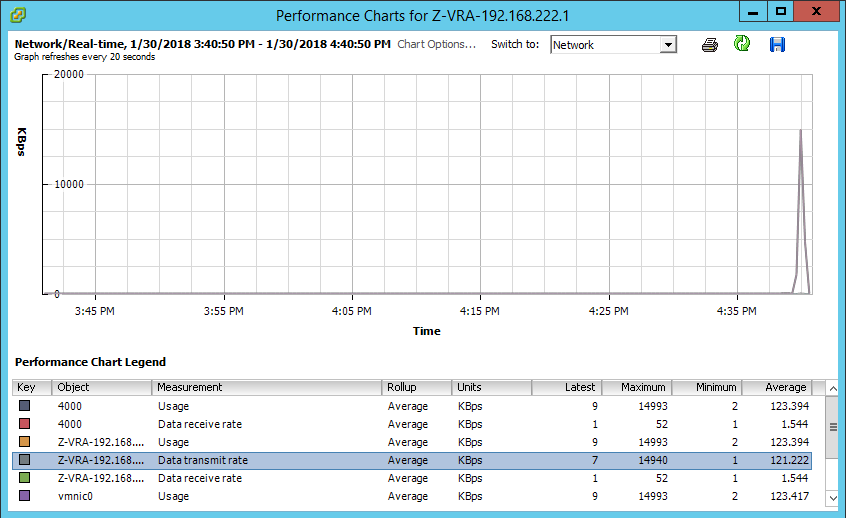
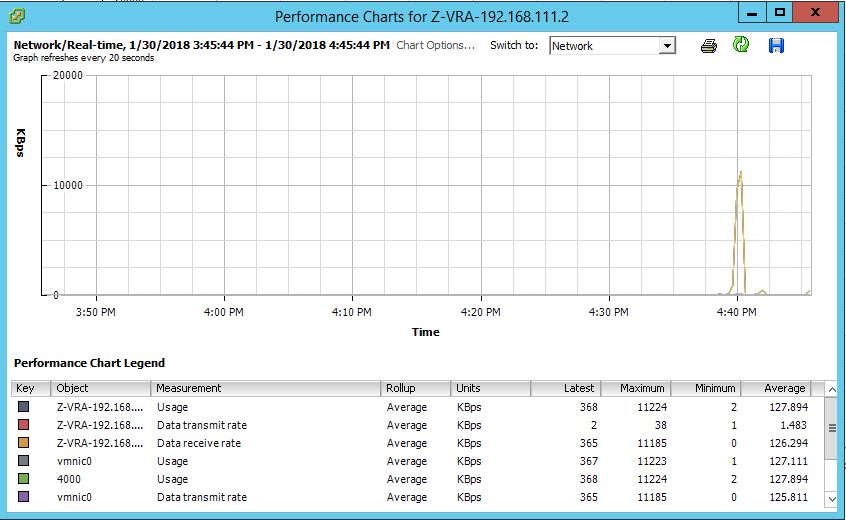
    At the VM (protected VM) level, you can monitor replication performance, however, it is limited to 2 counters, which are:

    • Replication Data Receive Rate (Average in KBps)
    • Replication Data Transmit Rate (Average in KBps)

    srm_vm_counters


    Monitoring at the Site Recovery > Sites Level

    At the site level, you can monitor things like issues, recovery plan history, and also get basic protection group and recovery plan information for Array Based Replication, Protection Groups, and Recovery Plans:

    srm_site_monitors


    Monitoring at the Protection Group Level

    At the protection group level, the summary tab will give you information such as status, number of VMs that are in the protection group, configuration status of those VMs, and any replication warnings (not clickable for more detail):

    srm_pg_summary

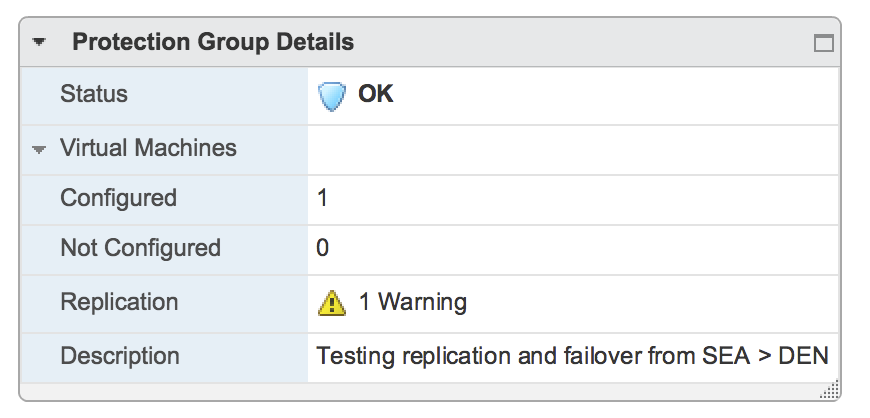
    Selecting a protection group gives you a list of recovery plans, and VMs, and general protection information, but no logging or reporting.

    srm_pg_monitors


    Monitoring at the Recovery Plan Level

    At the recovery plan level, when you select a recovery plan you the plan status, VM status, and recent history if the recovery plan has been run for testing or failover:

    srm_rp_summary


    Digging deeper into a recovery plan, you have the ability to see recovery plan steps, history, protection group general protection information, and virtual machine general protection information:

    srm_rp_monitors


    Monitoring vSphere Replication at the vCenter Level

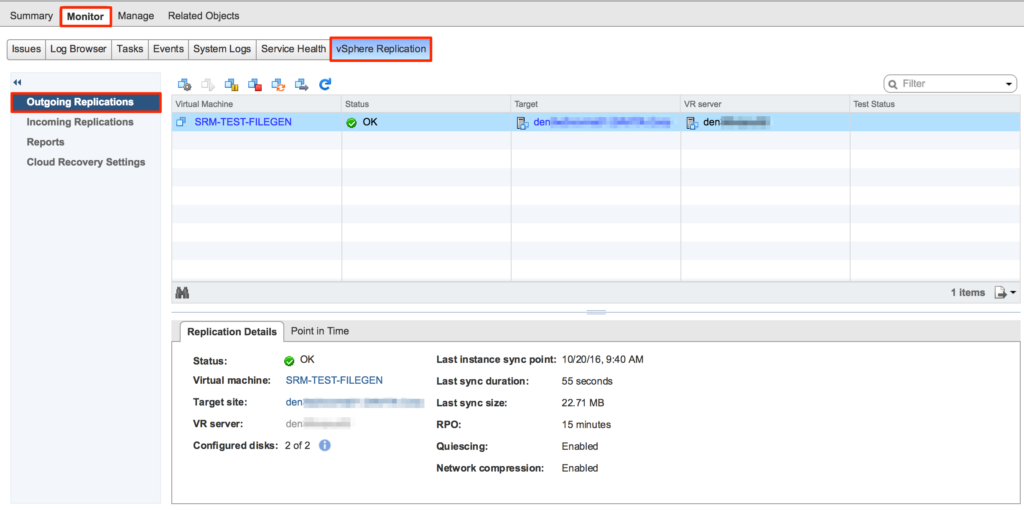
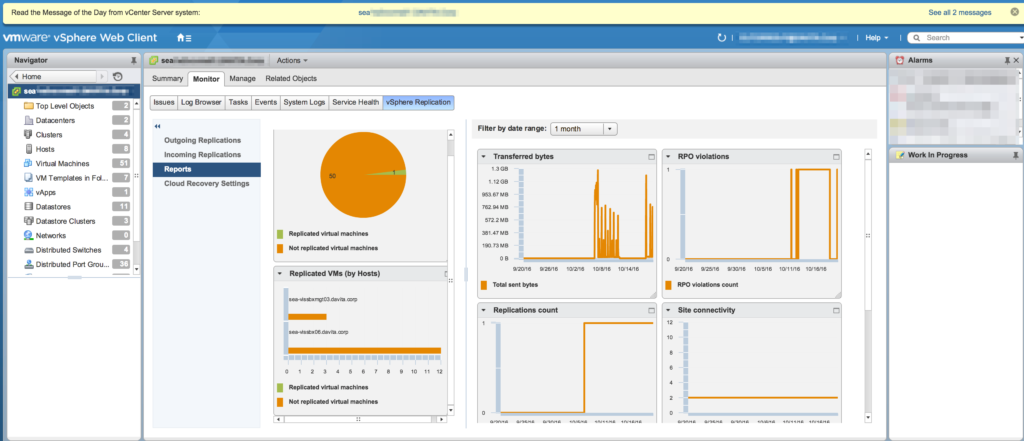
    One more place that I was able to find monitoring and reporting is at the vSphere Replication level.  Going to vSphere Replication in the vSphere Web Client, then clicking on a vCenter.  From there, going to the Monitor tab, and clicking on vSphere Replication will take you the the screen in the image below where you can monitor Outgoing Replications, Incoming Replications, View Reports and Cloud Recovery Settings.  The reports section looks to contain the most information, however, there isn’t a way in the UI to export reports if a customer requests a report to show history of their replication jobs.

    Monitoring Outgoing Replications (per vCenter)

    This section displays any Point in Time snapshots that can be recovered to if it has been configured, and replication information (although very general) such as:

    • Status
    • VM
    • Target Site
    • vR Server used
    • Configured Disks
    • Last Instance Sync Point
    • Last Sync Duration
    • Last Sync Size
    • RPO
    • Quiescing (enabled/disabled)
    • Network Compression (enabled/disabled)

    monitoring_vsphere_replication_outgoing_rep


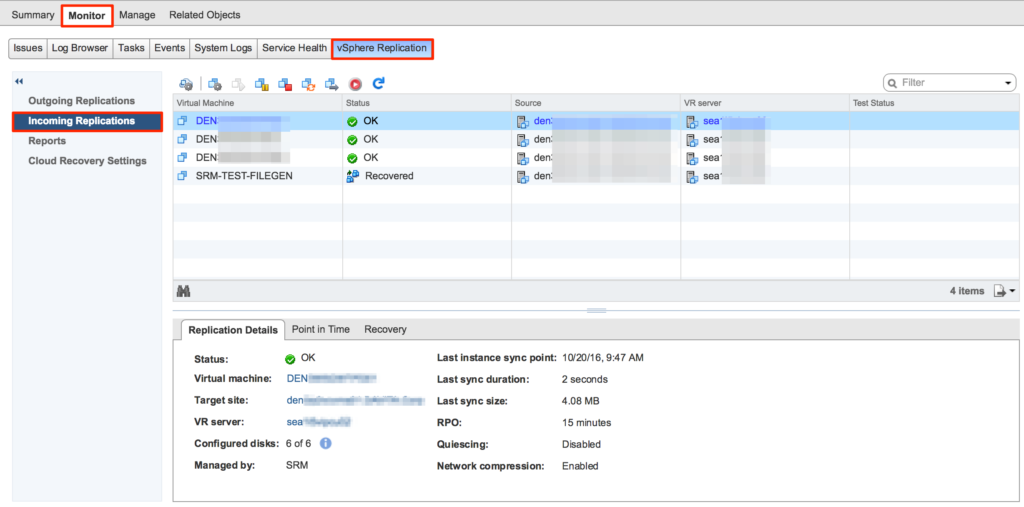
    Monitoring Incoming Replications (per vCenter)

    This section displays Point in Time Snapshots, Recovery history, and Replication information (again all general) such as:

    • Status
    • VM (when a VM is selected above)
    • Target Site
    • vR Server
    • Configured Disks
    • What manages the incoming replications (in this case, it’s SRM)
    • Last instance sync point
    • Last sync duration
    • Last sync size
    • RPO
    • Quiescing (enabled/disabled)
    • Network Compression (enabled/disabled)

    monitoring_vsphere_replication_incoming_rep


    Reporting for vSphere Replication (per vCenter)

    This section contains statistical information that can be filtered by date range.  This section is a little more detailed (my favorite view), and actually contains numbers on graphs. It contains information such as:

    • Count of replicated vs non-replicated VMs
    • Replicated VMs per by host(s)
    • Transferred bytes
    • RPO violations
    • Replications Count
    • Site connectivity status
    • vR Server Connectivity (not pictured)

    While this is great information, there is no way from the interface to export the reports if needed.

    monitoring_vsphere_replication


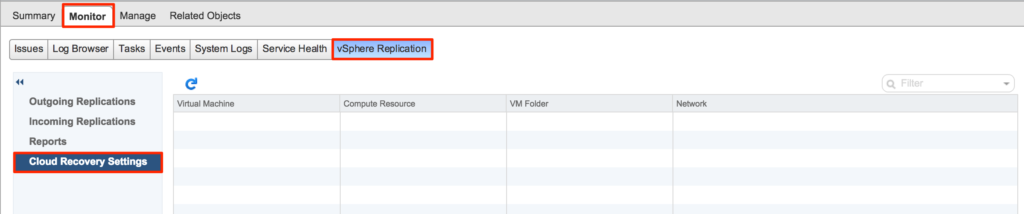
    Cloud Recovery Testing

    This section contains general information on any replications to the cloud.  Since we are not replicating to the public cloud, this section is empty, but I have shown it to display what detail it contains.

    monitoring_vsphere_replication_cloud_settings

    Based on the findings for monitoring vSphere Replication and SRM, as shown above, there are multiple places to look for information, statistics, and reports.  The problem here is that monitoring any ongoing replication jobs and/or recoveries and performance is a multi-tiered approach, and there is no centralization of information that is exportable for review.  There are too many places to look for information, and it would be too tedious to effectively monitor protection jobs, recoveries, and performance out-of-the-box.


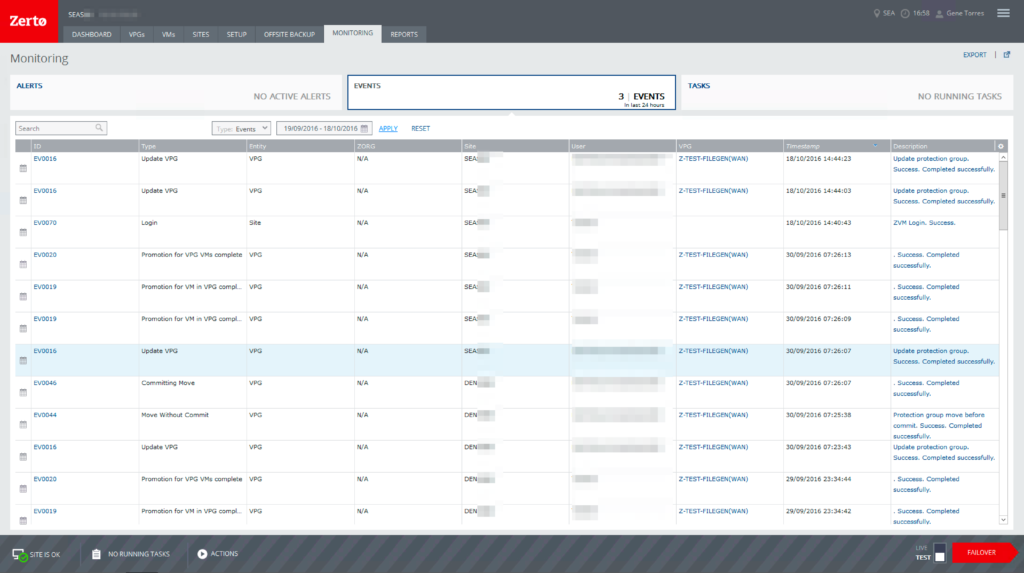
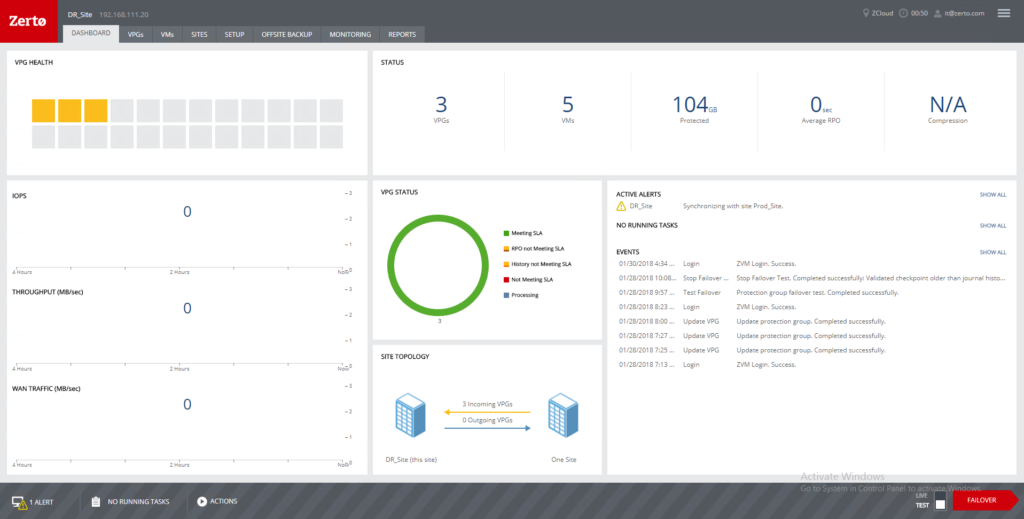
    Monitoring and Reporting in Zerto Virtual Replication

    Monitoring protection status in Zerto has been intuitive, detailed, and centralized. Zerto has decided to separate the two functions into “tabs” within the UI. One tab for monitoring (includes tasks and alerts), and one tab for reporting. The ability to set Zerto up to alert via e-mail and send reports at a regular interval (and scheduled!) are natively built into the product. The product doesn’t stop with 1 e-mail address destination, as it also allows for multiple recipients via comma or semicolon separator in the site settings. In the resource reports, you can set up the sampling rate, and the sampling time interval. In terms of BC/DR solutions, it would be much more preferred to receive more information than necessary, rather than waiting for a problem to surface. Nothing is more embarrassing or resume-generating than finding out at the point of a failure that your replication product hasn’t been replicating much or hasn’t been able to meet your RPO/RTO.

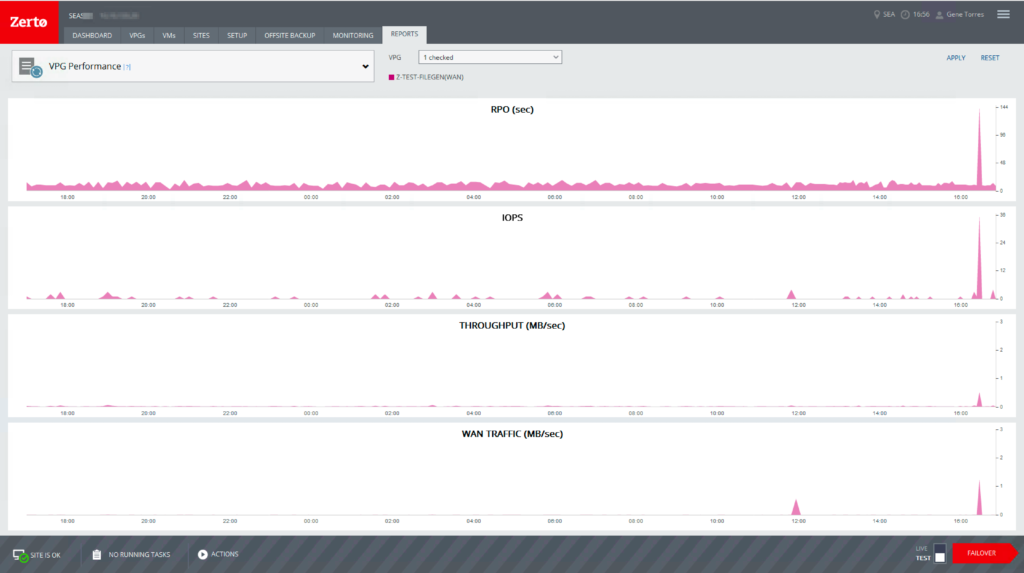
    In the Zerto UI, monitoring alerts, events, and tasks is as simple as clicking on the “monitoring” tab. You can search for specific events or alerts (or both), and also modify the timeframe that you are targeting. In the reporting tab, you can get reports for the following items, and you can select any of them per VPG, or for all VPGs (and customize the reporting dates).

    • VPG Performance (RPO in seconds, IOPs, Throughput (MB/s), and WAN traffic (MB/s))
    • Outbound Protection Over Time (data in GB) – for each recovery site
    • Protection Over Time by Site (Journal Usage in GB, VMs protected by count)
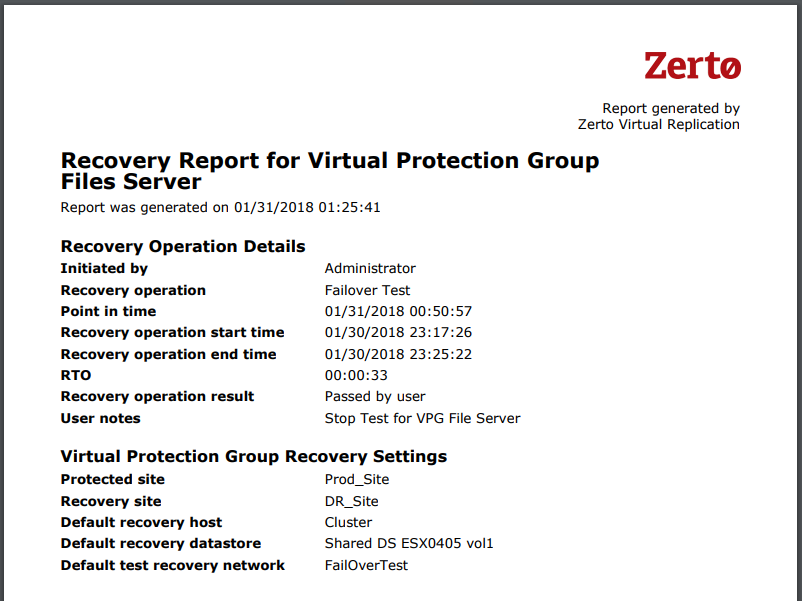
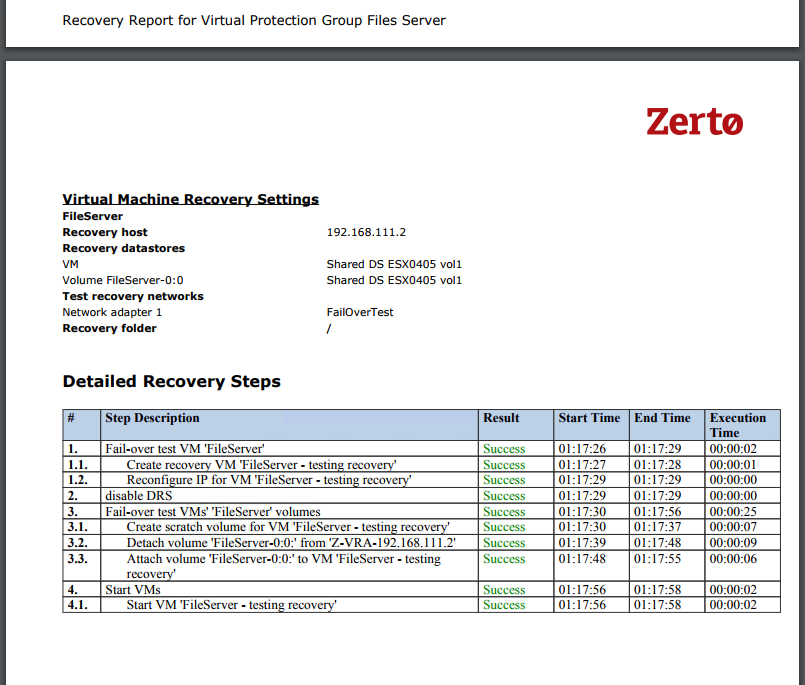
    • Recovery Reports by VPG, type, and/or status
    • Resource Report – shows resources used by protected VMs, which is required by Zerto to ensure recovery capability. (Exports to Excel)
    • Usage – exports to CSV, PDF, or ZIP

    zerto_monitoring_tab

    zerto_reports_tab


    Conclusion

    In conclusion, both products work as advertised, and deciding which product to go with may come down to trust, flexibility, simplicity, scalability, monitoring & reporting, re-protection capabilities, and of course, cost. When considering the cost of either solution, be sure to also include the cost of human hours required to successfully deploy and support either one. Both products have their benefits and quirks, but the bottom line is that THEY BOTH WORK GREAT!

    Since I also went through the entire process from design to implementation, to protection, testing, and recovery – it took a considerable amount of time for VMware Site Recovery Manager to become usable due to some external problems we were having, so that sort of left a bad taste in my mouth (it was frustrating – but that was specific to my environment). Because Zerto wasn’t affected by those existing problems in terms of being prevented from working, it felt much simpler, but don’t get me wrong, you still have to plan for your deployment.  The time that it took to deploy and have both products functioning varied considerably, with Zerto coming in as the winner in terms of time to protection versus Site Recovery Manager in my experience (again related to the underlying problems in my environment).

    Array-based replication is an optional feature of SRM, and once we figured out what was needed on the SAN side for this to work properly, it actually runs nicely. This method has historically an expensive route to go due to the requirement of needing to have the same storage (vendor at least) in each site (protected and recovery). This also introduces another layer of complexity in configuration, administration, maintenance, and support alignment, which will involve SAN administrators.  vSphere Replication, on the other hand, is easy to set up and you can be replicating VMs using this method in a short period of time.

    Scalability of the products is another area I researched and determined that both products can protect up to 5000 VMs per vCenter instance (refer to comparison tables).

    vSphere replication (without Site Recovery Manager) has a limitation of 1 vSphere Replication Appliance per vCenter instance.  When leveraging the additional (limit) of 9 more vSphere Replication Servers per vSphere Replication appliance, you can protect up to 2000 VMs – see here for details.  When pairing vSphere Replication with Site Recovery Manager and array-based replication, you can achieve protection of up to 5000 VMs per vCenter instance. (SRM Operation Limits)

    Zerto can scale out to take advantage of cluster resources by deploying a VRA (virtual replication appliance) to each host in a cluster where you are protecting VMs. The VRAs come at no additional cost (both products are licensed per VM being protected) and can be sized as needed for best performance. When deploying Zerto VRAs, you will need IP addresses, so that’s one downside to having one per host, especially in large environments.  On the plus side, you can deploy all those VRAs from one screen and their deployments can be automated, so that saves time.

    Compatibility of each product and their requirements vary as well, with SRM having more requirements in both sites (protected and recovery). Since Zerto is basically deployed on top of a virtualization infrastructure, it is not tightly integrated into the base vSphere product nor does it rely on the same version requirements as SRM.  Zerto is very flexible in versioning for both protected and recovery sites, and it also can protect and recovery to/from vSphere and Microsoft Hyper-V, or cloud providers.

    Lastly, while I’m not seasoned programmer or script guru – at a high-level, both products can be programmatically managed, and both support PowerShell (with SRM requiring the PowerCLI add-on from VMware). Both products can also leverage vRealize Orchestrator, allowing workflow automation for protection tasks. Both products include support for multiple scripting/programming languages and have their APIs documented, however, in the case of SRM, the creation of recovery plans and forced-failovers cannot be automated (per the API documentation). Zerto can be managed through a feature-rich RESTful API that allows management of pretty much every aspect of the product and its capabilities, and their documentation is clear and full of example scripts in each of their supported languages for everyday tasks.

    I hope this information has been helpful for those who are trying to decide which product to go with, and as always, comments or questions are welcome!  And if you find this to be useful information, please share it!

    Share This:

    Zerto: Perform a VPG Move (VM Migration)

    In a situation where a workload needs to be migrated from a protected to a recovery (or site A to site B) in an effort to change where the production workload runs from, you can perform a VPG move.

    From what I’ve seen, in terms of VPG move versus Failover, is that when using the Failover option, there is an assumption that the protected site has failed, so systems may not automatically be cleaned up on the protected site.  When performing a move, the protected site is cleaned up as soon as that move is completed and committed unless you select to re-protect the workload in the other direction (can be automatic or manual for commit, maximum time you have to do it is 24 hours, and that is configurable).

    One recommendation I have here is that before you perform these steps, perform a recovery test on the VPG you’d like to move to ensure that recovery steps are completed as expected, and that the system is usable at least in a testing capacity.

    1. Log in to the Zerto UI
    2. From the dashboard screen, go to Actions > Move VPG.zerto_perform_vpg_move_1_2
    3. Select (tick the checkbox) for the VPG you want to move, and click Next.zerto_perform_vpg_move_1_3
    4. Select your options for the Execution Parameters, and click Next.  For this example, I will select “none” for the commit policy, to demonstrate where to commit the migration task when you are ready to.zerto_perform_vpg_move_1_4
      > Commit Policy: Auto-Commit - you can delay up to 24 hours (specified in minutes), or select 0 
      to automatically commit immediately when the migration process is completed.
      > Commit Policy: Auto-Rollback - You can delay up to 24 hours (specified in minutes), default 
      delay is 10 minutes
      > Commit Policy: None - You must manually select whether or not to commit or rollback, based 
      on your results.
      > Force Shutdown - Use this in the event VMware Tools isn't running, therefore, allowing an 
      automatic shutdown. Force shutdown will first attempt to gracefully shut the VM down, and if that doesn't work, 
      it will power off the VM on the protected site.
      > Reverse Protection - This will automatically sync changes from the recovery site back to the 
      protected site in case you want to be able to re-protect a system after a migration. This eliminates the need 
      to have to re-initialize synchronization in the other direction. If reverse protection is selected, a delta 
      sync will take place to re-protect after the migration is completed. Caveat - You cannot 
      re-protect if you select "NONE" as the commit policy.
      > Boot Order -(Defined in VPG Configuration, but displayed here)
      > Scripts - (Defined in VPG configuration, but displayed here)
      
    5. Review the summary, and when ready, click Start Move.
      During promotion of data, you cannot move a VM to another host.  If the host is rebooted
      during promotion, make sure the VRA on the host is running and communicating with the ZVM before 
      starting up the recovered VMs.

      zerto_perform_vpg_move_1_5

    6. Since we have selected a commit policy of “none”, once the migration is ready for completion, the Zerto UI will alert you letting you know there is a task awaiting input.  Click on the area highlighted below.zerto_perform_vpg_move_1_6_a
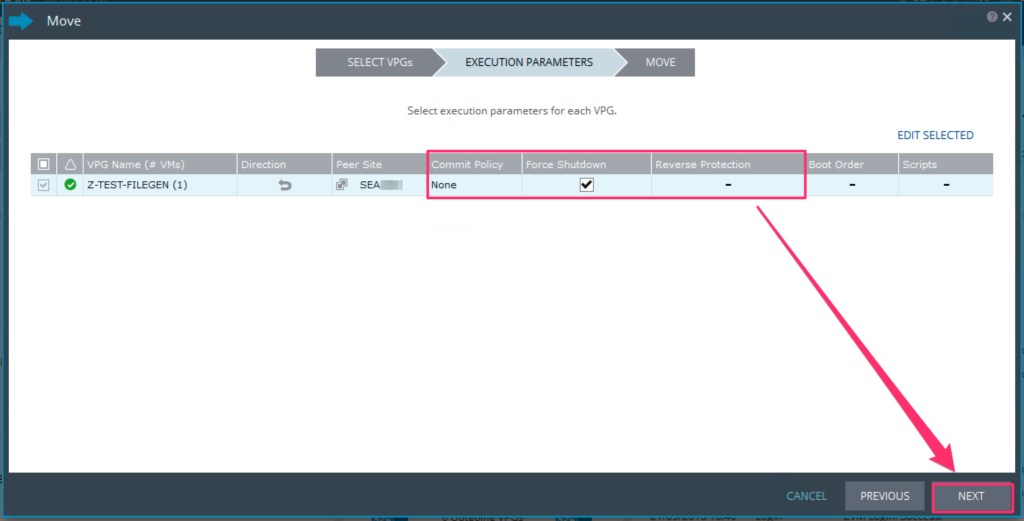
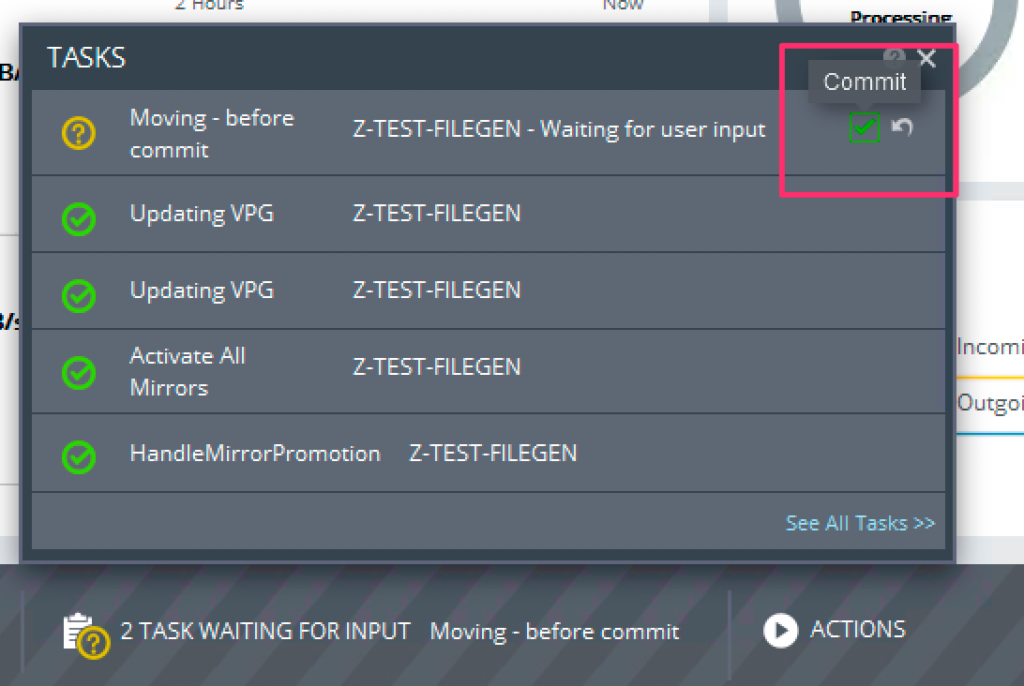
Select to either Commit (checkmark), or Rollback (undo Arrow):

      zerto_perform_vpg_move_1_6_b

    7. At this point, you can also choose whether or not to reverse-protect.  Make your selection and click Commit.zerto_perform_vpg_move_1_7_a
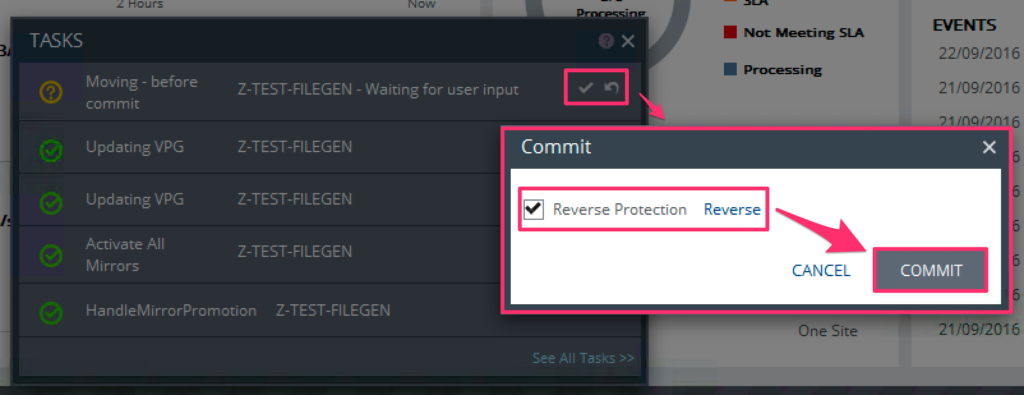
The task will update as seen below:zerto_perform_vpg_move_1_7_b

      Once you commit the move, the data in the protected site is then deleted, thus completing the migration.

    Share This: